In December of 2018, I received an email from Google, saying that they are shutting down Google+ API on March 7, 2019, and that I have 3 projects that use it for Login with Google. They suggested to move from "Google+ Sign In" to "Google Sign In". Subtle difference, but new API. Luckily, it is all well covered by Laravel Socialite, and this article will show you how to use it.
Here's the email that I've got.

So for those of you who haven't moved yet, you still have a few weeks, as of writing this article.
Now, let's get to Laravel Socialite and Google Sign In implementation.
Step 1. Preparation: Fresh Project
We will start with totally fresh Laravel 5.7 project. After installation, we launch this command to generate login/register views:
php artisan make:authStep 2. DB Changes in Users Table
Socialite providers need to add a few fields into the DB table. Also we alter password field to be nullable, because OAuth2 logins don't have passwords.
php artisan make:migration add_socialite_fields_to_users_table

public function up()
{
    Schema::table('users', function (Blueprint $table) {
        $table->string('provider_name')->nullable()->after('id');
        $table->string('provider_id')->nullable()->after('provider_name');
        $table->string('password')->nullable()->change();
        $table->string('avatar')->nullable();
    });
}
Important notice. To use ->change() method in migration, we need to install additional package:
composer require doctrine/dbalAnd hey, did you see we add avatar field? We can get avatar automatically from Google, will show you later how.
We also need to make a few changes to app/User.php model, related to new fields:
protected $hidden = [
    'provider_name', 'provider_id', 'password', 'remember_token',
];
We add provider_name and provider_id to $hidden fields, because we don't want to return them when passing model instance as array or JSON due to security concerns.
You may also add those two fields to $fillable array, but in this article example it's not necessary, we won't use User::create() assignment, more on that - below.
Step 3. Install/Configure Laravel Socialite
Installation is simple:
composer require laravel/socialiteNext, we go to config/auth.php file and add this:
'socialite' => [
    'drivers' => [
        'google',
    ],
],
Finally, we go to config/services.php and add our Google App credentials:
'google' => [
    'client_id'     => env('GOOGLE_CLIENT_ID'),
    'client_secret' => env('GOOGLE_CLIENT_SECRET'),
    'redirect'      => env('GOOGLE_REDIRECT'),
],
Credentials should come from .env file and look something like this:
GOOGLE_CLIENT_ID=XXXXXXXXXXXXXXXXXXXXXXXXXXXXXXXXXXXXXXXXXXXXX.apps.googleusercontent.com
GOOGLE_CLIENT_SECRET=XXXXXXXXXXXXXXXXXXXXXXXX
GOOGLE_REDIRECT=http://yourdomain.com/google/callback
Step 4. Button with Redirect to Google
Now, let's add the buttons to log in. What we need:
- Controller method to redirect to Google
- Route to match with that Controller method
- Buttons to point to that Route
Here's how redirect method look like in app/Http/Controllers/Auth/LoginController.php:
use Socialite;

// ...

/**
 * Redirect the user to the provider authentication page.
 *
 * @return \Illuminate\Http\Response
 */
public function redirectToProvider($driver)
{
    return Socialite::driver($driver)->redirect();
}
Next, routes/web.php for that method:
Route::get('redirect/{driver}', 'Auth\LoginController@redirectToProvider')
    ->name('login.provider')
    ->where('driver', implode('|', config('auth.socialite.drivers')));
Notice we're restricting this route only for the providers that we specified in the config. If someone tries to redirect to some other driver, Laravel will not match this route and throw 404 error.
Finally, button - we add it to both Login and Register screens:
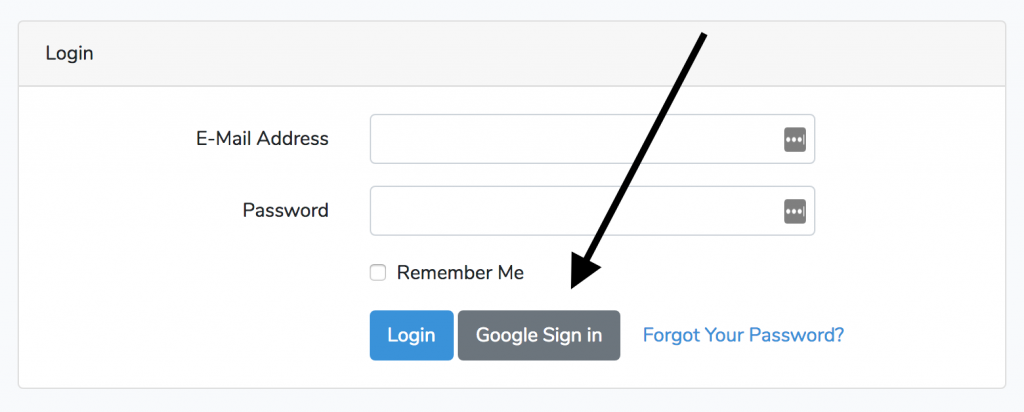
Here's the code to add to both resources/views/auth/login.blade.php and resources/views/auth/register.blade.php:
<a href="{{ route('login.provider', 'google') }}"
  class="btn btn-secondary">{{ __('Google Sign in') }}</a>
Step 5. Callback to Create User
If you click that Google Sign in button and grant permission to your Google account as a user, Google will redirect you back to a so-called callback URL (remember, we provided it in .env in Step 3 above). Now it's time to actually implement it.
On this step, we're actually creating a new user with their Google credentials. Here we need a Controller method and a Route line.
New method in app/Http/Controllers/Auth/LoginController.php:
use App\User;

// ...

/**
 * Obtain the user information from provider.
 *
 * @return \Illuminate\Http\Response
 */
public function handleProviderCallback($driver)
{
    try {
        $user = Socialite::driver($driver)->user();
    } catch (\Exception $e) {
        return redirect()->route('login');
    }

    $existingUser = User::where('email', $user->getEmail())->first();

    if ($existingUser) {
        auth()->login($existingUser, true);
    } else {
        $newUser                    = new User;
        $newUser->provider_name     = $driver;
        $newUser->provider_id       = $user->getId();
        $newUser->name              = $user->getName();
        $newUser->email             = $user->getEmail();
        $newUser->email_verified_at = now();
        $newUser->avatar            = $user->getAvatar();
        $newUser->save();

        auth()->login($newUser, true);
    }

    return redirect($this->redirectPath());
}
Step by step, what this method does:
- We get the user from Socialite, if it fails - we redirect to login form;
- We check if user with such email exists, if so - we log them in;
- If it's a new user - we register them and also log them in;
- Finally - redirecting to logged in homepage, as typical LoginController action would do.
A few more things to notice:
- As mentioned above, we're not using User::create() here, so those new fields don't have to be in $fillable array of User model;
- We automatically make email_verified_at as verified now, because, well, they kinda verified their Google email during this step;
- Google provider gives us quite a lot of useful data - on top of email, we're getting name, and even avatar.
We also need a route to point to that Controller method, so here's routes/web.php snippet:
Route::get('{driver}/callback', 'Auth\LoginController@handleProviderCallback')
->name('login.callback')
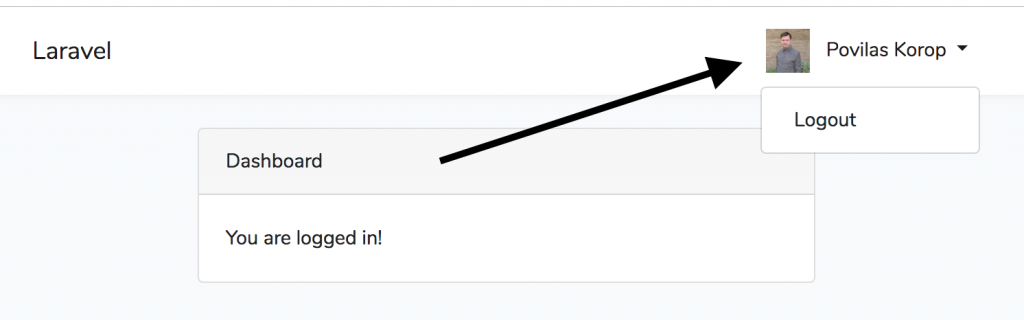
->where('driver', implode('|', config('auth.socialite.drivers')));Step 6. Showing User's Name and Avatar
We will follow default "make:auth" template of Laravel and show user's name and avatar (if it is set) in top-right corner, like this:
Here's the code:
<a id="navbarDropdown" class="nav-link dropdown-toggle" href="#" role="button" data-toggle="dropdown" aria-haspopup="true" aria-expanded="false" v-pre>
    @if(auth()->user()->avatar)
        <img src="{{ auth()->user()->avatar }}" alt="avatar" width="32" height="32" style="margin-right: 8px;">
    @endif
    {{ auth()->user()->name }} <span class="caret"></span>
</a>
Aaaaand, that's it!
Note that this process should work for every provider and nothing is done explicitly for google. Just add credentials for another provider and enable them in config/auth.php.
-front_grid.jpg)
-front_grid.jpg)
-front_grid.jpg)
-front_grid.jpg)

-front_grid.jpg)
No comments or questions yet...