
Laravel has a useful Notification system, where you can notify user about something via email, Slack etc. And there is a quite good default HTML template for emails. But what if you want to customize its design?
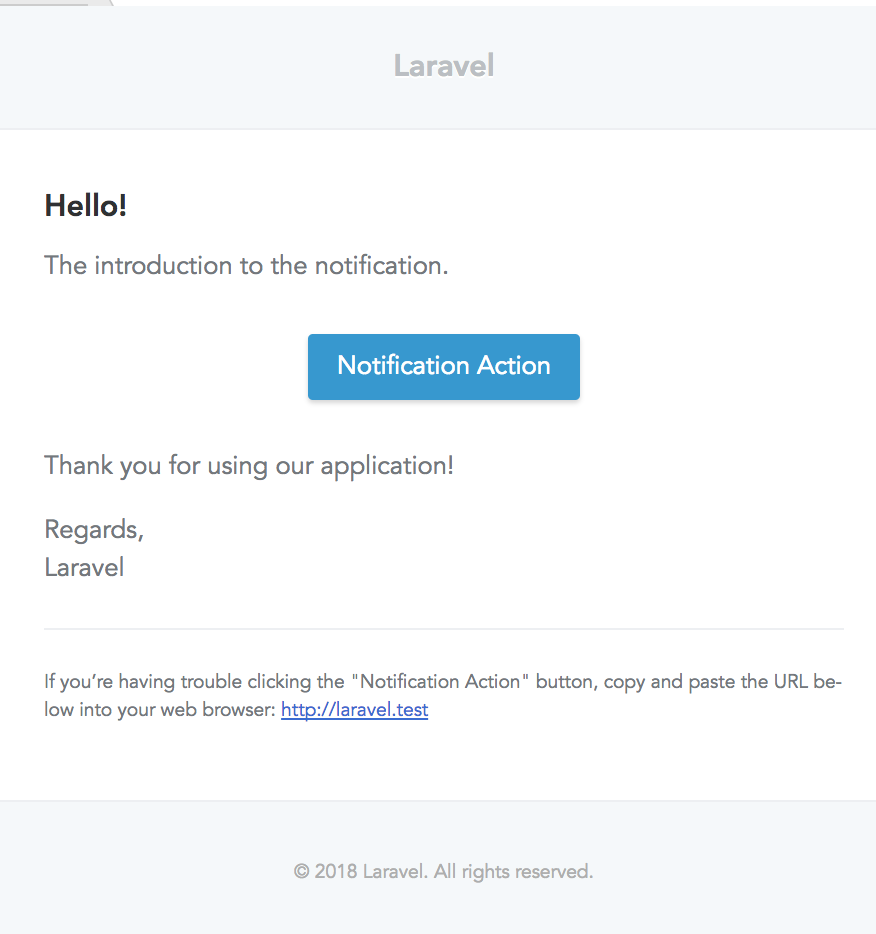
This is the template I'm talking about:
Let's remind ourselves how to send this email.
php artisan make:notification HelloUser
It will generate class app/Notifications/HelloUser.php - here's the main part of it:
class HelloUser extends Notification
{
    public function via($notifiable)
    {
        return ['mail'];
    }

    public function toMail($notifiable)
    {
        return (new MailMessage)
                    ->line('The introduction to the notification.')
                    ->action('Notification Action', url('/'))
                    ->line('Thank you for using our application!');
    }

}
By default, notification channel is mail, and there is some default email constructed.
You build the email text by using methods like ->line() or ->action(), and actually in the back-end it fills in a beautiful HTML template.
How to fire this notification?
$user = User::first(); // or any other way you get User instance
$user->notify(new HelloUser());
Now, we didn't edit any Blade template or any HTML, where to find it? It's not that easy, by default it's not in resources/views anywhere. You need to publish the templates, like this:
php artisan vendor:publish --tag=laravel-notifications
Result:
Copied Directory [/vendor/laravel/framework/src/Illuminate/Notifications/resources/views] To [/resources/views/vendor/notifications]
So before you publish - the template is inside of Laravel core in /vendor folder (which you shouldn't edit, ever). And now - we can modify our HTML.
In fact, there's only one published template - file resources/views/vendor/notifications/email.blade.php:
@component('mail::message')
{{-- Greeting --}}
@if (! empty($greeting))
# {{ $greeting }}
@else
@if ($level == 'error')
# Whoops!
@else
# Hello!
@endif
@endif

{{-- Intro Lines --}}
@foreach ($introLines as $line)
{{ $line }}

@endforeach

{{-- Action Button --}}
@isset($actionText)

@component('mail::button', ['url' => $actionUrl, 'color' => $color])
{{ $actionText }}
@endcomponent
@endisset

{{-- Outro Lines --}}
@foreach ($outroLines as $line)
{{ $line }}

@endforeach

{{-- Salutation --}}
@if (! empty($salutation))
{{ $salutation }}
@else
Regards,
{{ config('app.name') }}
@endif

{{-- Subcopy --}}
@isset($actionText)
@component('mail::subcopy')
If you’re having trouble clicking the "{{ $actionText }}" button, copy and paste the URL below
into your web browser: [{{ $actionUrl }}]({{ $actionUrl }})
@endcomponent
@endisset
@endcomponent
But wait, you will say - where's all the HTML?? It's hiding under another layer - Laravel's notification components based on Markdown language.
There are three components, mentioned in the official Laravel docs:
1. Button:
@component('mail::button', ['url' => $url, 'color' => 'green'])
View Invoice
@endcomponent
2. Panel:
@component('mail::panel')
This is the panel content.
@endcomponent
3. Table:
@component('mail::table')
| Laravel       | Table         | Example  |
| ------------- |:-------------:| --------:|
| Col 2 is      | Centered      | $10      |
| Col 3 is      | Right-Aligned | $20      |
@endcomponent
And yes, you can write Markdown instead of HTML, it may be a convenient thing for some people (developers, mostly).
But if you do want to get HTML and be able to edit it, run this:
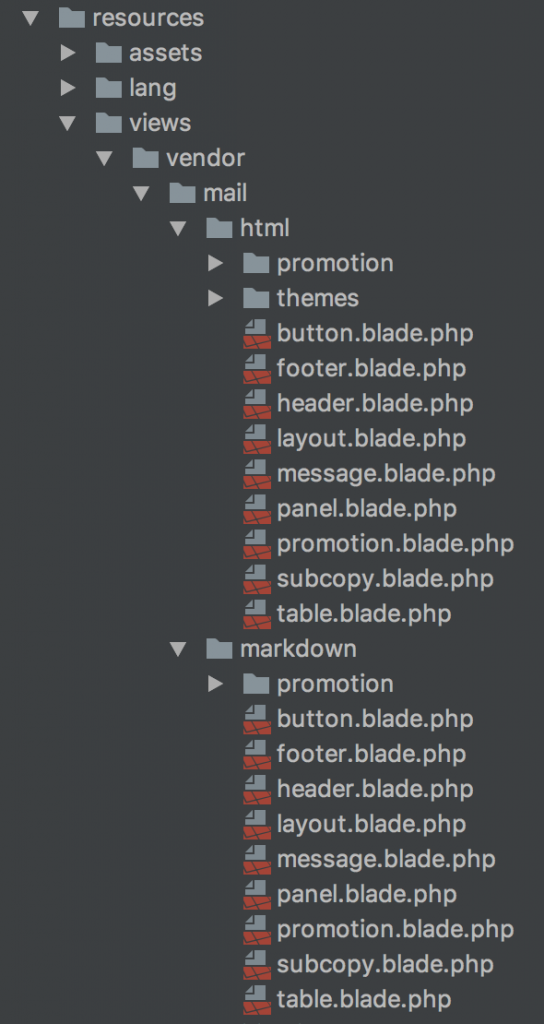
php artisan vendor:publish --tag=laravel-mail
This will happen:
Copied Directory [/vendor/laravel/framework/src/Illuminate/Mail/resources/views] To [/resources/views/vendor/mail]
This is what we get then:
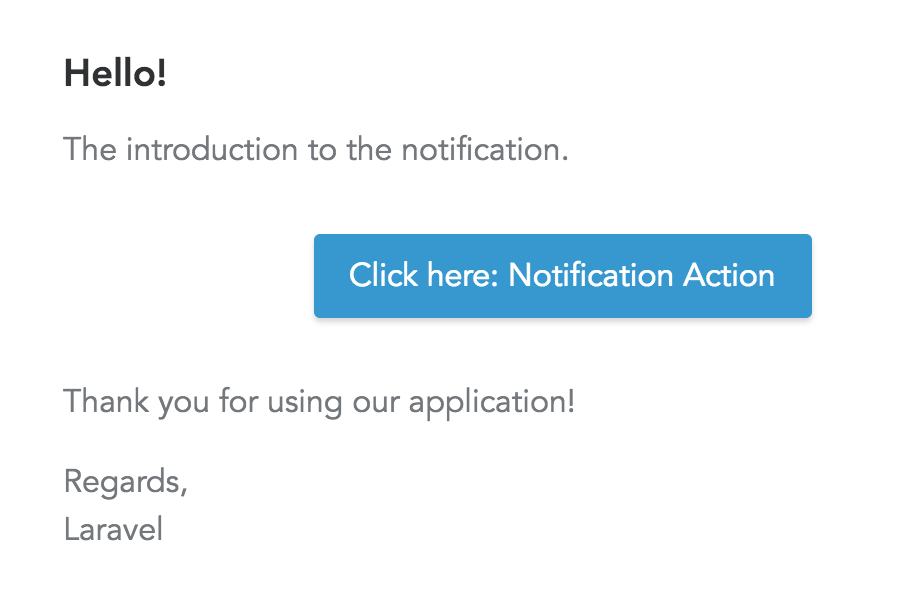
Now it looks really familiar and we can, for example, go to button.blade.php and add some class or text:
<table class="wp-block-table action"><tbody><tr><td>
<table border="0" width="100%" cellspacing="0" cellpadding="0">
<tbody>
<tr>
<td align="center">
<table border="0" cellspacing="0" cellpadding="0">
<tbody>
<tr>
<td><a class="button button-{{ $color or 'blue' }}" href="{{ $url }}" target="_blank" rel="noopener">{{ $slot }}</a></td>
</tr>
</tbody>
</table>
</td>
</tr>
</tbody>
</table>
</td><td>
<table border="0" cellspacing="0" cellpadding="0">
<tbody>
<tr>
<td><a class="button button-{{ $color or 'blue' }}" href="{{ $url }}" target="_blank" rel="noopener">{{ $slot }}</a></td>
</tr>
</tbody>
</table>
</td><td><a class="button button-{{ $color or 'blue' }}" href="{{ $url }}" target="_blank" rel="noopener">{{ $slot }}</a></td></tr><tr><td>
<table border="0" cellspacing="0" cellpadding="0">
<tbody>
<tr>
<td><a class="button button-{{ $color or 'blue' }}" href="{{ $url }}" target="_blank" rel="noopener">{{ $slot }}</a></td>
</tr>
</tbody>
</table>
</td><td><a class="button button-{{ $color or 'blue' }}" href="{{ $url }}" target="_blank" rel="noopener">{{ $slot }}</a></td></tr><tr><td><a class="button button-{{ $color or 'blue' }}" href="{{ $url }}" target="_blank" rel="noopener">{{ $slot }}</a></td></tr></tbody></table>
We change {{ $slot }} into Click here: {{ $slot }} and we get this email:
Finally, you can even have THEMES with different CSS styles for each of them - like, for example, different emails for different user groups.
For that, there's a folder resources/views/mail/html/themes with a CSS file, and you can change the default them in config/mail.php:
    'markdown' => [
        'theme' => 'default',

        'paths' => [
            resource_path('views/vendor/mail'),
        ],
    ],
So this is how to customize Laravel email notifications. You can find more information in the official documentation.
Useful article and it worked, thanks
Is there a way to edit the mail blade template files directly? There was a package by maileclipse.io but it looks like it's been abandoned?
If you publish them:
php artisan vendor:publish --tag=laravel-mailThen you can go into a vendor views folder and change all the blade templates there to your needs
Hello sir,
Is it possible to send email notification with direct url to the related data? For exemple, when an order is created/updated, in the email notification body, instead of url('/') it will use the url of that particular order?
Of course! You can add a direct link with
route('your route name', $record->id)The key thing to know here is your route name