Vue.js is getting more and more popular, and good thing about it that it's pretty quick to get started with. Let me show you an example in this tutorial and sample project.
What we're building here

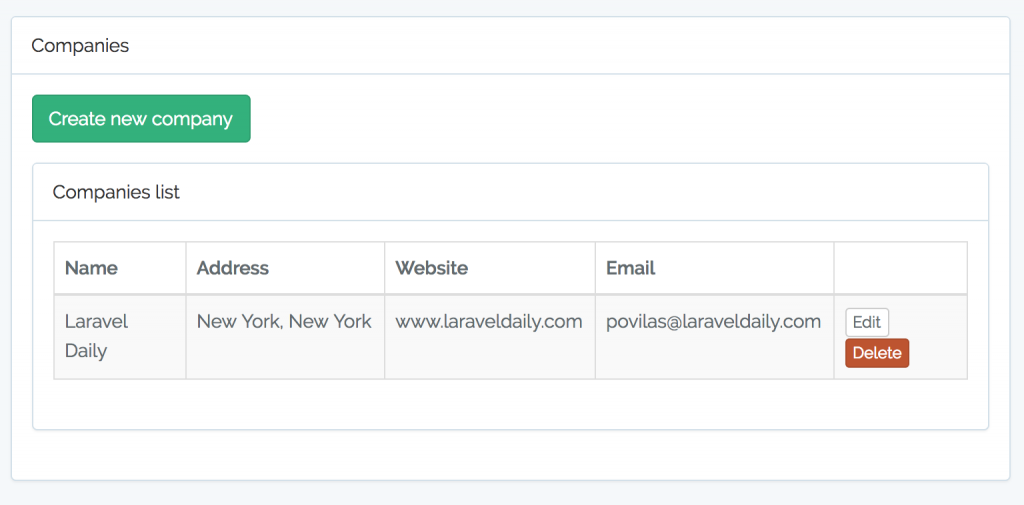
This is our sample project - one CRUD (Create/Read/Update/Delete) for managing companies.
We will first build a core Laravel project and then add Vue.js logic.
TL;DR version
If you prefer to just check code: GitHub repository
If you prefer video over text: YouTube video (8 minutes)
Phase 1: Typical Laravel project
This is a pretty simple phase.
Step 1. Create a Laravel project with laravel new or composer create-project command, whatever you prefer.
Step 2. Launch php artisan make:auth command to have a typical Bootstrap.
Step 3. Copy resources/views/auth/login.blade file into a new template which would represent companies list - I called it resources/views/admin/companies/index.blade.php - and delete all the internal code, for now:
@extends('layouts.app')

@section('content')

<div class="container">
  <div class="row">
    <div class="col-md-8 col-md-offset-2">
      <div class="panel panel-default">
        <div class="panel-heading">Companies</div>
        <div class="panel-body">Coming soon...</div>
      </div>
    </div>
  </div>
</div>

@endsection Go to QuickAdminPanel.com
Phase 2. Database layer and API
Next step - is to take care of managing our CRUD.
Step 1. Model and database. Launch this:
php artisan make:model Company -m
It will create a file app/Company.php which you would fill with this:
class Company extends Model
{
    protected $fillable = ['name', 'address', 'website', 'email'];
}
And same fields in a migration file that has been generated:
public function up()
{
    Schema::create('companies', function (Blueprint $table) {
        $table->increments('id');
        $table->string('name')->nullable();
        $table->string('address')->nullable();
        $table->string('website')->nullable();
        $table->string('email')->nullable();
        $table->timestamps();
    });
}
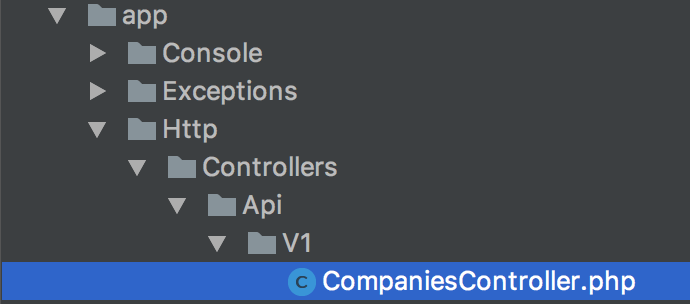
Now, let's create a Controller that will manage all CRUD operations. But it won't be a simple make:controller command - we have to save it as API thing, something like this:

So command would look like this - with full path:
php artisan make:controller Api/V1/CompaniesController --resource
And we fill it with a typical CRUD operation list:
namespace App\Http\Controllers\Api\V1;

use App\Company;
use Illuminate\Http\Request;
use App\Http\Controllers\Controller;

class CompaniesController extends Controller
{
    public function index()
    {
        return Company::all();
    }

    public function show($id)
    {
        return Company::findOrFail($id);
    }

    public function update(Request $request, $id)
    {
        $company = Company::findOrFail($id);
        $company->update($request->all());

        return $company;
    }

    public function store(Request $request)
    {
        $company = Company::create($request->all());
        return $company;
    }

    public function destroy($id)
    {
        $company = Company::findOrFail($id);
        $company->delete();
        return '';
    }
}
Finally, we need to take care of the routing - in our routes/api.php file:
Route::group(['prefix' => '/v1', 'namespace' => 'Api\V1', 'as' => 'api.'], function () {
    Route::resource('companies', 'CompaniesController', ['except' => ['create', 'edit']]);
});
As you can see, I'm adding a prefix api. and excluding create/edit methods cause they don't make sense without visual forms for API.
Important notice: for this tutorial, I didn't build any authentication mechanism for the API, in real life you should protect your routes with some middleware or Laravel Passport. Actually, we have a separate tutorial and demo-project for that.
Ok, we should be done with API layer by now, you can try it with Postman or some other client. Now, let's get (finally!) to Vue.js layer.
Phase 3: Start with Vue.js
To begin coding Vue.js in Laravel, you actually don't need to install it, it's already there, look at the file resources/assets/js/app.js:
/**
 * First we will load all of this project's JavaScript dependencies which
 * includes Vue and other libraries. It is a great starting point when
 * building robust, powerful web applications using Vue and Laravel.
 */

require('./bootstrap');

window.Vue = require('vue');

/**
 * Next, we will create a fresh Vue application instance and attach it to
 * the page. Then, you may begin adding components to this application
 * or customize the JavaScript scaffolding to fit your unique needs.
 */

Vue.component('example', require('./components/Example.vue'));

const app = new Vue({
    el: '#app'
});
Basically, all it does for now is attaching a new Vue application to a selector with id="app", which is generated by make:auth (see steps above) and is located in resources/views/layouts/app.blade.php:
<div id="app">
  <nav class="navbar navbar-default navbar-static-top">
    <div class="container">...</div>
  </nav>
</div>
Now, what we actually need from Vue is only one core thing called Vue-router. Let's run this command from the main folder:
npm install && npm install vue-router
Next thing we do is compile the basic Vue.js file. To do so, we need to run following command:
npm run watch
It will compile resources/assets/js/app.js file into public/js/app.js, which is also generated by make:auth - look at the bottom of layouts/app.blade.php:
<!-- Scripts -->
<script src="{{ asset('js/app.js') }}"></script>
npm run watch will also launch a "watcher" which will compile files as we change them.
Phase 4: Vue-router and Index/List Component
Next step is to actually use Vue-router and assign it to different views in CRUD.
First, let's open our resources/views/admin/companies/index.blade.php file and load the router:
...
<div class="panel-heading">Companies</div>
<div class="panel-body table-responsive">
  <router-view name="companiesIndex"></router-view>
</div>
...
See the lines with router-view? That's exactly where the companiesIndex will be loaded. Now, let's create it.
Open file resources/assets/js/app.js and put these contents - below I will explain each part:
/**
 * First we will load all of this project's JavaScript dependencies which
 * includes Vue and other libraries. It is a great starting point when
 * building robust, powerful web applications using Vue and Laravel.
 */

require('./bootstrap');

window.Vue = require('vue');
import VueRouter from 'vue-router';

window.Vue.use(VueRouter);

import CompaniesIndex from './components/companies/CompaniesIndex.vue';
import CompaniesCreate from './components/companies/CompaniesCreate.vue';
import CompaniesEdit from './components/companies/CompaniesEdit.vue';

const routes = [
    {
        path: '/',
        components: {
            companiesIndex: CompaniesIndex
        }
    },
    {path: '/admin/companies/create', component: CompaniesCreate, name: 'createCompany'},
    {path: '/admin/companies/edit/:id', component: CompaniesEdit, name: 'editCompany'},
]

const router = new VueRouter({ routes })

const app = new Vue({ router }).$mount('#app')
You can look up Vue documentation on how Router works in general, but what we've done here, basically, is attaching every route we need to some Vue component - like CompaniesIndex, CompaniesCreate and CompaniesEdit.
Now, let's create them - here's a file resources/assets/js/components/companies/CompaniesIndex.vue:
<div>
    <div class="form-group">
        <router-link :to="{name: 'createCompany'}" class="btn btn-success">Create new company</router-link>
    </div>
    <div class="panel panel-default">
        <div class="panel-heading">Companies list</div>
        <div class="panel-body">
            <table class="table table-bordered table-striped">
            <thead>
                <tr>
                  <th>Name</th>
                  <th>Address</th>
                  <th>Website</th>
                  <th>Email</th>
                  <th width="100"> </th>
                </tr>
            </thead>
            <tbody>
                <tr v-for="company, index in companies">
                    <td>{{ company.name }}</td>
                    <td>{{ company.address }}</td>
                    <td>{{ company.website }}</td>
                    <td>{{ company.email }}</td>
                    <td>
                        <router-link :to="{name: 'editCompany', params: {id: company.id}}" class="btn btn-xs btn-default">
                            Edit
                        </router-link>
                        <a href="#" class="btn btn-xs btn-danger" v-on:click="deleteEntry(company.id, index)">
                            Delete
                        </a>
                    </td>
                </tr>
            </tbody>
            </table>
        </div>
    </div>
</div>

<script>
    export default {
        data: function () {
            return {
                companies: []
            }
        },
        mounted() {
            var app = this;
            axios.get('/api/v1/companies')
                .then(function (resp) {
                    app.companies = resp.data;
                })
                .catch(function (resp) {
                    console.log(resp);
                    alert("Could not load companies");
                });
        },
        methods: {
            deleteEntry(id, index) {
                if (confirm("Do you really want to delete it?")) {
                    var app = this;
                    axios.delete('/api/v1/companies/' + id)
                        .then(function (resp) {
                            app.companies.splice(index, 1);
                        })
                        .catch(function (resp) {
                            alert("Could not delete company");
                        });
                }
            }
        }
    }
</script>
Looks familiar, doesn't it? Same table that would appear in index.blade.php with just some Vue.js flavour.
- Line with <router-link :to="{name: 'createCompany'}"> creates a link to the component which would load without reloading the whole page;
- Table row <tr v-for="company, index in companies"> will load the data and show each field there;
- Data for the table comes from API (remember, we've created it) via JS at the bottom: axios.get('/api/v1/companies') -> app.companies = resp.data;
- There's also an event for Delete button, which also calls API delete method axios.delete('/api/v1/companies/' + id) and reloads the table (but not the page)
Basically, that's it for the list of companies! It will load empty table and then fill it in with the data from the API.
Final Phase 5: Create/Edit Vue components
Now you know what are Vue components and how to attach them to URLs via VueRouter. Let's finish our demo-project with create and edit forms which will be pretty similar.
resources/assets/js/components/companies/CompaniesCreate.vue:
<div class="form-group">
    <router-link to="/" class="btn btn-default">Back</router-link>
</div>

<div class="panel panel-default">
    <div class="panel-heading">Create new company</div>
    <div class="panel-body">
        <form v-on:submit="saveForm()">
            <div class="row">
                <div class="col-xs-12 form-group">
                    <label class="control-label">Company name</label>
                    <input type="text" v-model="company.name" class="form-control">
                </div>
            </div>
            <div class="row">
                <div class="col-xs-12 form-group">
                    <label class="control-label">Company address</label>
                    <input type="text" v-model="company.address" class="form-control">
                </div>
            </div>
            <div class="row">
                <div class="col-xs-12 form-group">
                    <label class="control-label">Company website</label>
                    <input type="text" v-model="company.website" class="form-control">
                </div>
            </div>
            <div class="row">
                <div class="col-xs-12 form-group">
                    <label class="control-label">Company email</label>
                    <input type="text" v-model="company.email" class="form-control">
                </div>
            </div>
            <div class="row">
                <div class="col-xs-12 form-group">
                    <button class="btn btn-success">Create</button>
                </div>
            </div>
        </form>
    </div>
</div>
<script>
    export default {
        data: function () {
            return {
                company: {
                    name: '',
                    address: '',
                    website: '',
                    email: '',
                }
            }
        },
        methods: {
            saveForm() {
                event.preventDefault();
                var app = this;
                var newCompany = app.company;
                axios.post('/api/v1/companies', newCompany)
                    .then(function (resp) {
                        app.$router.push({path: '/'});
                    })
                    .catch(function (resp) {
                        console.log(resp);
                        alert("Could not create your company");
                    });
            }
        }
    }
</script>
What you can see here?
- Same <template> tag for the main content and <script> for the JS part;
- Assigning input fields to their model fields: input type="text" v-model="company.name"
- Form with submit event v-on:submit="saveForm()" and method defined by calling API: axios.post('/api/v1/companies', newCompany)
And that's it, after submitting the form Vue.js will reload main table, but again - without reloading whole page.
Finally, Edit file resources/assets/js/components/companies/CompaniesEdit.vue looks really similar, I will show only JS part:
<script>
    export default {
        mounted() {
            let app = this;
            let id = app.$route.params.id;
            app.companyId = id;
            axios.get('/api/v1/companies/' + id)
                .then(function (resp) {
                    app.company = resp.data;
                })
                .catch(function () {
                    alert("Could not load your company")
                });
        },
        data: function () {
            return {
                companyId: null,
                company: {
                    name: '',
                    address: '',
                    website: '',
                    email: '',
                }
            }
        },
        methods: {
            saveForm() {
                event.preventDefault();
                var app = this;
                var newCompany = app.company;
                axios.patch('/api/v1/companies/' + app.companyId, newCompany)
                    .then(function (resp) {
                        app.$router.replace('/');
                    })
                    .catch(function (resp) {
                        console.log(resp);
                        alert("Could not create your company");
                    });
            }
        }
    }
</script>
So, that's it, you can try the project out - it's available on GitHub.
Or, if you prefer a video version, here it is:
Good luck with Vue.js!
