
There are many customer support chat solutions, but sometimes you need something simple. For that, we can use Reverb and create a chat around it:

On the admin side, the administrator user will be able to see the chat requests and reply to them:
With this solution, we don't need to use any third-party free/paid software. We also have complete control over how it works/looks of what happens. Finally, all the data stays on our servers.
Project Overview
Our demo project contains two critical parts in the application:
On the user side - we have a chatbox that will be used to send messages to the support team:
Chatbox has this code inside:
Note: Repository is linked at the end of the tutorial.
<div class="fixed bottom-2 right-2 bg-blue-900 rounded-xl" style="width: 64px; height: 64px;"> <button id="chatbox-button" class="mx-auto flex justify-center items-center " style="width: 64px; height: 64px;"> </button></div><div id="chatbox-container" class="hidden fixed bottom-24 right-2 bg-gray-200 border-2 border-blue-400" style="min-width: 400px; max-width: 30%; height: 600px"> <div class="p-6 flex flex-col justify-between h-full"> <div class="pb-4 mb-4 border-b-2 border-b-gray-400"> <h2 class="text-2xl text-center">Chat with Customer Support</h2> </div> <div class="overflow-y-scroll h-full" id="messagesList"> <div class=""> <div class="font-bold">System</div> <p> Hello, how can we help you? </p> </div> </div> <div class="pt-4 mt-4 border-t-2 border-t-gray-400"> <textarea id="message" class="w-full"></textarea> <button id="sendMessage" class="w-full bg-blue-300 py-2">Send Message</button> </div> </div></div> <script type="text/html"> <div class="_POSITION_"> <div class="font-bold">_SENDER_</div> <p>MESSAGE</p> </div></script> <script> const MESSAGE_ICON = ` <svg xmlns="http://www.w3.org/2000/svg" width="32" height="32" viewBox="-3 -2 32 32" fill="none" stroke="#FFFFFF" stroke-width="2" stroke-linecap="round" stroke-linejoin="round" class="feather feather-mail p-0 m-0"> <path d="M4 4h16c1.1 0 2 .9 2 2v12c0 1.1-.9 2-2 2H4c-1.1 0-2-.9-2-2V6c0-1.1.9-2 2-2z"></path> <polyline points="22,6 12,13 2,6"></polyline> </svg>`; const CLOSE_ICON = ` <svg xmlns="http://www.w3.org/2000/svg" width="32" height="32" viewBox="-3 -2 32 32" fill="#FFFFFF" stroke="#FFFFFF" stroke-width="2" stroke-linecap="round" stroke-linejoin="round" class="feather feather-x p-0 m-0"> <line x1="18" y1="6" x2="6" y2="18"></line> <line x1="6" y1="6" x2="18" y2="18"></line> </svg>`; // Set the session identifier // This acts as "rooms" for now, and will be cleared on page refresh let identifier = '{{ auth()->id() }}-{{ uniqid() }}'; // Add default chatbox button icon as soon as page loads const chatboxButton = document.getElementById('chatbox-button'); chatboxButton.innerHTML = MESSAGE_ICON; // Add event listener to chatbox button (open/close chatbox) document.getElementById('chatbox-button').addEventListener('click', function () { const chatboxContainer = document.getElementById('chatbox-container'); chatboxContainer.classList.toggle('hidden'); if (chatboxContainer.classList.contains('hidden')) { chatboxButton.innerHTML = MESSAGE_ICON; } else { chatboxButton.innerHTML = CLOSE_ICON; } }) // Send the message on sendMessage button click document.getElementById('sendMessage').addEventListener('click', function () { const message = document.getElementById('message').value; const messagesList = document.getElementById('messagesList'); const messageTemplate = document.querySelector('script[type="text/html"]').innerHTML; // Post the message to the server fetch('{{ route('send-message') }}', { method: 'POST', headers: { 'Content-Type': 'application/json', 'X-CSRF-TOKEN': document.querySelector('meta[name="csrf-token"]').getAttribute('content') }, body: JSON.stringify({message: message, identifier: identifier}) }) .then(() => { const newMessage = messageTemplate .replace('_POSITION_', 'text-right') .replace('_SENDER_', 'You') .replace('MESSAGE', message); messagesList.innerHTML += newMessage; messagesList.scrollTop = messagesList.scrollHeight; document.getElementById('message').value = ''; }); });</script>On the support side (admin), we have a list of all user-created chat rooms. From there, we can go inside the chat room and see all the messages that were sent:
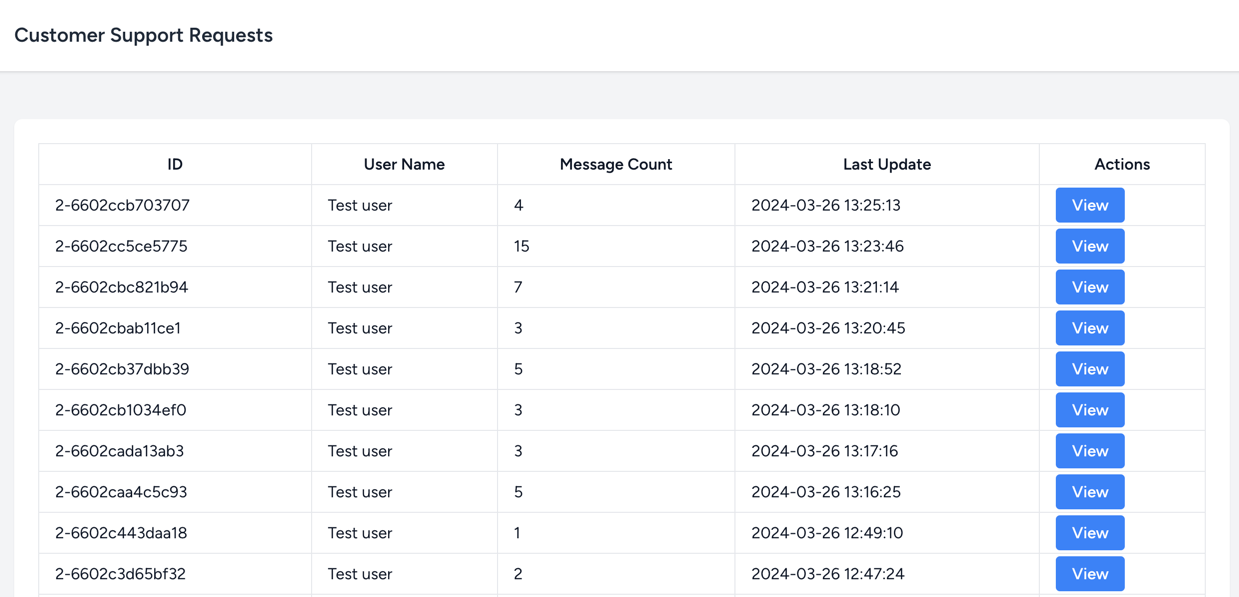
We are simply using a controller and a table to display all the chat rooms:
app/Http/Controllers/CustomerChatsController.php
// ... public function index(){ $chatRooms = ChatRoom::query() ->with(['user']) ->withCount('chatMessages') ->orderBy('updated_at', 'desc') ->paginate(15); return view('chatRooms.index', compact('chatRooms'));} // ...resources/views/chatRooms/index.blade.php
{{-- ... --}} <table class="w-full"> <thead> <tr> <th class="border px-4 py-2">ID</th> <th class="border px-4 py-2">User Name</th> <th class="border px-4 py-2">Message Count</th> <th class="border px-4 py-2">Last Update</th> <th class="border px-4 py-2">Actions</th> </tr> </thead> <tbody> @foreach ($chatRooms as $chatRoom) <tr> <td class="border px-4 py-2">{{ $chatRoom->identifier }}</td> <td class="border px-4 py-2">{{ $chatRoom->user->name }}</td> <td class="border px-4 py-2">{{ $chatRoom->chat_messages_count }}</td> <td class="border px-4 py-2">{{ $chatRoom->updated_at }}</td> <td class="border px-4 py-2"> <a href="{{ route('chatRooms.show', $chatRoom->id) }}" class="bg-blue-500 hover:bg-blue-700 text-white font-bold py-2 px-4 rounded">View</a> </td> </tr> @endforeach </tbody></table> {{-- ... --}}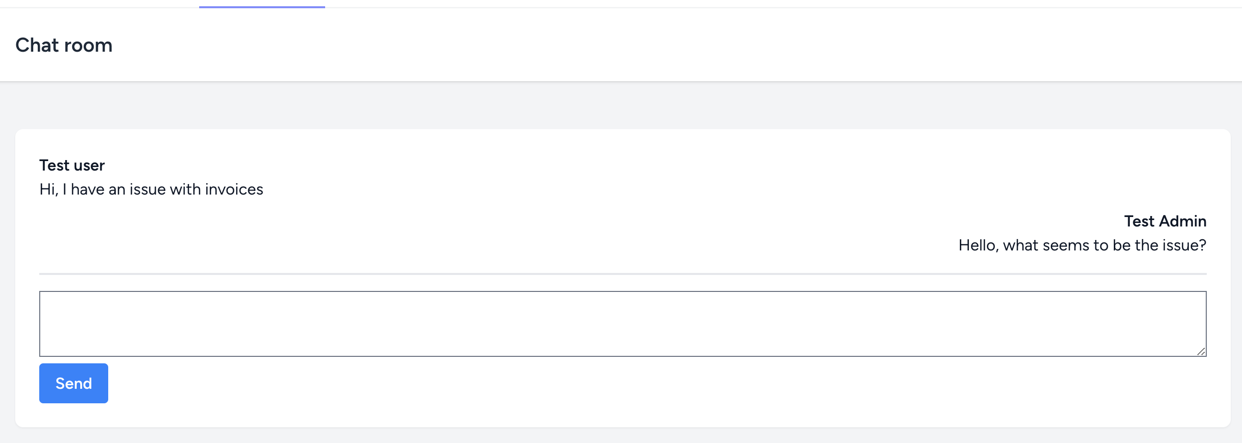
The chat room has this code...
I downloaded your repository and I am getting the following error when I go to login
Vite manifest not found at: C:_ _ _ Tests\lvdy-chat\public\build/manifest.json
how do I fix this?
You need to install nom packages and build the assets
What is nom and how do you install it?
Sorry for typo! It was supposed to be npm
Npm was setup as one of the first things I did I did install it nom 0.0.3 and now I am still getting the same error.:
Vite manifest not found at: C:_ _ _ Tests\lvdy-chat\public\build/manifest.json
You need to compile the assets - run 'npm run build'
I just ran the npm update and this is what I got:
PS C:_ _ _ Tests\lvdy-chat> npm update npm warn EBADENGINE Unsupported engine { npm warn EBADENGINE package: 'nom@0.0.3', npm warn EBADENGINE required: { node: '0.6.x' }, npm warn EBADENGINE current: { node: 'v22.13.0', npm: '10.9.2' } npm warn EBADENGINE }
Why is there a "nom" package?
you sed to install it so I did.
I ran the site again and as I noted above I am still getting the same error however I al so noted the following:
C:_ _ _ Tests\lvdy-chat\vendor\laravel\framework\src\Illuminate\Foundation\Vite.php :934
I just said that it was a typo! Laravel uses npm to manage assets. So remove the nom package and run this exact commands:
npm install
npm run build
one after another
Ok let me inform you as to what I have don; First, I downloaded the repository from GitHub after unzipping it I hooked it up to Herd to serve it up then I opened it up using PhpStorm PhpStorm installed Composer files then PhpStorm installed npm files Once this was finished I ran the key:generate command next I ran the php artisan migrate:fresh –seed Once all of this was completed I updated the npm files using npm update when this was finished I ran the composer update command the following is what the package.json and the composer.json files have:
Once all of this was up and running, I opened my command prompt and ran the npm run dev command since PhpStorm had all ready ran the install command.
You still have not ran the command I said to run :) But this article might help you, as it is exactly your issue:
https://laraveldaily.com/post/laravel-vite-manifest-not-found-at-manifest-json
Ok I will however I have on more issue and that is I have never removed a package so can you please gide me throu the stepo?
npm uninstall package-name
sorry I just have not needed to remove a package befor. Thanks for the help.