Laravel has a useful Notification system, where you can notify user about something via email, Slack etc. And there is a quite good default HTML template for emails. But what if you want to customize its design?
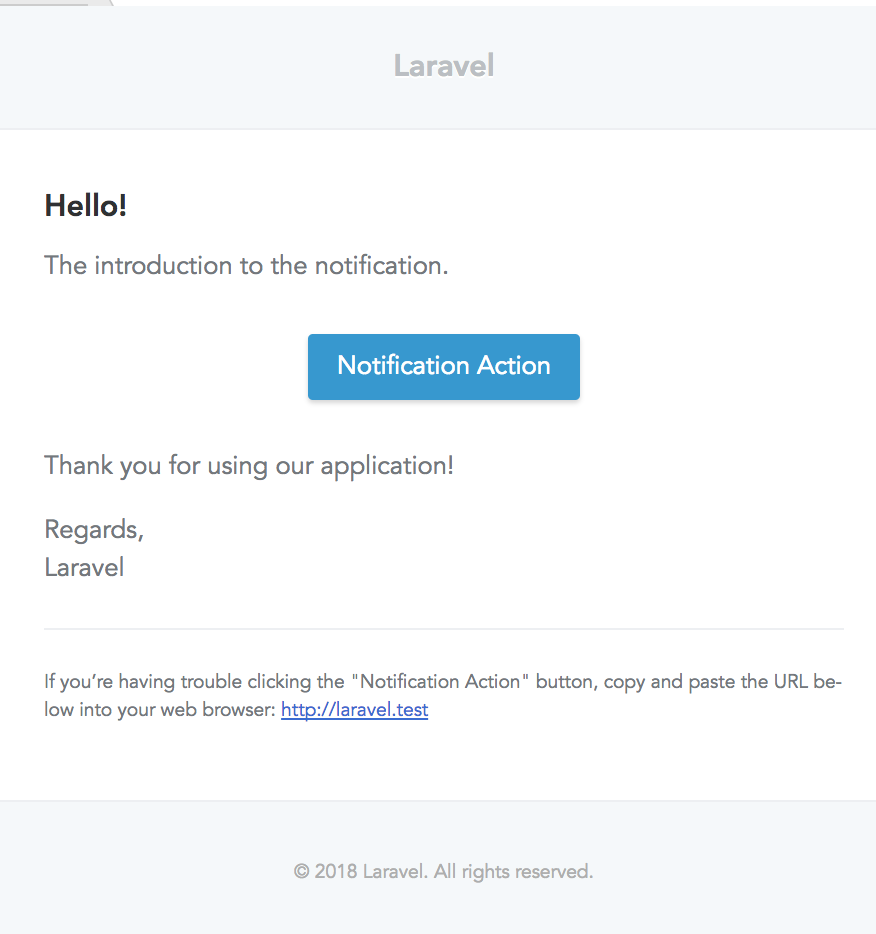
This is the template I'm talking about:
Let's remind ourselves how to send this email.
php artisan make:notification HelloUser
It will generate class app/Notifications/HelloUser.php - here's the main part of it:
class HelloUser extends Notification
{
    public function via($notifiable)
    {
        return ['mail'];
    }

    public function toMail($notifiable)
    {
        return (new MailMessage)
                    ->line('The introduction to the notification.')
                    ->action('Notification Action', url('/'))
                    ->line('Thank you for using our application!');
    }

}
By default, notification channel is mail, and there is some default email constructed.
You build the email text by using methods like ->line() or ->action(), and actually in the back-end it fills in a beautiful HTML template.
How to fire this notification?
$user = User::first(); // or any other way you get User instance
$user->notify(new HelloUser());
Now, we didn't edit any Blade template or any HTML, where to find it? It's not that easy, by default it's not in resources/views anywhere. You need to publish the templates, like this:
php artisan vendor:publish --tag=laravel-notifications
Result:
Copied Directory [/vendor/laravel/framework/src/Illuminate/Notifications/resources/views] To [/resources/views/vendor/notifications]
So before you publish - the template is inside of Laravel core in /vendor folder (which you shouldn't edit, ever). And now - we can modify our HTML.
In fact, there's only one published template - file resources/views/vendor/notifications/email.blade.php:
@component('mail::message')
{{-- Greeting --}}
@if (! empty($greeting))
# {{ $greeting }}
@else
@if ($level == 'error')
# Whoops!
@else
# Hello!
@endif
@endif

{{-- Intro Lines --}}
@foreach ($introLines as $line)
{{ $line }}

@endforeach

{{-- Action Button --}}
@isset($actionText)

@component('mail::button', ['url' => $actionUrl, 'color' => $color])
{{ $actionText }}
@endcomponent
@endisset

{{-- Outro Lines --}}
@foreach ($outroLines as $line)
{{ $line }}

@endforeach

{{-- Salutation --}}
@if (! empty($salutation))
{{ $salutation }}
@else
Regards,
{{ config('app.name') }}
@endif

{{-- Subcopy --}}
@isset($actionText)
@component('mail::subcopy')
If you’re having trouble clicking the "{{ $actionText }}" button, copy and paste the URL below
into your web browser: [{{ $actionUrl }}]({{ $actionUrl }})
@endcomponent
@endisset
@endcomponent
But wait, you will say - where's all the HTML?? It's hiding under another layer - Laravel's notification components based on Markdown language.
There are three components, mentioned in the official Laravel docs:
1. Button:
@component('mail::button', ['url' => $url, 'color' => 'green'])
View Invoice
@endcomponent
2. Panel:
@component('mail::panel')
This is the panel content.
@endcomponent
3. Table:
@component('mail::table')
| Laravel       | Table         | Example  |
| ------------- |:-------------:| --------:|
| Col 2 is      | Centered      | $10      |
| Col 3 is      | Right-Aligned | $20      |
@endcomponent
And yes, you can write Markdown instead of HTML, it may be a convenient thing for some people (developers, mostly).
But if you do want to get HTML and be able to edit it, run this:
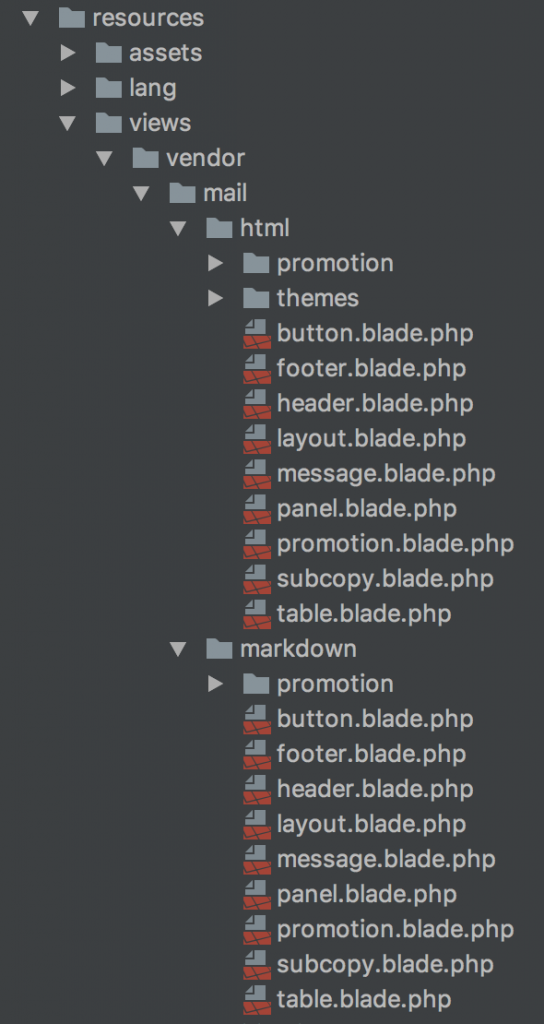
php artisan vendor:publish --tag=laravel-mail
This will happen:
Copied Directory [/vendor/laravel/framework/src/Illuminate/Mail/resources/views] To [/resources/views/vendor/mail]
This is what we get then:
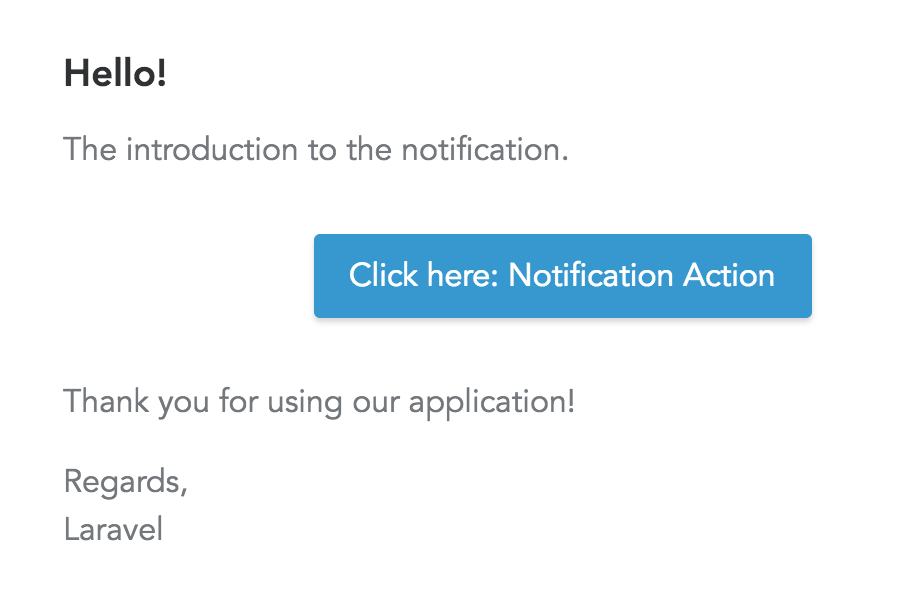
Now it looks really familiar and we can, for example, go to button.blade.php and add some class or text:
<table class="wp-block-table action"><tbody><tr><td>
<table border="0" width="100%" cellspacing="0" cellpadding="0">
<tbody>
<tr>
<td align="center">
<table border="0" cellspacing="0" cellpadding="0">
<tbody>
<tr>
<td><a class="button button-{{ $color or 'blue' }}" href="{{ $url }}" target="_blank" rel="noopener">{{ $slot }}</a></td>
</tr>
</tbody>
</table>
</td>
</tr>
</tbody>
</table>
</td><td>
<table border="0" cellspacing="0" cellpadding="0">
<tbody>
<tr>
<td><a class="button button-{{ $color or 'blue' }}" href="{{ $url }}" target="_blank" rel="noopener">{{ $slot }}</a></td>
</tr>
</tbody>
</table>
</td><td><a class="button button-{{ $color or 'blue' }}" href="{{ $url }}" target="_blank" rel="noopener">{{ $slot }}</a></td></tr><tr><td>
<table border="0" cellspacing="0" cellpadding="0">
<tbody>
<tr>
<td><a class="button button-{{ $color or 'blue' }}" href="{{ $url }}" target="_blank" rel="noopener">{{ $slot }}</a></td>
</tr>
</tbody>
</table>
</td><td><a class="button button-{{ $color or 'blue' }}" href="{{ $url }}" target="_blank" rel="noopener">{{ $slot }}</a></td></tr><tr><td><a class="button button-{{ $color or 'blue' }}" href="{{ $url }}" target="_blank" rel="noopener">{{ $slot }}</a></td></tr></tbody></table>
We change {{ $slot }} into Click here: {{ $slot }} and we get this email:
Finally, you can even have THEMES with different CSS styles for each of them - like, for example, different emails for different user groups.
For that, there's a folder resources/views/mail/html/themes with a CSS file, and you can change the default them in config/mail.php:
    'markdown' => [
        'theme' => 'default',

        'paths' => [
            resource_path('views/vendor/mail'),
        ],
    ],
So this is how to customize Laravel email notifications. You can find more information in the official documentation.
-=-{-axios.get('apiabilities')-.then(response-=-{-front_grid.jpg)
Useful article and it worked, thanks
Is there a way to edit the mail blade template files directly? There was a package by maileclipse.io but it looks like it's been abandoned?
If you publish them:
php artisan vendor:publish --tag=laravel-mailThen you can go into a vendor views folder and change all the blade templates there to your needs