Multilanguage projects are quite easy to configure in Laravel. In this tutorial, I will show you how to do it.
If you prefer to watch video tutorials, here's the video live-coding version of an older version of this article.
Step 1. Project Preparation
First, we generate a default Laravel project with laravel new laravel. For this example, I will be using Laravel Breeze, with these two commands:
composer require laravel/breeze --devphp artisan breeze:installSo, we have created Auth views in resources/views/auth, and also will now see the Login and Register links in resources/views/welcome.blade.php.
Step 2. Prefix routes with locale
Next, we will add Route::prefix() for all possible URLs – so all the pages inside of the project will have prefix of /[locale]/[whatever_page]. Here's how it looks in the routes/web.php:
Route::prefix('{locale}')->group(function () { Route::get('/', function () { return view('welcome'); }); Route::get('/dashboard', function () { return view('dashboard'); })->middleware(['auth'])->name('dashboard'); require __DIR__.'/auth.php';});All the routes above were pre-generated, we just moved them inside of our Route::prefix() group.
This group will cover such URLs as /en/, /en/home or /en/register.
Now, for validation purposes, let’s set the {locale} to be only two letters, like en or fr or de. We add a regular-expression-based rule inside of the group:
Route::prefix('{locale}') ->where(['locale' => '[a-zA-Z]{2}']) ->group(function () { // ...Step 3. Setting App Locale with Middleware
People often think that Middleware classes are about restricting some access. But you can do more actions inside these classes. In our example, we will set app()->setLocale().
php artisan make:middleware SetLocaleThis command will generate app/Http/Middleware/SetLocale.php, where we need to add only two lines of code:
class SetLocale{ public function handle(Request $request, Closure $next) { app()->setLocale($request->segment(1)); URL::defaults(['locale' => $request->segment(1)]); return $next($request); }}Variable $request->segment(1) will contain our {locale} part of the URL, so we set the app locale on all requests. And URL::defaults() will set that every route by default will have locale.
Of course, we need to register this class in app/Http/Kernel.php to the $routeMiddleware array:
protected $routeMiddleware = [ 'auth' => \App\Http\Middleware\Authenticate::class, // 'setlocale' => \App\Http\Middleware\SetLocale::class,Finally, we will apply this middleware to the whole locale group we created above:
Route::prefix('{locale}') ->where(['locale' => '[a-zA-Z]{2}']) ->middleware('setlocale') ->group(function () { // ...Step 4. Automated Redirect of Homepage
We need to add another line to routes/web.php – to redirect the user from non-localed homepage to /en/ homepage. This route will be outside of the Route::prefix() we created above:
Route::get('/', function () { return redirect(app()->getLocale());});This will redirect user from yourdomain.com to yourdomain.com/en, which will show default Welcome page.
Step 5. Login and Register – Redirect to the proper route
After successfully registering or logging in, you are being redirected. By default where you are redirected is provided in App\Providers\RouteServiceProvider.php constant HOME. Because you can't use functions in constants, we will add app()->getLocale() to redirect in app\Http\Controllers\Auth\RegisteredUserController.php and app\Http\Controllers\Auth\AuthenticatedSessionController.php:
return redirect(app()->getLocale() . RouteServiceProvider::HOME);Step 6. Choosing Language in TopBar
It's pretty weird to have this visual step only now, but I wanted to get to “how it works” before showing “how it looks”.
Now, let's implement a language choice in the header visually. Like this – see three languages on top:

It's pretty simple, as we have all the system ready for it.
First, let's define the array of possible languages, in config/app.php we will add an array of available_locales:
'available_locales' => [ 'en', 'de', 'fr'],Then, before dropdown in the resources/views/layouts/navigation.blade.php file, add a @foreach loop:
@foreach(config('app.available_locales') as $locale) <x-nav-link :href="route(\Illuminate\Support\Facades\Route::currentRouteName(), ['locale' => $locale])" :active="app()->getLocale() == $locale"> {{ strtoupper($locale) }} </x-nav-link>@endforeach<x-dropdown align="right" width="48">- We're taking the list of languages from
config('app.available_locales')that we had just created above; - We're giving the
hreflink to the same current route but with a different language – for that we're usingRoute::currentRouteName()method; - Also we're checking for active current language with
app()->getLocale() == $localecondition; - Finally, we're showing the language itself in uppercase mode with
strtoupper($locale).
Step 7. Filling Translations
This is the goal we've been working for – so that /en/register URL would show form in English, and /fr/register – in French language.
Let's keep our en locale as default, and we need to fill in the translations for other languages.
If you look at resources/views/auth/login.blade.php file and other views, they all use underscore __() method to get the texts, see examples below:
<!-- Email Address --><div> <x-label for="email" :value="__('Email')" /> <x-input id="email" class="block mt-1 w-full" type="email" name="email" :value="old('email')" required autofocus /></div> <!-- Password --><div class="mt-4"> <x-label for="password" :value="__('Password')" /> <x-input id="password" class="block mt-1 w-full" type="password" name="password" required autocomplete="current-password" /></div>So, all we need to do is to fill in the files in other languages. Let's create a file lang/fr.json and fill in some translations:
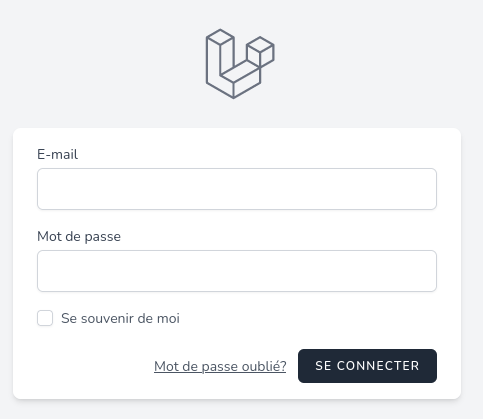
{ "Email": "E-mail", "Password": "Mot de passe", "Remember me": "Se souvenir de moi", "Forgot your password?": "Mot de passe oublié?", "Log in": "Se connecter"}Final visual result, if we hit a Login link on a French language:

That's it! If you don't want to do it all yourself, you may also use a package like mcamara/laravel-localization.


Really helpful, thank you!