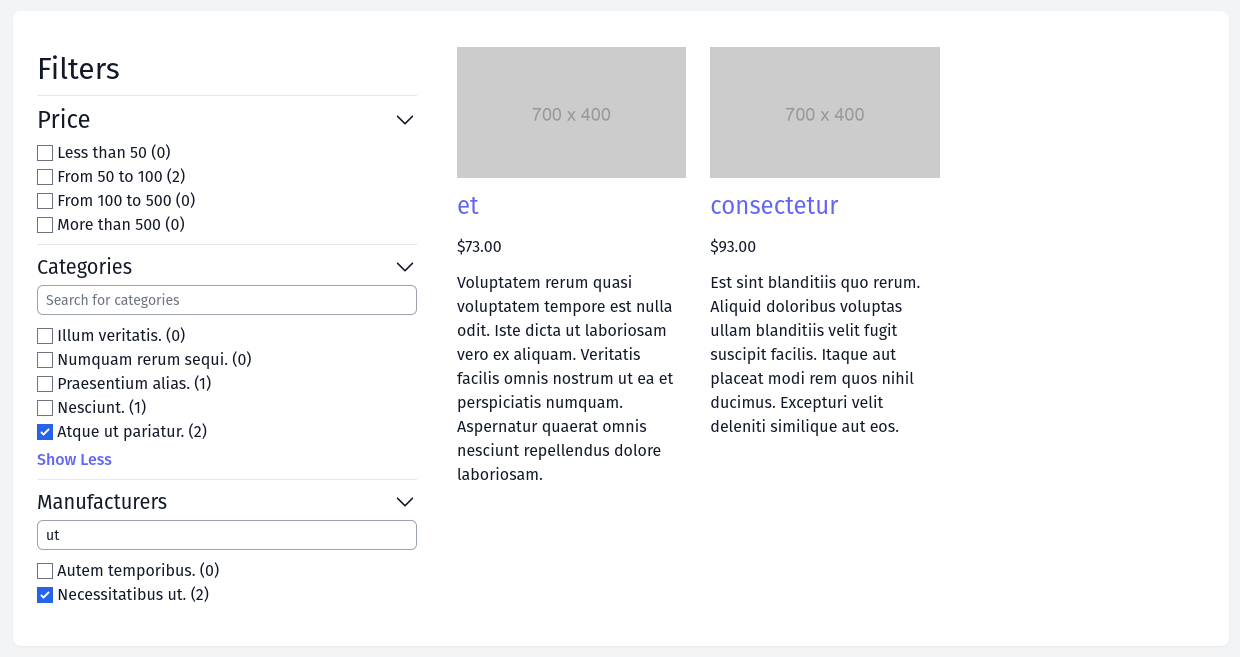
This tutorial is a Part 2 follow-up to the Livewire Sidebar Filters for E-Shop Products: Step-by-Step article. We decided to improve that Sidebar Filter component with new features using Alpine.js.
We will add:
- Collapsable filter options
- Search for every filter
- Show more/less for the filter options list

At the end of this tutorial, you will find a link to the repository with both the original Livewire component, and these Alpine.js improvements in the form of Pull Request.
So let's dive in!
Livewire Component Changes
First, we need to make changes to the Livewire component. We need to add public properties for categories and manufacturers and make them as an array.
app/Http/Livewire/Sidebar.php:
class Sidebar extends Component{ public array $categories = []; public array $manufacturers = []; // ... public function render(PriceService $priceService): View { $prices = $priceService->getPrices( [], $this->selected['categories'], $this->selected['manufacturers'] ); $categories = Category::withCount(['products' => function (Builder $query) { $this->categories = Category::withCount(['products' => function (Builder $query) { $query->withFilters( $this->selected['prices'], [], $this->selected['manufacturers'] ); }]) ->get() ->toArray(); $manufacturers = Manufacturer::withCount(['products' => function (Builder $query) { $this->manufacturers = Manufacturer::withCount(['products' => function (Builder $query) { $query->withFilters( $this->selected['prices'], $this->selected['categories'], [] ); }]) ->get() ->toArray(); return view('livewire.sidebar', compact('prices', 'categories', 'manufacturers')); return view('livewire.sidebar', compact('prices')); }}This way we will be able to share the state between Livewire and Alpine.js.
Now, let's go to the resources/views/livewire/sidebar.blade.php and add more features.
Collapse
First, we will add a collapse feature.

We will add all features only for categories now, and later for other blocks.
Everything in Alpine.js starts with the x-data directive. So first thing, we need to wrap the block with a div and add x-data with the reactive data open which by default will be true.
<div x-data="{ open: true }"> <h3 class="mt-2 mb-1 text-3xl">Categories</h3> @foreach($categories as $index => $category) <div> <input type="checkbox" id="category{{ $index }}" value="{{ $category->id }}" wire:model="selected.categories"> <label for="category{{ $index }}"> {{ $category['name'] }} ({{ $category['products_count'] }}) </label> </div> @endforeach</div> Next, the title, in our case Categories, needs to be transformed into a button.
<div x-data="{ open: true }"> <h3 class="mt-2 mb-1 text-3xl">Categories</h3> <button @click="open = !open" class="flex w-full items-center justify-between text-left"> Categories <svg xmlns="http://www.w3.org/2000/svg" fill="none" viewBox="0 0 24 24" stroke-width="1.5" stroke="currentColor" class="h-6 w-6 transform duration-300" :class="{'rotate-180': open}"> <path stroke-linecap="round" stroke-linejoin="round" d="M4.5 15.75l7.5-7.5 7.5 7.5" /> </svg> </button> @foreach($categories as $index => $category) <div> <input type="checkbox" id="category{{ $index }}" value="{{ $category->id }}" wire:model="selected.categories"> <label for="category{{ $index }}"> {{ $category['name'] }} ({{ $category['products_count'] }}) </label> </div> @endforeach</div>When the button is pressed, open will be set to the opposite value. Also, we bind :class to rotate the arrow.
Now we need to hide the list when the button is pressed. For this we will wrap the @foreach blade directive into a div and will show or hide the list using x-show directive. Also, we will add some transition animation.
<div x-data="{ open: true }"> <h3 class="mt-2 mb-1 text-3xl">Categories</h3> <button @click="open = !open" class="flex w-full items-center justify-between text-left"> Categories <svg xmlns="http://www.w3.org/2000/svg" fill="none" viewBox="0 0 24 24" stroke-width="1.5" stroke="currentColor" class="h-6 w-6 transform duration-300" :class="{'rotate-180': open}"> <path stroke-linecap="round" stroke-linejoin="round" d="M4.5 15.75l7.5-7.5 7.5 7.5" /> </svg> </button> <div x-show="open" x-transition.scale.origin.top x-transition:enter.duration.500ms x-transition:leave.duration.500ms > @foreach($categories as $index => $category) <div> <input type="checkbox" id="category{{ $index }}" value="{{ $category->id }}" wire:model="selected.categories"> <label for="category{{ $index }}"> {{ $category['name'] }} ({{ $category['products_count'] }}) </label> </div> @endforeach </div> </div>After all this, we have a similar result to the one below. The left part is showing everything, and on the right it's collapsed.

For the prices block, this will be the only feature. So we need to do the same. Wrap in a div with x-data, adding a button to show/hide, and wrapping foreach into a div with the x-show.
resources/views/livewire/sidebar.blade.php:
<div x-data="{ open: true }"> <h3 class="mt-2 mb-1 text-2xl"> <button @click="open = !open" class="flex w-full items-center justify-between text-left"> Price <svg xmlns="http://www.w3.org/2000/svg" fill="none" viewBox="0 0 24 24" stroke-width="1.5" stroke="currentColor" class="h-6 w-6 transform duration-300" :class="{'rotate-180': open}"> <path stroke-linecap="round" stroke-linejoin="round" d="M4.5 15.75l7.5-7.5 7.5 7.5" /> </svg> </button> </h3> <div x-show="open" x-transition.scale.origin.top x-transition:enter.duration.500ms x-transition:leave.duration.500ms > @foreach($prices as $index => $price) <div> <input type="checkbox" id="price{{ $index }}" value="{{ $index }}" wire:model="selected.prices"> <label for="price{{ $index }}"> {{ $price['name'] }} ({{ $price['products_count'] }}) </label> </div> @endforeach </div> </div> Search
Now let's add the search functionality.

First, we need an input and it has to be...
Premium Members Only
This advanced tutorial is available exclusively to Laravel Daily Premium members.
Already a member? Login here
Premium membership includes:

Can you make the same with Laravel / Vue?
We did a smaller version, a few years ago: Laravel + Vue.js Demo: Filter by Category/Price/Manufacturer