
Date pickers are quite complex web input components. So, this article will cover how to set up the Vue 3 Datepicker package and do basic customization, saving and updating data.
This package has many features, is frequently updated, and, most importantly, has good Documentation with many examples.
We have installed Laravel with the Laravel Breeze Vue starter-kit preset and seeded a single Post Model with published_at column for update form to work.
Installation & Setup
Install the package via NPM.
npm install @vuepic/vue-datepickerRegister the component with its styles in the app.js file.
resources/js/app.js
import './bootstrap';import '../css/app.css';import '@vuepic/vue-datepicker/dist/main.css'; import { createApp, h } from 'vue';import { createInertiaApp } from '@inertiajs/vue3';import { resolvePageComponent } from 'laravel-vite-plugin/inertia-helpers';import { ZiggyVue } from '../../vendor/tightenco/ziggy/dist/vue.m';import VueDatePicker from '@vuepic/vue-datepicker'; // ... return createApp({ render: () => h(App, props) }) .use(plugin) .use(ZiggyVue, Ziggy) .component('VueDatePicker', VueDatePicker) .mount(el);For storing and updating data, we have this API Controller.
Routes & Forms
app/Http/Controllers/Api/PostController.php
namespace App\Http\Controllers\Api; use App\Http\Controllers\Controller;use App\Models\Post;use Illuminate\Http\Request; class PostController extends Controller{ public function store(Request $request) { return Post::create(['published_at' => $request->published_at]); } public function show(Post $post) { return response()->json($post); } public function update(Post $post, Request $request) { return $post->update(['published_at' => $request->published_at]); }}Then, register API Routes.
routes/api.php
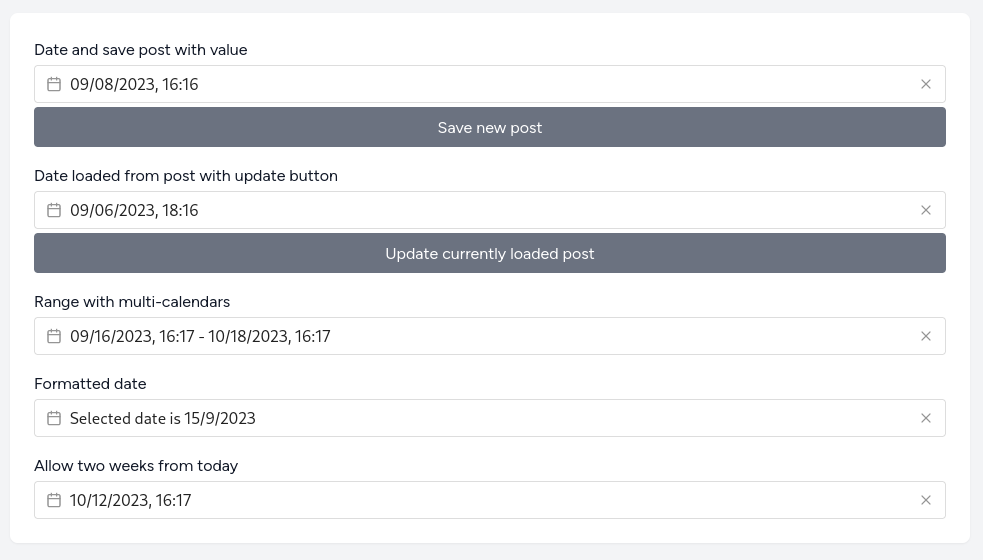
use App\Http\Controllers\Api\PostController; Route::post('/posts', [PostController::class, 'store']);Route::get('/posts/{post}', [PostController::class, 'show']);Route::put('/posts/{post}', [PostController::class, 'update']);Finally, update the page where you want to check and play around with all the examples. In our case, we did that on the Dashboard. Below, you will find a quick summary of different selectors.
resources/js/Pages/Dashboard.vue
<script setup>import AuthenticatedLayout from '@/Layouts/AuthenticatedLayout.vue';import { Head } from '@inertiajs/vue3';import { ref, reactive, onMounted } from 'vue'; // store exampleconst date = ref(); const save = () => { axios.post('/api/posts', { published_at: date.value })} // update exampleconst post = reactive({ id: null, published_at: null}); const getPost = (id) => { axios.get(`/api/posts/${ id }`) .then(response => { post.id = response.data.id post.published_at = response.data.published_at })} onMounted(() => getPost(1)) const update = () => { axios.put(`/api/posts/${ post.id }`, post)} // Select range exampleconst range = ref(); // date format exampleconst formattedDate = ref();const format = (date) => { const day = date.getDate(); const month = date.getMonth() + 1; const year = date.getFullYear(); return `Selected date is ${day}/${month}/${year}`;} // disabled dates exampleconst nowToTwoWeeks = ref();const today = new Date();const futureTwoWeeks = new Date(today)futureTwoWeeks.setDate(futureTwoWeeks.getDate() + 14)</script> <template> <Head title="Dashboard" /> <AuthenticatedLayout> <template #header> <h2 class="font-semibold text-xl text-gray-800 leading-tight">Dashboard</h2> </template> <div class="py-12"> <div class="max-w-7xl mx-auto sm:px-6 lg:px-8"> <div class="bg-white shadow-sm sm:rounded-lg"> <div class="p-6 text-gray-900 flex flex-col gap-4"> <!-- store example --> <div class="flex flex-col gap-1"> <label>Date and save post with value</label> <VueDatePicker v-model="date"></VueDatePicker> <button type="button" @click="save" class="bg-gray-500 text-white px-3 py-2 rounded">Save new post</button> </div> <!-- update example --> <div class="flex flex-col gap-1"> <label>Date loaded from post with update button</label> <VueDatePicker v-model="post.published_at"></VueDatePicker> <button type="button" @click="update" class="bg-gray-500 text-white px-3 py-2 rounded">Update currently loaded post</button> </div> <!-- select range example --> <div class="flex flex-col gap-1"> <label>Range with multi-calendars</label> <VueDatePicker v-model="range" range multi-calendars></VueDatePicker> </div> <!-- date format example --> <div class="flex flex-col gap-1"> <label>Formatted date</label> <VueDatePicker v-model="formattedDate" :format="format"></VueDatePicker> </div> <!-- disabled dates example --> <div class="flex flex-col gap-1"> <label>Allow two weeks from today</label> <VueDatePicker v-model="nowToTwoWeeks" :min-date="today" :max-date="futureTwoWeeks" multi-calendars></VueDatePicker> </div> </div> </div> </div> </div> </AuthenticatedLayout></template>Store New Post with Selected Date

Script setup
const date = ref(); const save = () => { axios.post('/api/posts', { published_at: date.value })}Template
<VueDatePicker v-model="date"></VueDatePicker><button type="button" @click="save" class="bg-gray-500 text-white px-3 py-2 rounded">Save new post</button>Load Data and Update Post's published_at column

Script setup
const post = reactive({ id: null, published_at: null}); const getPost = (id) => { axios.get(`/api/posts/${ id }`) .then(response => { post.id = response.data.id post.published_at = response.data.published_at })} onMounted(() => getPost(1)) const update = () => { axios.put(`/api/posts/${ post.id }`, post)}Template
<VueDatePicker v-model="post.published_at"></VueDatePicker><button type="button" @click="update" class="bg-gray-500 text-white px-3 py-2 rounded">Update currently loaded post</button>Select Range

Script setup
const range = ref();Template
<VueDatePicker v-model="range" range multi-calendars></VueDatePicker>Custom Date Format

Script setup
const formattedDate = ref();const format = (date) => { const day = date.getDate(); const month = date.getMonth() + 1; const year = date.getFullYear(); return `Selected date is ${day}/${month}/${year}`;}Template
<VueDatePicker v-model="formattedDate" :format="format"></VueDatePicker>Select Only Specified Range

Script setup
const nowToTwoWeeks = ref();const today = new Date();const futureTwoWeeks = new Date(today)futureTwoWeeks.setDate(futureTwoWeeks.getDate() + 14)Template
<VueDatePicker v-model="nowToTwoWeeks" :min-date="today" :max-date="futureTwoWeeks" multi-calendars></VueDatePicker>
No comments yet…