
Notice: this article is from 2017, we have newer article on this topic!
Multiple File Upload with Dropzone.js and Laravel MediaLibrary Package
File upload is one of the most commonly used features in web-projects. And it seems pretty easy - form, submit, validation, store. But it gets a little more complex if you want to allow your users to upload more than one file with one input - let's see how it's done in Laravel.
1. Preparing the database
Let's have a simple and probably the most often example - product and its photos. To simplify let's take only necessary field - product will have a title and N photos. So we create models with migrations - with these commands:
php artisan make:model Product -m
php artisan make:model ProductsPhoto -m
Notice: this -m parameter means that migration should be automatically created with the model - more about it here.
File app/Product.php:
namespace App;

use Illuminate\Database\Eloquent\Model;

class Product extends Model
{
    protected $fillable = ['name'];
}
Migration of products table:
use Illuminate\Database\Schema\Blueprint;
use Illuminate\Database\Migrations\Migration;

class CreateProductsTable extends Migration
{
    public function up()
    {
        Schema::create('products', function (Blueprint $table) {
            $table->increments('id');
            $table->string('name');
            $table->timestamps();
        });
    }

    public function down()
    {
        Schema::drop('products');
    }
}
Now, a little more complicated thing - for products_photos table we have a model app/ProductsPhoto.php with a relationship method:
namespace App;

use Illuminate\Database\Eloquent\Model;

class ProductsPhoto extends Model
{
    protected $fillable = ['product_id', 'filename'];

    public function product()
    {
        return $this->belongsTo('App\Product');
    }
}
And, finally, migration for products_photos table:
use Illuminate\Database\Schema\Blueprint;
use Illuminate\Database\Migrations\Migration;

class CreateProductsPhotosTable extends Migration
{
    public function up()
    {
        Schema::create('products_photos', function (Blueprint $table) {
            $table->increments('id');
            $table->integer('product_id')->unsigned();
            $table->foreign('product_id')->references('id')->on('products');
            $table->string('filename');
            $table->timestamps();
        });
    }

    public function down()
    {
        Schema::drop('products_photos');
    }
}
Go to QuickAdminPanel.com
2. Structure: Routes, Controllers and Views
We start with a default Laravel project and will create two pages - upload form and result page. Basically, we need two routes and one controller.
File routes/web.php (you can choose different URLs or method names):
Route::get('/upload', 'UploadController@uploadForm');
Route::post('/upload', 'UploadController@uploadSubmit');
Next we generate a controller - there's an artisan command for that:
php artisan make:controller UploadController
And for now we fill the methods with something like this:
namespace App\Http\Controllers;

use Illuminate\Http\Request;

class UploadController extends Controller
{

    public function uploadForm()
    {
        return view('upload_form');
    }

    public function uploadSubmit(Request $request)
    {
        // Coming soon...
    }

}
Let's load URL /upload in the browser.
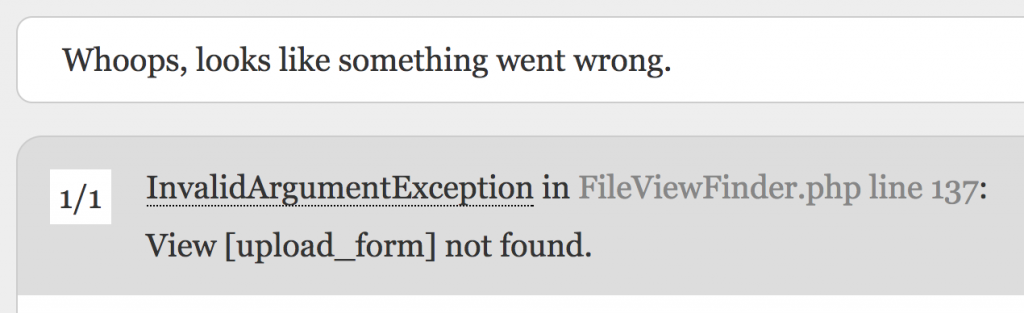
Got this error "View [upload_form] not found."? GOOD. It means two things:
- Route and Controller work ok;
- It's time to create the missing view
3. View with Upload Form
For our form let's use default HTML tags without any Form packages - our form will look like this:
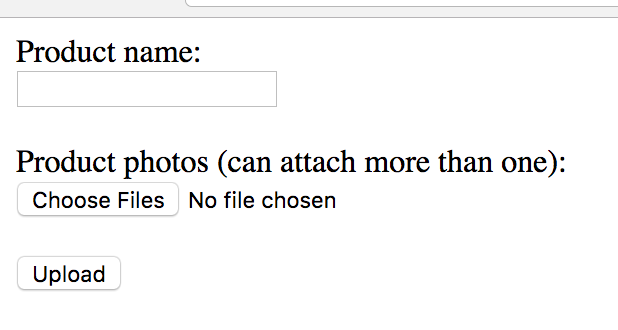
<form action="/upload" enctype="multipart/form-data" method="post">
{{ csrf_field() }}
Product name: <br>
<input name="name" type="text">
<br><br>
Product photos (can attach more than one): <br>
<input multiple="multiple" name="photos[]" type="file">
<br><br>
<input type="submit" value="Upload">
</form>
4. Validation Request
Now let's get back to our Controller and start filling in uploadSubmit() method. Before actually uploading the file, we probably want to validate the form data.
Let's say that we have a required product name and files are images not bigger than 2 MB. We create a request file for it:
php artisan make:request UploadRequest
And then open the file app/Http/Requests/UploadRequest.php.
class UploadRequest extends FormRequest
{

    public function authorize()
    {
        return false;
    }

    public function rules()
    {
        return [
            //
        ];
    }
}
First, we change authorize() method to return true, otherwise we would get "unauthorized action" on submit.
Now, what we're interested in is rules() method. We need to fill that array with our own rules of validation.
First, we add product name as required, so we have:
return [
    'name' => 'required'
];
Now, we need to fill the rules for photos. If we had only one field photo, it would look like this:
return [
    'name' => 'required',
    'photo' => 'image|mimes:jpeg,bmp,png|size:2000'
];
Notice: you can see all the validation rules (and add more) on this page of official documentation.
But we have more than one file, right? So we can fill in the rules() array dynamically! With a loop, something like this:
    public function rules()
    {
        $rules = [
            'name' => 'required'
        ];
        $photos = count($this->input('photos'));
        foreach(range(0, $photos) as $index) {
            $rules['photos.' . $index] = 'image|mimes:jpeg,bmp,png|max:2000';
        }

        return $rules;
    }
Next step - we need to apply this Request class to the Controller, so we change the parameter of the method. Also don't forget to include it in use on top - PhpStorm did it automatically for me.
namespace App\Http\Controllers;

use App\Http\Requests\UploadRequest;

class UploadController extends Controller
{

    public function uploadForm()
    {
        return view('upload_form');
    }

    public function uploadSubmit(UploadRequest $request)
    {
        // Coming soon...
    }

}
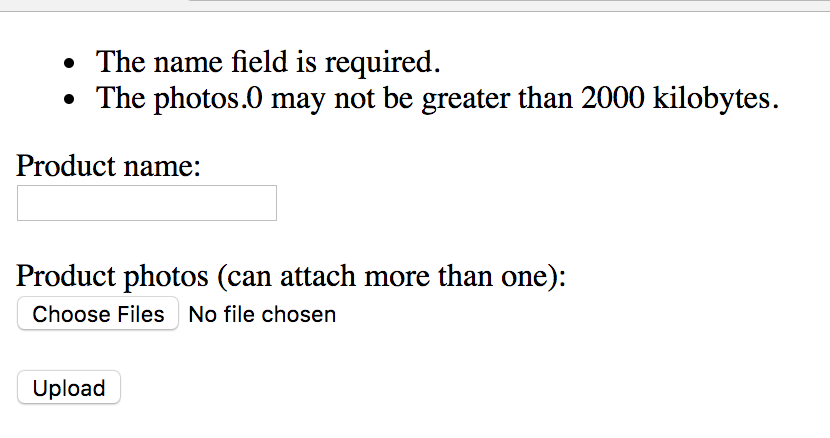
Finally, let's show the validation errors, if there are any. Almost copy-paste from the original Laravel documentation:
@if (count($errors) > 0)
<ul><li>{{ $error }}</li></ul>
@endif

<form action="/upload" enctype="multipart/form-data" method="post">...</form>
Now, if I don't enter product name and upload an image which is too big - here's what I will see:
5. Storing Data and Files
After all this hard work - let's finally upload the data. We have two things to take care of - database and file storage. Let's start with the files, and here we need to know about filesystems in Laravel.
There is a file config/filesystems.php where you specify the locations for your file storage. It allows you to easily configure external storage like Amazon S3, but we won't do it in this tutorial - we will stick with default parameters:
return [

    'default' => 'local',

    'disks' => [

        'local' => [
            'driver' => 'local',
            'root' => storage_path('app'),
        ],

    // ...
Basically, it means that all your files will be stored in /storage/app folder. Not in /public, so safely and not accessible directly from browser URL. But you can change it here, if needed.
The file upload itself is incredibly simple in Laravel. Our whole Controller method will look like this:
    public function uploadSubmit(UploadRequest $request)
    {
        $product = Product::create($request->all());
        foreach ($request->photos as $photo) {
            $filename = $photo->store('photos');
            ProductsPhoto::create([
                'product_id' => $product->id,
                'filename' => $filename
            ]);
        }
        return 'Upload successful!';
    }
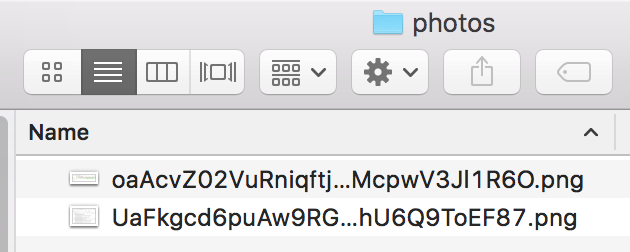
As you can see, the only method for uploading file is $photo->store('photos'). Parameter means what sub-folder to use for storage, so in this case it will be /storage/app/photos. Filename will be created dynamically to a random string. Like this:
And here's how the result looks in database:


Basically, that's it! Of course, you can go a step further and add more validation rules, image resize, thumbnails and more functions. But that's a topic for another article, I can recommend a few packages to work with images:
Finally, if you want to play around with the code listed here, I've prepared you the archive to download. Enjoy!