
In our system, we are going to have the following roles:
-
admin- Admin user, manages vendors (Restaurant owners). Admin will create Restaurants and their Owner accounts. -
vendor- Restaurant Owner can manage the restaurant menu and staff members. -
staff- Staff Member belongs to the Restaurant, is managed by Restaurant Owner, and fulfills customer orders. -
customer- The customer can place orders, and Staff Members will process the orders.
But to give them access to different features, we need to expand that into a more granular permission system.
In this project, we will not use any external packages, but you may choose to use something like spatie/laravel-permission. It's a personal preference.
Our goal is to have the following database tables:
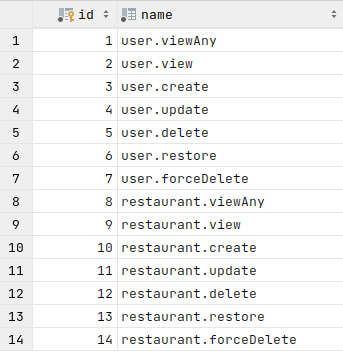
Seeded permissions table:
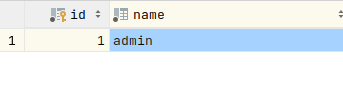
roles table with admin role to begin with:
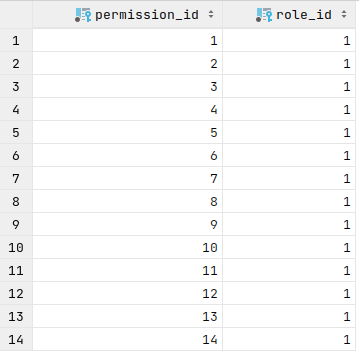
On the permission_role pivot table, all permissions are assigned to the admin role:
And user with admin role:

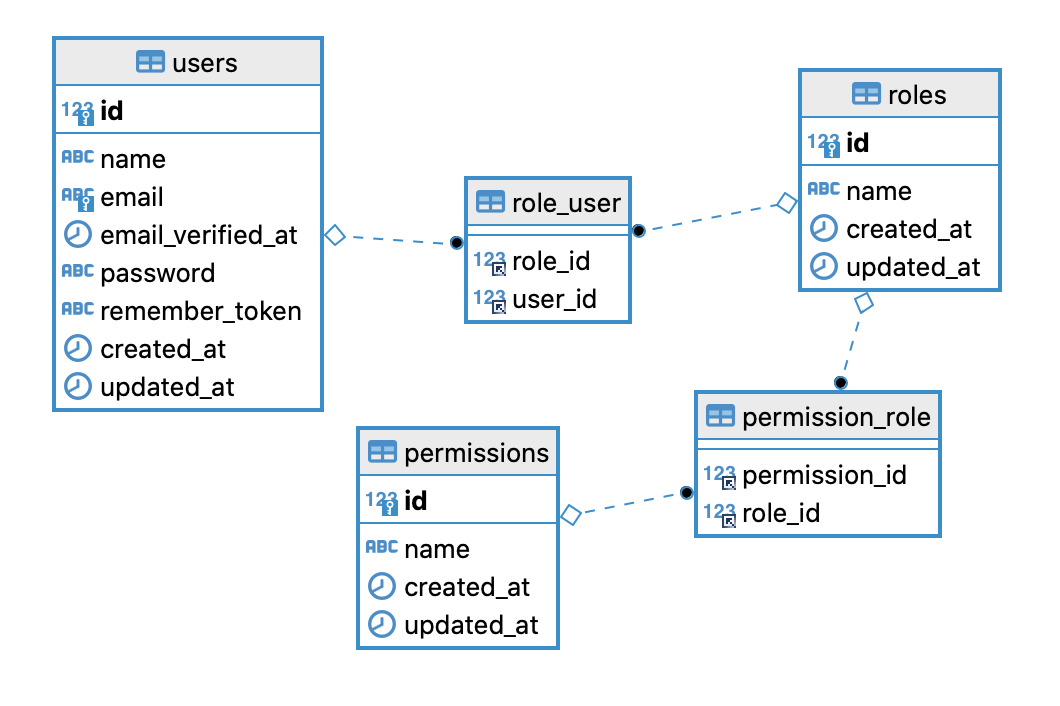
Here's the DB schema we're aiming for:
Let's implement all of that step by step.
Create Permissions Model
Let's create our first Permissions Model with the make:model Artisan command. Flags -ms instructs to create Migration and Seeder for that model.
php artisan make:model Permission -msIn migration, we add the string column name as follows:
2023_05_31_000001_create_permissions_table.php
public function up(): void{ Schema::create('permissions', function (Blueprint $table) { $table->id(); $table->string('name'); $table->timestamps(); });}Then update the PermissionSeeder with the following content:
database/seeders/PermissionSeeder.php
namespace Database\Seeders; use App\Models\Permission;use Illuminate\Database\Console\Seeds\WithoutModelEvents;use Illuminate\Database\Seeder; class PermissionSeeder extends Seeder{ public function run(): void { $actions = [ 'viewAny', 'view', 'create', 'update', 'delete', 'restore', 'forceDelete', ]; $resources = [ 'user', 'restaurant', ]; collect($resources) ->crossJoin($actions) ->map(function ($set) { return implode('.', $set); })->each(function ($permission) { Permission::create(['name' => $permission]); }); }}Here we do not specify each permission. Instead, we create permissions dynamically.
-
$actionsarray defines what actions the user will be able to perform on a resource. -
$resourcesarray defines whom we will perform those actions. In our case, it is just a definition of the model.
We use the crossJoin Collection method to match every action with every resource. The result of such action gives the following output:
[ ['user', 'viewAny'], ['user', 'view'], ['user', 'create'], // etc... ['restaurant', 'forceDelete']]As we can see, it produces a set of each value. Later we map them using the implode() method into strings like user.viewAny, user.View and create permission names based on that.
Create Roles Model
Our permissions will be assigned to roles. Let's create the Role model using the Artisan command:
php artisan make:model Role -msRoles can have multiple permissions, and a single permission can belong to various roles, so we need the permission_role pivot table. Run the Artisan command to create that:
php artisan make:migration create_permission_role_tableAnd the same reasoning applies to the role_user pivot table with another Artisan command:
php artisan make:migration create_role_user_tableThe role will contain only the name column in its table. Let's update the Migration:
database/migrations/2023_05_31_000002_create_roles_table.php
public function up(): void{ Schema::create('roles', function (Blueprint $table) { $table->id(); $table->string('name'); $table->timestamps(); });}Then update the permission_role pivot table Migration as follows:
database/migrations/2023_05_31_000003_create_permission_role_table.php
use App\Models\Permission;use App\Models\Role; // ... public function up(): void{ Schema::create('permission_role', function (Blueprint $table) { $table->foreignIdFor(Permission::class)->constrained(); $table->foreignIdFor(Role::class)->constrained(); });}The foreignIdFor() method will create keys permission_id and role_id by automatically resolving the class names we provide as an argument.
Alternatively, you could write ->foreignId('permission_id'), it's a personal preference.
In the same fashion, we update the role_user pivot table migration:
2023_05_31_000004_create_role_user_table
use App\Models\Role;use App\Models\User; // ... public function up(): void{ Schema::create('role_user', function (Blueprint $table) { $table->foreignIdFor(Role::class)->constrained(); $table->foreignIdFor(User::class)->constrained(); });}Then update the Role Model by adding permissions() and users() relationships as follows:
app/Models/Role.php
use Illuminate\Database\Eloquent\Relations\BelongsToMany; // ... public function permissions(): BelongsToMany{ return $this->belongsToMany(Permission::class);} public function users(): BelongsToMany{ return $this->belongsToMany(User::class);}Now let's define Role names using backed enums. They are convenient to reference the roles elsewhere in the code by their names and not IDs. Also, if you later change role names so you can do it in one place instead, and no other references need to be changed.
Create new RoleName enum as follows:
app/Enums/RoleName.php
namespace App\Enums; enum RoleName: string{ case ADMIN = 'admin'; case VENDOR = 'vendor'; case STAFF = 'staff'; case CUSTOMER = 'customer';}Finally, we can update RoleSeeder with the following content:
database/seeders/RoleSeeder.php
namespace Database\Seeders; use App\Enums\RoleName;use App\Models\Permission;use App\Models\Role;use Illuminate\Database\Console\Seeds\WithoutModelEvents;use Illuminate\Database\Seeder;use Illuminate\Support\Collection; class RoleSeeder extends Seeder{ /** * Run the database seeds. */ public function run(): void { $this->createAdminRole(); } protected function createRole(RoleName $role, Collection $permissions): void { $newRole = Role::create(['name' => $role->value]); $newRole->permissions()->sync($permissions); } protected function createAdminRole(): void { $permissions = Permission::query() ->where('name', 'like', 'user.%') ->orWhere('name', 'like', 'restaurant.%') ->pluck('id'); $this->createRole(RoleName::ADMIN, $permissions); }}This may look like an overengineering at first glance, but I already envision we will seed more roles in the future, so to avoid repeating the code, I extracted some of it into smaller methods.
At this point, we seed only the Admin role.
The createRole() method accepts two arguments, the enum RoleName we defined before (see, it already paid off to use the enum!) and a Collection of permissions.
The createAdminRole() method queries for all permissions that begin with user. OR restaurant. and passes them along the RoleName to the createRole() method. We allow the admin user to perform all available actions on models.
Add Roles To User
Now, let's add the relationships to the User model. I also created a few helper methods we would use later in the course.
app/Models/User.php
use App\Enums\RoleName;use App\Models\Role;use Illuminate\Database\Eloquent\Relations\BelongsToMany; class User extends Authenticatable{ // ... public function roles(): BelongsToMany { return $this->belongsToMany(Role::class); } public function isAdmin(): bool { return $this->hasRole(RoleName::ADMIN); } public function isVendor(): bool { return $this->hasRole(RoleName::VENDOR); } public function isStaff() { return $this->hasRole(RoleName::STAFF); } public function isCustomer() { return $this->hasRole(RoleName::CUSTOMER); } public function hasRole(RoleName $role): bool { return $this->roles()->where('name', $role->value)->exists(); } public function permissions(): array { return $this->roles()->with('permissions')->get() ->map(function ($role) { return $role->permissions->pluck('name'); })->flatten()->values()->unique()->toArray(); } public function hasPermission(string $permission): bool { return in_array($permission, $this->permissions(), true); } }Add Admin User
To seed our first admin user, let's create a UserSeeder with the following Artisan command:
php artisan make:seed UserSeederAnd update its contents as follows:
database/seeders/UserSeeder.php
namespace Database\Seeders; use App\Enums\RoleName;use App\Models\Role;use App\Models\User;use Illuminate\Database\Console\Seeds\WithoutModelEvents;use Illuminate\Database\Seeder; class UserSeeder extends Seeder{ /** * Run the database seeds. */ public function run(): void { $this->createAdminUser(); } public function createAdminUser() { User::create([ 'name' => 'Admin User', 'password' => bcrypt('password'), ])->roles()->sync(Role::where('name', RoleName::ADMIN->value)->first()); }}As we did with roles, by following the same logic, the admin user is created with a different method, and the role is synchronized via the sync() method by the enum RoleName::ADMIN.
Seed Database
Now it is time to update run() method of DatabaseSeeder as follows:
database/seeders/DatabaseSeeder.php
public function run(): void{ $this->call([ PermissionSeeder::class, RoleSeeder::class, UserSeeder::class, ]);}Finally, we can seed the database with all the requirements using the migrate --seed Artisan command:
php artisan migrate --seedNow if you did everything correctly, all the entries in the database should be populated.
Here's our DB schema for users/roles/permissions:
Register Auth Gates
To fully utilize Laravel's authorization capabilities, we will register our permissions as Gates.
For example, if we want to check if the user is allowed to restaurant.viewAny, then in Controller, we could check it like this:
$this->authorize('restaurant.viewAny');Typically, gates are defined within the boot method of the App\Providers\AuthServiceProvider class using the Gate facade. Gates always receive a user instance as their first argument and may optionally receive additional arguments such as a relevant Eloquent model.
app/Providers/AuthServiceProvider.php
use App\Models\Permission;use Illuminate\Support\Facades\Gate; class AuthServiceProvider extends ServiceProvider{ //... public function boot(): void { $this->registerGates(); } protected function registerGates(): void { try { foreach (Permission::pluck('name') as $permission) { Gate::define($permission, function ($user) use ($permission) { return $user->hasPermission($permission); }); } } catch (\Exception $e) { info('registerPermissions(): Database not found or not yet migrated. Ignoring user permissions while booting app.'); } }}The closure provided to the Gate definition should always return a boolean that tells if the user can perform a given action.
Our hasPermission() method from the User model will return a true or false whether the user has the following permission.
It may sound complicated for now, but we will return to that when actually using those permissions in other parts of our application. For now, the groundwork for roles/permissions is done.
What about to define
Gate::beforeinstead of attaching all permissions to admin user.app/Providers/AuthServiceProvider.php
you can do that. then you would have to add additional is_admin column to the database and write more logic for this.
however the point is that admin is part of the permission system, not the some exception along permissions.
Ok if
adminrole is something that can't do everything, then i get it.But imagine creating one speical role that can do everything, something like
super-admin. Then we can define:No additional column is needed as we can use the
roletable.Yes you can do that if you want. I'm not telling you cannot create a special role for that if you have a need.
if the project is small it is fine i think. although there might be cases where even "super-admin" should not have access to everything, for example some data that users can manage themselves like patient data.
if project is bigger your approach might fall behind because everyone developing system should know additional information "all roles are normal, BUT NOT THIS ONE". this applies not only for 'super-admin' but for "exceptional models" in general.
there's no good or bad on this take i guess, but it is important to understand the differences.