
Filament comes with native Broadcasting via Echo, but by default, it recommends Pusher. What if you want to use the new Laravel Reverb? Let's see how to do it.

Step 1: Get Your Filament Project Ready
First, we will assume that you already have a Filament project. It doesn't have to be anything special. It can even be an empty project like this:
![]()
Step 2: Install Reverb
To install Reverb, you need to run the following command:
php artisan install:broadcastingThis will install all required files and dependencies. We can confirm this by looking at our .env file:
# ... REVERB_APP_ID=872729REVERB_APP_KEY=xvka9nt9izfvfitrneewREVERB_APP_SECRET=svpfxlkv7uvhxkpqwbpdREVERB_HOST="localhost"REVERB_PORT=8080REVERB_SCHEME=httpStep 3: Publish Filament Broadcasting Configuration
Next, we have to publish the Filament configuration file to make it work with Reverb. To do this, run the following command:
php artisan vendor:publish --tag=filament-configThis will create a new file, config/filament.php. Open it and change the broadcasting section to look like this:
// ... 'echo' => [ 'broadcaster' => 'reverb', 'key' => env('VITE_REVERB_APP_KEY'), 'cluster' => env('VITE_REVERB_APP_CLUSTER'), 'wsHost' => env('VITE_REVERB_HOST'), 'wsPort' => env('VITE_REVERB_PORT'), 'wssPort' => env('VITE_REVERB_PORT'), 'authEndpoint' => '/broadcasting/auth', 'disableStats' => true, 'encrypted' => true, 'forceTLS' => false,], // ...Now, what is this? Well, if we look at a deep-dived source code - Filament takes this echo array and passes it to Laravel Echo:
vendor/filament/filament/resources/views/components/layout/base.blade.php
{{-- ... --}} @if (config('filament.broadcasting.echo')) <script data-navigate-once> window.Echo = new window.EchoFactory(@js(config('filament.broadcasting.echo'))) window.dispatchEvent(new CustomEvent('EchoLoaded')) </script>@endif {{-- ... --}}Step 4: Test It
Now, we can test if everything works. Open your page in the browser and look at the Inspector. You should see:

This is because we still need to start the Reverb server. To do this, run the following command:
php artisan reverb:startNow refresh the page, and you should not see any errors. If you don't - congratulations! You have successfully set up Reverb with Filament. From here, you can send out events as usual and react to them in JavaScript like this:
<script> window.addEventListener('DOMContentLoaded', function () { window.Echo.private('App.Models.User.1') .listen('SendDeploymentMessageEvent', (event) => { // Do something with the event }); });</script>Of course, if you want to do something more complex - here are some resources:
- Livewire Broadcasting Documentation - Livewire allows you to add Listeners from the Echo server
- Laravel Reverb: Four "Live" Practical Examples - Our course with a set of Reverb examples
Happy Broadcasting!
Bonus: Check Browser WebSocket Connection
As a bonus, we want to show you how to check if your browser is connected to the WebSocket server. Here are the steps:
- In the Inspector, visit the
Networktab - Find
WSfilter - Click on the name of the WebSocket connection
- Go to the
Messagestab
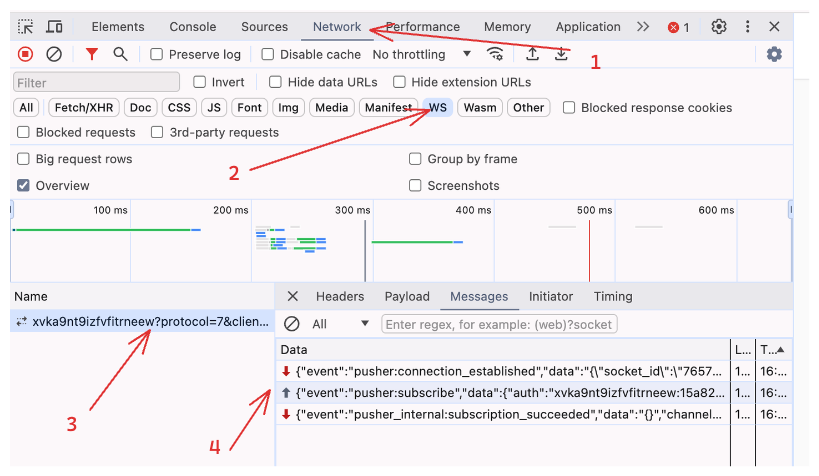
That's it! You will now see all events coming in or out of your browser.
Thanks for the guide!
The instructions here only seems to work if I use
php artisan serve.When using Herd, I get:
I Googled a bit but it seems like a rabbithole. I'll update this post if I get it right.
Edit 1: After many hours of troubleshooting I finally got it working with Herd.
.env:Relevant part of the Laravel manual that held the clue: https://laravel.com/docs/11.x/reverb#ssl
Actual command that helped me:
Ironically now I can't get it working on Forge but I'm moving closer to working out where the mismatches are. The be honest, the ideal situation would be a script to compare
config/filament.phpwith theenvand maybe the local directory to see where one could be going wrong. It's great when it works first time but once you get the dreadedWebSocket is closedmessage things become difficult.Would love to hear if/how you figured out the Forge piece.
Had the same problem. "failed: WebSocket is closed before the connection is established", any ideas?