
Filament allows you to enable the registration form quickly, but how do you add something extra? In this tutorial, we will see how to assign a role to a user after registration, both automatically and selected from the form.
DB Schema
For this example, we will just have a string field role in the User table.
database/migrations/xxx_add_role_to_users_table.php:
public function up(): void{ Schema::table('users', function (Blueprint $table) { $table->string('role')->nullable()->after('password'); });}app/Models/User.php:
class User extends Authenticatable implements FilamentUser{ use HasApiTokens, HasFactory, Notifiable; protected $fillable = [ 'name', 'email', 'password', 'role', ]; // ...}Method 1: Auto-Assign Role in Eloquent
If you need to assign a static role to every registered user, you can use it without customizing anything in Filament. We can use Eloquent Events and assign a role when a user is being created.
app/Models/User.php:
class User extends Authenticatable implements FilamentUser{ // ... protected static function booted(): void { static::creating(function (User $user) { $user->role = 'user'; }); } // ...}And that's it. After registering, the user will be assigned a user role.

Method 2: Allowing User to Select Role
Your application might need to allow users to select a role when registering. Let's see how to do it.
For this method, we will overwrite the original Register class of Filament. First, we need to create a Custom Page and use it for registration.
php artisan make:filament-page Auth/Registerapp/Filament/Pages/Auth/Register.php:
use Filament\Pages\Auth\Register as BaseRegister; class Register extends Page class Register extends BaseRegister { protected static ?string $navigationIcon = 'heroicon-o-document-text'; protected static string $view = 'filament.pages.auth-register'; }app/Providers/Filament/AdminPanelProvider.php:
use App\Filament\Pages\Auth\Register; class AdminPanelProvider extends PanelProvider{ public function panel(Panel $panel): Panel { return $panel ->default() ->id('admin') ->path('admin') ->login() ->registration(Register::class) // ... }}As you can see, we specified our own Register class instead of the default Filament one.
In our Register class, we need to copy-paste the getForms() method from the Filament class and add our own custom logic. In this case, we must create a new form field and add it to the getForms() method.
app/Filament/Pages/Auth/Register.php:
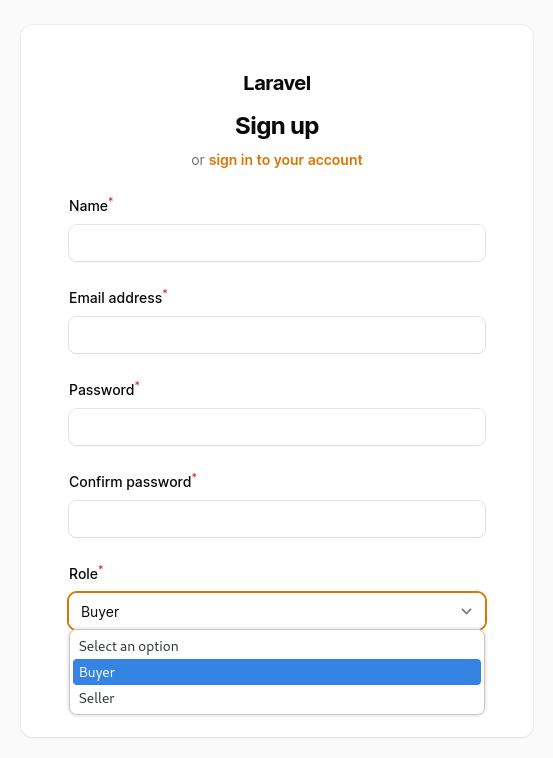
use Filament\Forms\Components\Select;use Filament\Forms\Components\Component; class Register extends BaseRegister{ protected function getForms(): array { return [ 'form' => $this->form( $this->makeForm() ->schema([ $this->getNameFormComponent(), $this->getEmailFormComponent(), $this->getPasswordFormComponent(), $this->getPasswordConfirmationFormComponent(), $this->getRoleFormComponent(), ]) ->statePath('data'), ), ]; } protected function getRoleFormComponent(): Component { return Select::make('role') ->options([ 'buyer' => 'Buyer', 'seller' => 'Seller', ]) ->default('buyer') ->required(); }}And that's it. Filament will take care of saving the data.
After registering, we see that the role is assigned to the selected one.

The code repository for this project is available here on GitHub.
If you want more Filament examples, you can find more real-life projects on our FilamentExamples.com.
Povilas, Thanks for sharing! 😃
While we're on the subject: do you have any examples of 2FA for Filament with SMS or Whatsapp? Some time ago you showed us this in a traditional Laravel application, using NEXMO.
Same contept with filament
Released this video recently: Filament Login with Phone: SMS One-Time Password
Hello Povilas. Thanks for this article. I am following the article to test custom Registration for my project. and the changes are not reflected to me. i am testing this on 16th Sep 2023.
when i change protected function getForms(): array to
public function form(Form $form): Form
working fine.
I don't understand what you change. Is it from
getForms()toform()? Then why?Thanks for the tutorial, it's almost exactly what I was looking for. Any suggestions on how to do this with a relationship? Or more specifically, how to attach the new user to an option they select that's part of a relationship.
Modify the creation of user
Hey there, I did a custom register component to add a plan selection, made the relationship between users and plans and this is how it looks my register class
however, I'm getting an error Call to a member function isRelation() on null https://flareapp.io/share/x7XZpMAm
I would guess something is wrong with your relation or how you use it. Try removing first
nativeanddefaultmaybe. Without more debugging cannot tell the reason.Strange. Followed the steps but it seems the method form or getForms are just not called. Registered in the AdminPanelProvider with ->registration(Register::class) but it's not used.
It was cache. Solved with php artisan view:clear and php artisan route:clear
For those trying out Filament 4 beta,
getFormsis now simplyformand looks like this for the example: