If you want your user to reserve an item for X minutes before confirming the purchase, this tutorial will show you how to do it, with a project of timeslot booking and reservation timer, built with TALL stack - Livewire and Alpine.
Why Reserve For 15 Minutes?
It's a typical behavior in ticket booking systems, or anywhere where the supply of items is strictly limited. You wouldn't want to sell 100 plane tickets when a plane seats only 30 people, would you?
We have two typical scenarios here:
Scenario one - User A buys the product:
- User A adds a product to their cart
- User B sees that the product is no longer available
- User A buys the product within 15 minutes
- User B was never shown the product
Scenario two - User A abandons the page:
- User A adds a product to their cart
- User B sees that the product is no longer available
- User A waits 15 minutes and doesn't buy the product
- User B can now buy the product
- User B buys the product
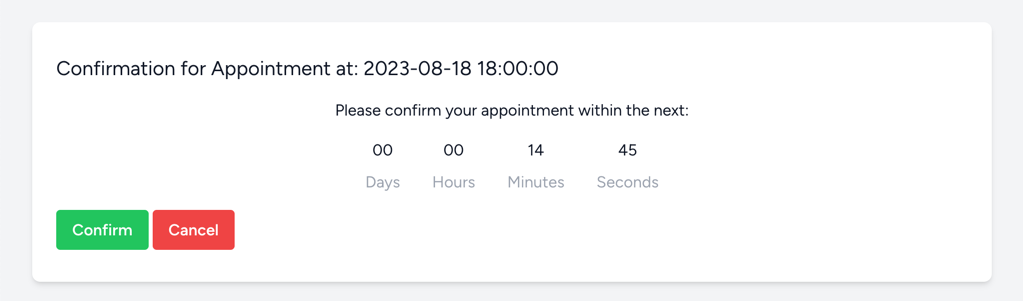
We will implement exactly that: a one-page checkout solution with Livewire and Alpine, including 15:00 countdown timer and automatic Laravel command freeing up the item after those 15 minutes are over without the purchase.
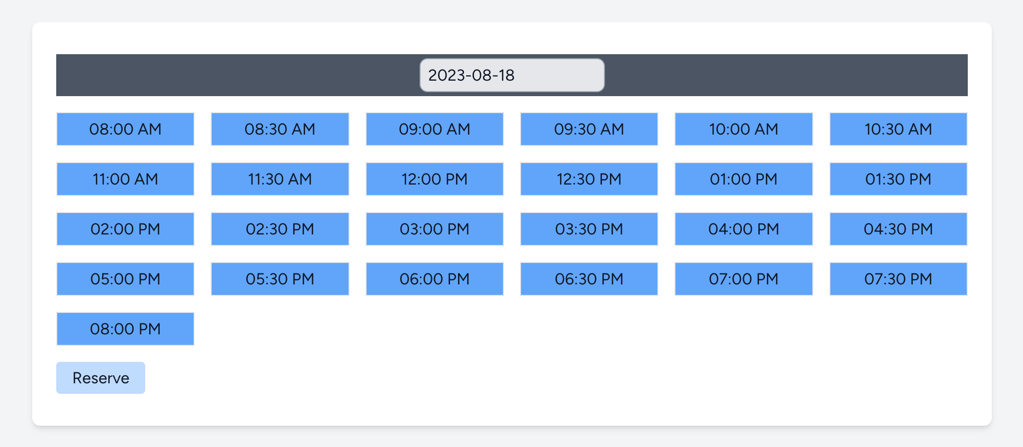
In our case, it will be an appointment system with timeslots: the timeslots will be reserved for 15 minutes and then become available again for other users, in case the current user doesn't confirm the reservation.
This tutorial will be a step-by-step one, explaining the Livewire component for picking the dates along the way.
Database Structure - Basic Setup
Our implementation of the reservation system will be based on the following database structure:
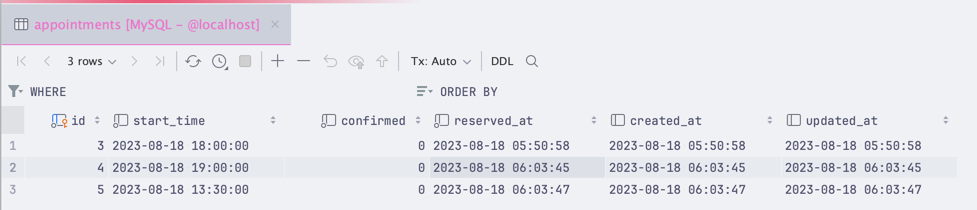
Key fields from the database are:
-
confirmed- A boolean field indicating the reservation has confirmation. This field is set totruewhen the user completes the checkout process. -
reserved_at- A datetime field that indicates when the reservation was created. This field is set to the current datetime when the user adds a product to their cart.
Any other field can be added based on the application requirements. We didn't want to focus on them in this tutorial.
Project Setup
For this tutorial, we will be using Livewire 3.0 with Laravel Breeze. You can install it by following the guide if you haven't already.
- https://laravel.com/docs/10.x/starter-kits#laravel-breeze-installation
- https://livewire.laravel.com/docs/quickstart#install-livewire
Creating an Appointment Reservation System
Let's start by creating a Livewire component that will be used to make a reservation, showing available timeslots for certain dates. We'll call it DateTimeAvailability:
php artisan make:livewire DateTimeAvailabilityNext, for our tutorial, we will load the component in the dashboard.blade.php file:
resources/views/dashboard.blade.php
<x-app-layout> <x-slot name="header"> <h2 class="font-semibold text-xl text-gray-800 leading-tight"> {{ __('Date time availability') }} </h2> </x-slot> <div class="py-12"> <div class="max-w-7xl mx-auto sm:px-6 lg:px-8"> <div class="font-sans text-gray-900 antialiased"> <div class="w-full sm:max-w-5xl mt-6 mb-6 px-6 py-8 bg-white shadow-md overflow-hidden sm:rounded-lg"> <livewire:date-time-availability></livewire:date-time-availability> </div> </div> </div> </div></x-app-layout>Before we dive into our Livewire component - we need to prepare our Layout to accept stackable Scripts:
resources/views/layouts/app.blade.php
<!DOCTYPE html><html lang="{{ str_replace('_', '-', app()->getLocale()) }}"><head> {{-- ... --}}</head><body class="font-sans antialiased"> {{-- ... --}} @stack('scripts')</body></html>Now that this is done, we can customize our Livewire...
-front_grid.jpg)

;-(5)-front_grid.jpg)
;-(19)-front_grid.jpg)