
IMPORTANT: this course is for older Laravel 11, released in 2024. We have a new VIDEO course for the LATEST version: Laravel 12 for Beginners: Your First Project.
Let's work on the validation of the form. If you don't fill out the form, you will receive an error from the database.
![]()
You could add required in the HTML form, and it would work. But this value can be easily removed using the browser developer tool, or the user could send the request not directly from the browser.
It could be a mobile application with API or someone maliciously trying to launch the request. So, we need the backend validation.
There are a few ways how to add backend validation. First, each field must have a set of validation rules. These rules can be placed in the Controller itself or in a separate Form Request class.
First, let's see how we can do it in the Controller. We must validate the Request, so we need to call the validate() method and provide fields with rules in an array.
app/Http/Controllers/PostController.php:
class PostController extends Controller{ // ... public function store(Request $request) { $request->validate([ 'title' => ['required'], 'text' => ['required'], 'category_id' => ['required'], ]); Post::create([ 'title' => $request->input('title'), 'text' => $request->input('text'), 'category_id' => $request->input('category_id'), ]); return redirect()->route('posts.index'); } // ...}Now, you will be redirected back if you try to submit an empty form. If validation fails, Laravel redirects back with error messages in the session.
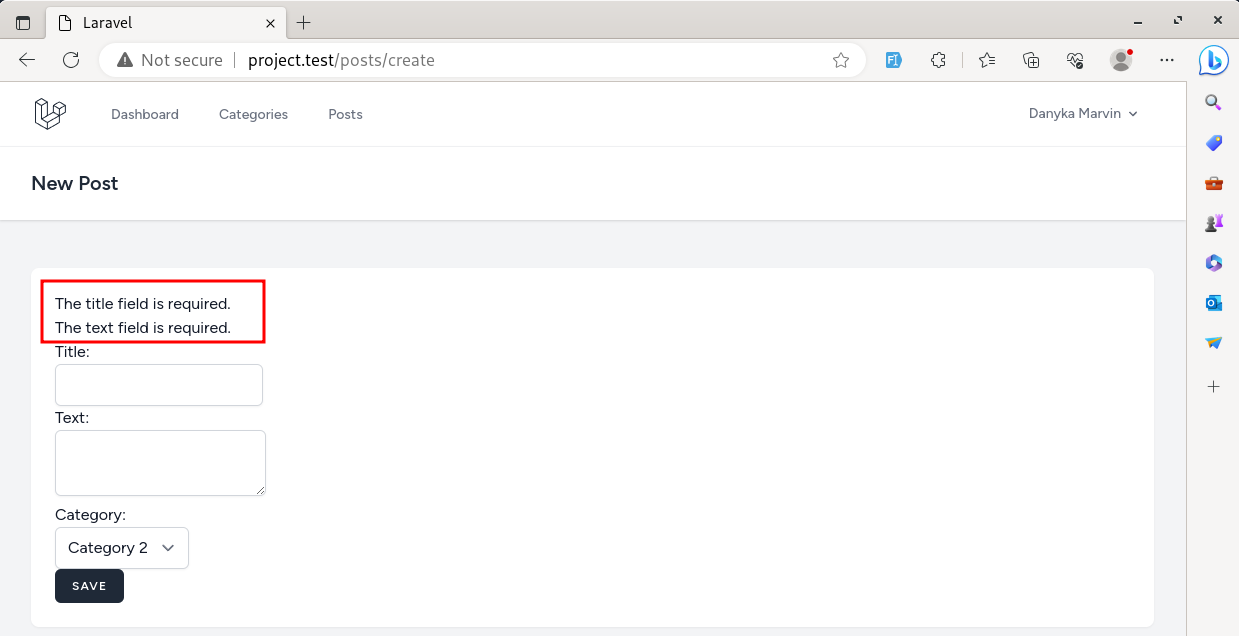
Let's show those validation errors. To show errors, we will use a snippet from the official documentation.
@if ($errors->any()) <div class="alert alert-danger"> <ul> @foreach ($errors->all() as $error) <li>{{ $error }}</li> @endforeach </ul> </div>@endifThe $errors variable is passed automatically to the Views. In the View where we have form, for example, in the create page, we can add this snippet before form.
resources/views/posts/create.blade.php:
// ...<div class="p-6 text-gray-900"> @if ($errors->any()) <div class="alert alert-danger"> <ul> @foreach ($errors->all() as $error) <li>{{ $error }}</li> @endforeach </ul> </div> @endif <form method="POST" action="{{ route('posts.store') }}"> // ...After posting an empty form, we can see validation error messages.
Next, I would like to show you how to make your Controllers shorter. For that, Laravel has a concept of Form Request class. Form Requests can also be created using an artisan command.
php artisan make:request StorePostRequest
Then, we replace the Request type in the Controllers method. And move all the fields into the StorePostRequest class rules() method.
app/Http/Controllers/PostController.php:
use App\Http\Requests\StorePostRequest; class PostController extends Controller{ // ... public function store(Request $request) public function store(StorePostRequest $request) { $request->validate([ 'title' => ['required'], 'text' => ['required'], 'category_id' => ['required'], ]); Post::create([ 'title' => $request->input('title'), 'text' => $request->input('text'), 'category_id' => $request->input('category_id'), ]); return redirect()->route('posts.index'); } // ...}The authorize() method means if the user is authorized for the request. It can be set as true, but could contain more checks like the user's role.
app/Http/Requests/StorePostRequest.php:
use Illuminate\Foundation\Http\FormRequest; class StorePostRequest extends FormRequest{ public function authorize(): bool { return false; return true; } public function rules(): array { return [ 'title' => ['required'], 'text' => ['required'], 'category_id' => ['required'], ]; }}Also, the returned result is validated data as an array when using Form Request. This array can be used when creating or updating records using the Request's validated() method.
app/Http/Controllers/PostController.php:
class PostController extends Controller{ // ... public function store(StorePostRequest $request) { $request->validate([ 'title' => ['required'], 'text' => ['required'], 'category_id' => ['required'], ]); Post::create([ 'title' => $request->input('title'), 'text' => $request->input('text'), 'category_id' => $request->input('category_id'), ]); Post::create($request->validated()); return redirect()->route('posts.index'); } // ...}Now, the create form works as expected. Validating data or creating the record is achieved with just two lines in the Controller.
Small addition. Repopulate form with old values after failed validation so you don't have to fill out all fields again if one field fails. Repopulate Form
Good addition