
This will be a step-by-step tutorial how to implement "Login with Google" in your Laravel projects. We will take Laravel Breeze as a starter kit. Let's go!
Step 1. Preparation: Fresh Project
We will start with a fresh project, including Breeze:
laravel new google-login --breeze --stack="blade" --dark --pest --gitThis will create a fresh Laravel application with:
- Breeze with Blade stack
- Dark mode support
- Pest for testing
- Empty GIT repository with separate commits for Laravel and Breeze
Step 2. Change Users Table
Next, we have to create a new migration.
php artisan make:migration add_social_fields_to_users_tableAnd modify the migration:
Schema::table('users', function (Blueprint $table) { $table->string('provider_name')->nullable()->after('id'); $table->string('provider_id')->nullable()->after('provider_name'); $table->string('password')->nullable()->change(); $table->string('avatar')->nullable();});This will add a few fields and modify one:
-
provider_name- we will store the social login provider. In our case,google, but you might have more than one! -
provider_id- this will store the provider ID. -
password- we will make itnullableas social logins don't use passwords! -
avatar- this will be retrieved via social login so we can fill it for a better experience.
But here's a thing - none of these fields need to be added to $fillable as we will not use User::create(). In fact, they should be added to $hidden:
app/Models/User.php
protected $hidden = [ 'password', 'remember_token', 'provider_name', 'provider_id', 'password', 'remember_token',];This will prevent us from accidentally leaking very sensitive information if we ever do $user->toArray() or return a JSON response.
Step 3. Install/Configure Laravel Socialite
Install the package by running the following:
composer require laravel/socialiteNext, we add supported drivers:
config/auth.php
// ... 'socialite' => [ 'drivers' => [ 'google', ],], // ...And, of course, Socialite requires API keys, so let's add them, too:
config/services.php
// ... 'google' => [ 'client_id' => env('GOOGLE_CLIENT_ID'), 'client_secret' => env('GOOGLE_CLIENT_SECRET'), 'redirect' => env('GOOGLE_REDIRECT'),], // ...Don't forget to fill the .env file:
.env
// ... GOOGLE_CLIENT_ID=XXXXXXXXXXXXXXXXXXXXXXXXXXXXXXXXXXXXXXXXXXXXX.apps.googleusercontent.comGOOGLE_CLIENT_SECRET=XXXXXXXXXXXXXXXXXXXXXXXXGOOGLE_REDIRECT="${APP_URL}/google/callback"Note: The ${APP_URL} allows us to take APP_URL env key and use it in another key. Saves us from typing the domain again.
Step 4. Adding a Button with a Redirect
Now, let's add the buttons to log in. What we need:
- Controller method to redirect to Google
- Route to match with that Controller method
- Buttons to point to that Route
Here's what our Controller will look like:
app/Http/Controllers/SocialLoginController.php
use App\Models\User;use Exception;use Illuminate\Http\RedirectResponse;use Laravel\Socialite\Facades\Socialite; class SocialLoginController extends Controller{ public function redirectToProvider(string $provider) { if (!in_array($provider, config('auth.socialite.drivers'), true)) { abort(404, 'Social Provider is not supported'); } return Socialite::driver($provider)->redirect(); }}Then we can register it in our routes file:
routes/auth.php
use App\Http\Controllers\SocialLoginController; // ... Route::middleware('guest')->group(function () { // ... Route::post('login', [AuthenticatedSessionController::class, 'store']); Route::get('redirect/{provider}', [SocialLoginController::class, 'redirectToProvider']) ->name('social.login') ->where('driver', implode('|', config('auth.socialite.drivers'))); // ...}); // ...Now that we have our Route and Controller in place - let's add the button:
resources/views/auth/login.blade.php
{{-- ... --}} <x-primary-button-link class="mr-2 ml-2" :href="route('social.login', 'google')"> {{ __('Google Sign In') }}</x-primary-button-link> <x-primary-button> {{ __('Log in') }}</x-primary-button> {{-- ... --}}And:
resources/views/auth/register.blade.php
{{-- ... --}} <x-primary-button-link class="mr-2 ml-2" :href="route('social.login', 'google')"> {{ __('Google Sign In') }}</x-primary-button-link><x-primary-button> {{ __('Register') }}</x-primary-button> {{-- ... --}}Note: Don't forget to run npm run build as we have included some new styling.
If we try to load the page, it will cause an error as primary-button-link component doesn't exist. Let's add it:
resources/views/components/primary-button-link.blade.php
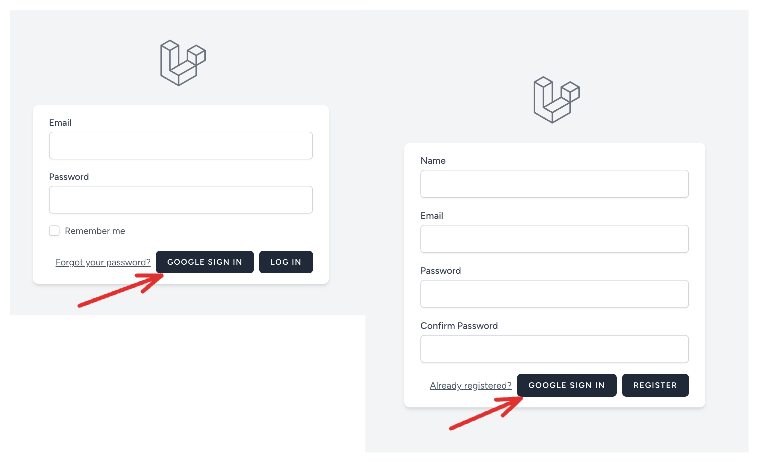
<a {{ $attributes->merge(['class' => 'inline-flex items-center px-4 py-2 bg-gray-800 dark:bg-gray-200 border border-transparent rounded-md font-semibold text-xs text-white dark:text-gray-800 uppercase tracking-widest hover:bg-gray-700 dark:hover:bg-white focus:bg-gray-700 dark:focus:bg-white active:bg-gray-900 dark:active:bg-gray-300 focus:outline-none focus:ring-2 focus:ring-indigo-500 focus:ring-offset-2 dark:focus:ring-offset-gray-800 transition ease-in-out duration-150']) }}> {{ $slot }}</a>Now we can load the login/register pages and see our button:
Step 5. Handling Socialite Callback - Creating the User
If you click that Google Sign in button and grant permission to your Google account as a user, Google will redirect you to a so-called callback URL (remember, we provided it in .env in Step 3 above). Now, it's time to actually implement it.
In this step, we create a new user with their Google credentials. We need a Controller method and a Route line here.
app/Http/Controllers/SocialLoginController.php
use App\Models\User;use Exception;use Illuminate\Http\RedirectResponse;use Laravel\Socialite\Facades\Socialite; class SocialLoginController extends Controller{ // ... public function handleProviderCallback(string $provider): RedirectResponse { if (!in_array($provider, config('auth.socialite.drivers'), true)) { abort(404, 'Social Provider is not supported'); } try { $user = Socialite::driver($provider)->user(); } catch (Exception $e) { return redirect()->route('login'); } $existingUser = User::where('email', $user->getEmail())->first(); if ($existingUser) { auth()->login($existingUser, true); } else { $newUser = new User; $newUser->provider_name = $provider; $newUser->provider_id = $user->getId(); $newUser->name = $user->getName(); $newUser->email = $user->getEmail(); $newUser->email_verified_at = now(); $newUser->avatar = $user->getAvatar(); $newUser->save(); auth()->login($newUser, true); } return redirect()->route('dashboard'); }}Step by step, what this method does:
- We get the user from Socialite; if it fails - we redirect to the login form;
- We check if user with such email exists, if so - we log them in;
- If it's a new user - we register them and also log them in;
- Finally - redirecting to the logged homepage, as a typical LoginController action would do.
A few more things to notice:
- As mentioned above, we're not using User::create() here, so those new fields don't have to be in the
$fillablearray of the User model; - We automatically make email_verified_at as verified now, because, well, they kinda verified their Google email during this step;
- Google provider gives us quite a lot of useful data - on top of email, we're getting name, and even avatar.
Of course, we need to have a route for this:
routes/auth.php
use App\Http\Controllers\SocialLoginController; // ... Route::middleware('guest')->group(function () { // ... Route::get('redirect/{provider}', [SocialLoginController::class, 'redirectToProvider']) ->name('social.login') ->where('driver', implode('|', config('auth.socialite.drivers'))); Route::get('{provider}/callback', [SocialLoginController::class, 'handleProviderCallback']) ->name('social.callback') ->where('provider', implode('|', config('auth.socialite.drivers'))); // ...}); // ...Step 6. Display the User's Name and Avatar
In this case, we will take the default Breeze template and add an Avatar next to our User's name:
![]()
Here's how we did it:
resources/views/layouts/navigation.blade.php
{{-- ... --}} <div> @if(auth()->user()->avatar) <img src="{{ auth()->user()->avatar }}" alt="avatar" width="32" height="32" class="mr-2 inline rounded"/> @endif {{ Auth::user()->name }}</div> {{-- ... --}} <div class="font-medium text-base text-gray-800 dark:text-gray-200"> @if(auth()->user()->avatar) <img src="{{ auth()->user()->avatar }}" alt="avatar" width="16" height="16" class="mr-2 inline-block"/> @endif {{ Auth::user()->name }}</div> {{-- ... --}}Note: Don't forget to run npm run build as we added more styling.
And that's it! Social login will work once you add credentials to the .env file!
Adding More Providers
To add more providers, you have to:
- Enable them in
config/auth.php- add to an array - Add their API keys to the
config/services.phpfile - Add the required
.envkeys (don't add them to theservices.phpfile!) - Add a button to the login/registration forms
That's it!
Great tutorial - Just a question - as a lot of people would tend to use Laravel Herd for local development which uses .test domains how would you suggest best ways to test this as .test domains aren't allowed when setting up the Google oAuth Client (public top-level domain only).
For this type of testing we always use ngrok service. It creates a public domain that points to your local application
Thanks!