
Default Laravel Export
Let's create a dummy project with Users table and default Laravel Auth. Then we create 10 random users. Actually, Laravel comes with pre-built Factory class for User model, so all we need to do is to create a UsersTableSeeder.php
class UsersTableSeeder extends Seeder
{
    public function run()
    {
        User::factory(10)->create();
    }
}
Then, we require Laravel Excel package:
composer require maatwebsite/excelNow, we export all users to Excel. To do that, we create a separate class app/Exports/UsersExport.php:
namespace App\Exports;

use App\Models\User;
use Maatwebsite\Excel\Concerns\FromCollection;
use Maatwebsite\Excel\Concerns\WithHeadings;

class UsersExport implements FromCollection, WithHeadings
{
    public function collection()
    {
        return User::all();
    }

    public function headings(): array
    {
        return [
            '#',
            'Name',
            'Email',
            'Created at',
            'Updated at'
        ];
    }

}
Finally, let's use it from Controller:
namespace App\Http\Controllers;

use App\Exports\UsersExport;
use Maatwebsite\Excel\Facades\Excel;

class ExportController extends Controller
{

    function export()
    {
        return Excel::download(new UsersExport, 'users.xlsx');
    }

}
Here's the visual result:
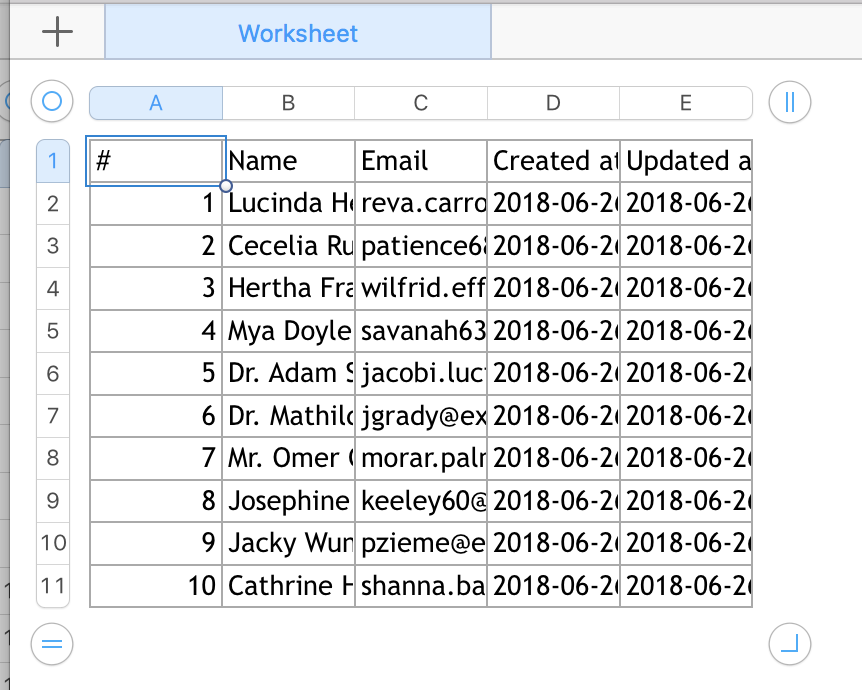 It does the job, exports the data. But does it look good and readable? Far from it. So let's tweak it a little.
Step 1. Auto-formatting column widths
Somewhere deep in the official documentation I've found a really easy way to adjust the column sizes automatically. All you need is to implement one interface ShouldAutoSize:
// ...
use Maatwebsite\Excel\Concerns\ShouldAutoSize;

class UsersExport implements FromCollection, WithHeadings, ShouldAutoSize
{
// ...
And here's the new Excel:
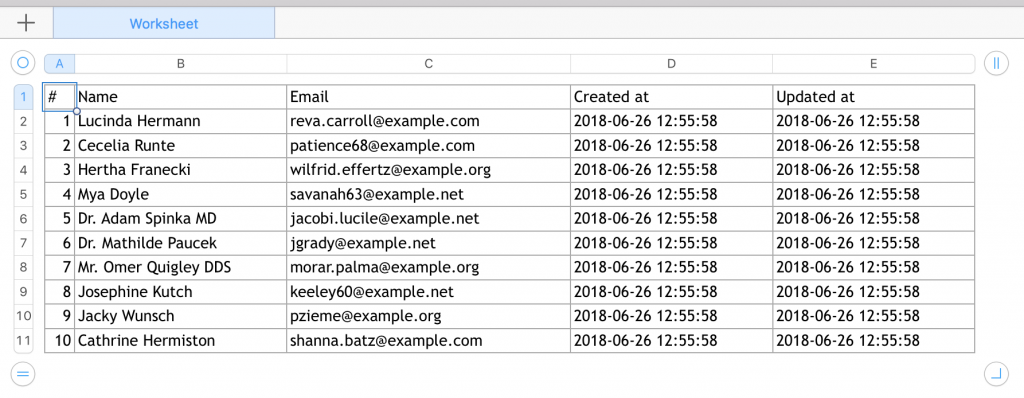 Better, huh? Let's move on.
Step 2. Formatting the fonts and sizes
You can adjust any cell styles using method called registerEvents() and AfterSheet event:
// ...
use Maatwebsite\Excel\Concerns\WithEvents;
use Maatwebsite\Excel\Events\AfterSheet;

class UsersExport implements FromCollection, WithHeadings, ShouldAutoSize, WithEvents
{

    // ...

    /**
     * @return array
     */
    public function registerEvents(): array
    {
        return [
            AfterSheet::class    => function(AfterSheet $event) {
                $cellRange = 'A1:W1'; // All headers
                $event->sheet->getDelegate()->getStyle($cellRange)->getFont()->setSize(14);
            },
        ];
    }

}
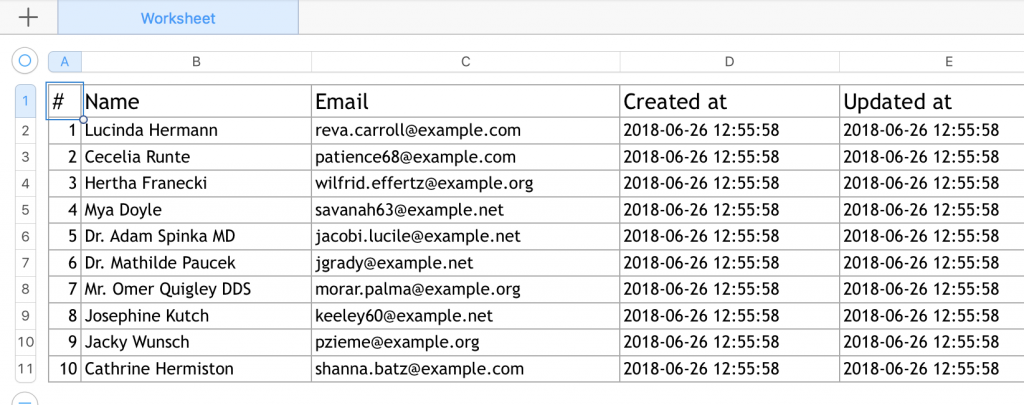
Here's how the header row looks now:
 The main logic here is this line:
$event->sheet->getDelegate()->getStyle($cellRange)->getFont()->setSize(14);It just takes whatever cell range we pass, and changes the styles. Here's where we need to dig deeper and look at the package which is the base of Laravel Excel. It's actually based on PHPSpreadsheet package. So let's take a look at its documentation, and specifically section Recipes. Some examples from there: Wrap text:
$spreadsheet->getActiveSheet()->getStyle('A1:D4')
    ->getAlignment()->setWrapText(true);
Default style of a worksheet:
$spreadsheet->getDefaultStyle()->getFont()->setName('Arial');
$spreadsheet->getDefaultStyle()->getFont()->setSize(8);
Styling borders and applying styles from array:
$styleArray = [
    'borders' => [
        'outline' => [
            'borderStyle' => \PhpOffice\PhpSpreadsheet\Style\Border::BORDER_THICK,
            'color' => ['argb' => 'FFFF0000'],
        ],
    ],
];

$worksheet->getStyle('B2:G8')->applyFromArray($styleArray);
You can find more examples in that recipes section, just apply it to your individual needs.
That's it, that's how you format exported excel with Laravel and PHP.
Related articles:
Hi do you know a solution for merging cells for a set of cells beyond "Z", what I need is "A1:AC" insted of "A1:Z1"
I get this error with "A1:AC"
PhpOffice\PhpSpreadsheet\Exception: Merge must be on a valid range of cells.