
I want to start this course by demonstrating Livewire to you. Its purpose is to create dynamic pages with no browser refresh but without writing JavaScript. So, let's start with a simple example of submitting the form and showing the success message on the same page, clearing up the form fields.
Let's start by installing Livewire into a Laravel project and creating the first Component.
By the of the lesson, you will know how to:
- Install Livewire and create a Livewire component.
- Use component properties and bind them into a form.
Preparation and Skeleton Project
Before installing Livewire, we will create a new Laravel project.
For this case, to have a simple design, I will use the Laravel Breeze starter kit but our custom version of it - Breeze Pages Skeleton. It allows you to quickly have Breeze-style pages without authentication.
Notice: you don't have to use Breeze or our skeleton to use Livewire. This is just for demonstration purposes.
git clone https://github.com/LaravelDaily/Laravel-Breeze-Pages-Skeleton projectcd project# Copy `.env.example` file to `.env` and edit database credentials therecomposer installphp artisan key:generatephp artisan migrate --seednpm install && npm run buildNow you should see this homepage.

Notice: the URL project2.test comes from my local Laravel Valet. Your domain will likely be different.
Next, we create a Migration and a Model for posts that we will work with:
php artisan make:model Post -mMigration:
public function up(): void{ Schema::create('posts', function (Blueprint $table) { $table->id(); $table->string('title'); $table->text('body'); $table->timestamps(); });}app/Models/Post.php:
class Post extends Model{ use HasFactory; protected $fillable = ['title', 'body'];}Let's add our new table to the database:
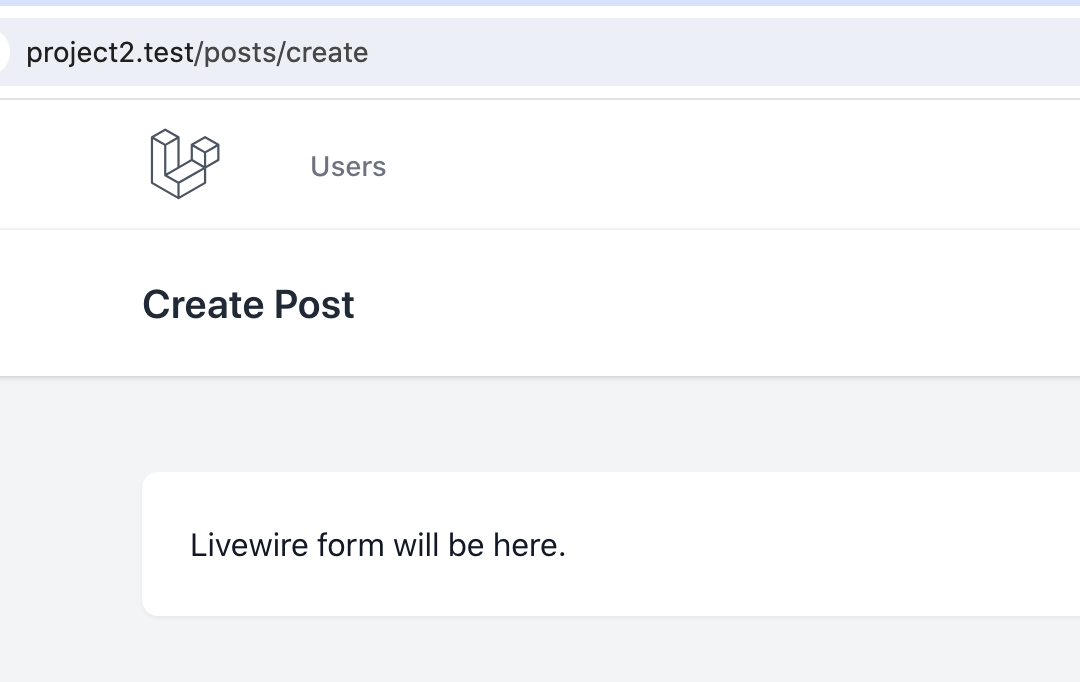
php artisan migrateNext, we create a Blade View file for our upcoming form. We just open the existing resources/views/home.blade.php and do File -> Save as with a new filename, changing the text from "This is home page!" to "Livewire form will be here".
resources/views/posts/create.blade.php:
<x-app-layout> <x-slot name="header"> <h2 class="font-semibold text-xl text-gray-800 dark:text-gray-200 leading-tight"> {{ __('Create Post') }} </h2> </x-slot> <div class="py-12"> <div class="max-w-7xl mx-auto sm:px-6 lg:px-8"> <div class="bg-white dark:bg-gray-800 overflow-hidden shadow-sm sm:rounded-lg"> <div class="p-6 text-gray-900 dark:text-gray-100"> Livewire form will be here. </div> </div> </div> </div></x-app-layout>Finally, we create a Laravel Route to that Blade file.
routes/web.php:
Route::view('posts/create', 'posts.create');And now, if we launch the URL /posts/create, we see the new page.
Ok, we've done our Laravel "homework". Now we're ready for Livewire.
Install Livewire and Create First Component
In the Terminal, we run this:
composer require livewire/livewire:^3.0Now that we have installed Livewire, let's create a Component and call it CreatePost.
php artisan make:livewire CreatePostThis command creates two files:
- a PHP class:
app/Livewire/CreatePost.php - and a Blade View file:
resources/views/livewire/create-post.blade.php
Now that we have a Livewire component, we need to render it inside the Laravel Blade file. You can do that using the <livewire:component-name /> syntax.
So, to render our CreatePost component, we need to add <livewire:create-post /> where we want to show the content of it.
resources/views/posts/create.blade.php:
<x-app-layout> <x-slot name="header"> // ... </x-slot> <div class="py-12"> <div class="max-w-7xl mx-auto sm:px-6 lg:px-8"> <div class="bg-white dark:bg-gray-800 overflow-hidden shadow-sm sm:rounded-lg"> <div class="p-6 text-gray-900 dark:text-gray-100"> <livewire:create-post /> </div> </div> </div> </div></x-app-layout>For a simple demonstration that it works, let's add a static text to the Livewire component in the resources/views/livewire/create-post.blade.php Blade file.
resources/views/livewire/create-post.blade.php:
<div> Create Post Livewire Component</div>Important: The Livewire component needs to have a root
<div>HTML tag.
Now, visit the page /posts/create where your Livewire component should be rendered, and you will see that static text from the Component.

Great, our component is loaded!
Remove Alpine.js from Breeze
Extra mini-step for those who use Laravel Breeze as a starter kit. Breeze automatically adds Alpine.js in its main JavaScript file:
resources/js/app.js:
import './bootstrap'; import Alpine from 'alpinejs'; window.Alpine = Alpine; Alpine.start();But when we install Livewire, it also adds Alpine by default since the Livewire 3 version.
So, to avoid conflicts of double-loading Alpine, we need to leave only one line in this Breeze file.
resources/js/app.js:
import './bootstrap';If you use npm run dev, JavaScript should re-compile automatically. Otherwise, re-run npm run build.
Properties and Data Binding
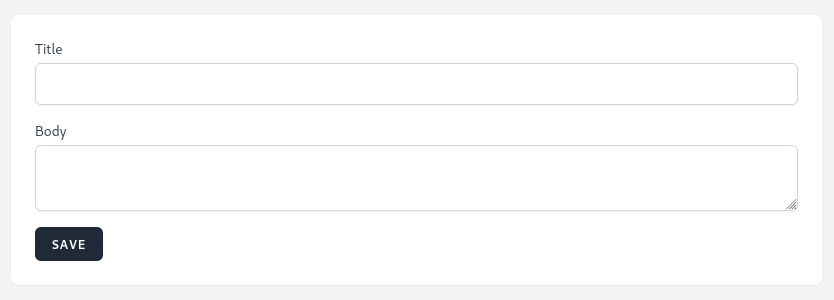
Now, let's add a simple form instead of that static text. The form input design is based on Blade components from Laravel Breeze.
resources/views/livewire/create-post.blade.php:
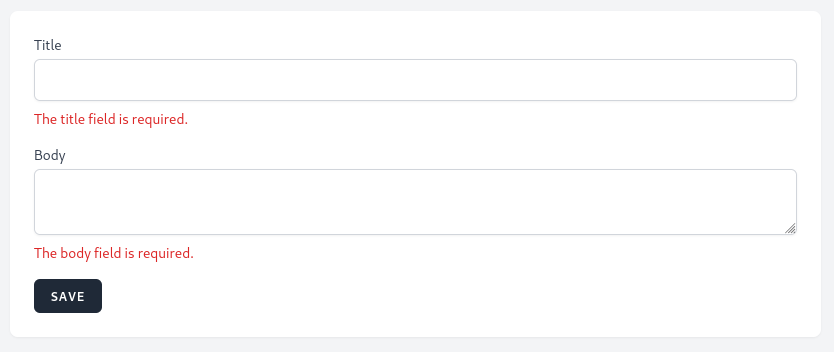
<div> <form method="POST"> <div> <label for="title" class="block font-medium text-sm text-gray-700">Title</label> <input id="title" class="block mt-1 w-full border-gray-300 rounded-md shadow-sm" type="text" /> @error('title') <span class="mt-2 text-sm text-red-600">{{ $message }}</span> @enderror </div> <div class="mt-4"> <label for="body" class="block font-medium text-sm text-gray-700">Body</label> <textarea id="body" class="block mt-1 w-full border-gray-300 rounded-md shadow-sm"></textarea> @error('body') <span class="mt-2 text-sm text-red-600">{{ $message }}</span> @enderror </div> <button class="mt-4 px-4 py-2 bg-gray-800 rounded-md font-semibold text-xs text-white uppercase tracking-widest hover:bg-gray-700"> Save </button> </form></div>The form should look similar to this:
So now that we have a form, each input field should have a public property inside the Livewire PHP class.
app/Livewire/CreatePost.php:
use Livewire\Component;use Illuminate\Contracts\View\View; class CreatePost extends Component{ public string $title = ''; public string $body = ''; public function render(): View { return view('livewire.create-post'); }}Now, we need to bind those properties to the inputs in the Blade file using the wire:model directive. Notice these two additions below:
-
wire:model="title" -
wire:model="body"
resources/views/livewire/create-post.blade.php:
<div> <form method="POST"> <div> <label for="title" class="block font-medium text-sm text-gray-700">Title</label> <input id="title" class="block mt-1 w-full border-gray-300 rounded-md shadow-sm" type="text" /> <input id="title" wire:model="title" class="block mt-1 w-full border-gray-300 rounded-md shadow-sm" type="text" /> @error('title') <span class="mt-2 text-sm text-red-600">{{ $message }}</span> @enderror </div> <div class="mt-4"> <label for="body" class="block font-medium text-sm text-gray-700">Body</label> <textarea id="body" class="block mt-1 w-full border-gray-300 rounded-md shadow-sm"></textarea> <textarea id="body" wire:model="body" class="block mt-1 w-full border-gray-300 rounded-md shadow-sm"></textarea> @error('body') <span class="mt-2 text-sm text-red-600">{{ $message }}</span> @enderror </div> <button class="mt-4 px-4 py-2 bg-gray-800 rounded-md font-semibold text-xs text-white uppercase tracking-widest hover:bg-gray-700"> Save </button> </form></div>That binding means that whenever the input value changes, the Livewire component variables will receive those new values, and then you may perform PHP operations with them.
Action Methods: Submit Form Data
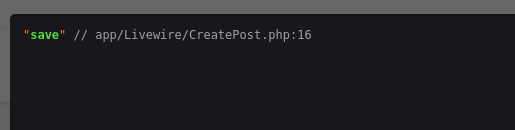
Now, let's add an action to save a post to the DB. For that, we create a method inside the Livewire PHP class. This method can be called whatever you want. We will just name it save().
app/Livewire/CreatePost.php:
class CreatePost extends Component{ // ... public function save(): void { dd('save'); // Just for demonstration, for now } // ...}For now, we hardcode the text just to show that it works.
Now, we need to call this method from Blade upon pressing the Save button. This is done by using the wire:submit directive and specifying the method.
resources/views/livewire/create-post.blade.php:
<div> <form method="POST"> <form method="POST" wire:submit="save"> // ... </form></div>Now, after clicking the Save button, we will have a dd() message save.
This means the button works! Now, let's replace the dd() with saving a post to the DB.
app/Livewire/CreatePost.php:
use App\Models\Post; class CreatePost extends Component{ // ... public function save(): void { dd('save'); Post::create([ 'title' => $this->title, 'body' => $this->body, ]); } // ...}After clicking Save, we should see a new post if we check the posts table in the DB.

Form Validation
Currently, our form doesn't have any validation after submitting, so let's add a few rules.
One of the ways to add them, released in the Livewire 3, is to use PHP 8 syntax of attributes on top of each property variable.
app/Livewire/CreatePost.php:
use Livewire\Attributes\Validate; class CreatePost extends Component{ #[Validate('required|min:5')] public string $title = ''; #[Validate('required|min:5')] public string $body = ''; public function save(): void { $this->validate(); Post::create([ 'title' => $this->title, 'body' => $this->body, ]); } // ...}And that's it. That is how easy it is to add validation in the Livewire component. And all Laravel validation rules also work here.
After clicking the Save button, you will see validation error messages.
Again, to reiterate: this happens without a page refresh but without writing any JavaScript. That's the beauty of Livewire.
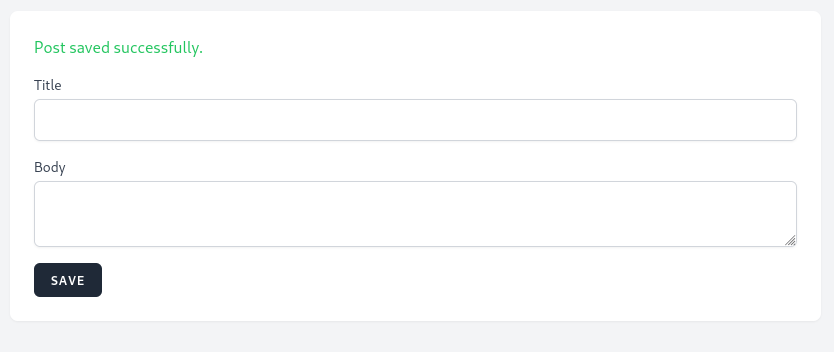
Show Success Message and Clear Form
Now, after saving the post, let's show a success message above the form and clear the form.
First, the success message. For this, we need a new boolean property $success, with a false default value.
class CreatePost extends Component{ #[Validate('required|min:5')] public string $title = ''; #[Validate('required|min:5')] public string $body = ''; public bool $success = false; // ...}In the Blade file, we need to make a simple if-check to see whether $success is true, and then the message will be shown.
resources/views/livewire/create-post.blade.php:
<div> @if($success) <span class="block mb-4 text-green-500">Post saved successfully.</span> @endif // ...</div>Notice. I'm not sure if you fully understand by now, but I will reiterate: each property of the Livewire class is automatically available in the Blade file as a variable. There is no need to pass them manually.
All that is left is to set success to true and reset the form.
app/Livewire/CreatePost.php:
class CreatePost extends Component{ // ... public function save(): void { $this->validate(); Post::create([ 'title' => $this->title, 'body' => $this->body, ]); $this->success = true; $this->reset('title', 'body'); } // ...}The method $this->reset() sets all the passed properties to their default values, which are empty strings in our case.
After the post is saved, we see a success message.
Great, it all works!
The repository for this lesson is here on GitHub.
So, does it give you an overview and "the first feeling" of Livewire? To reiterate, it gives you the opportunity to process form input variables without refreshing the page, but it all happens in a PHP/Laravel code familiar to us. No JavaScript to write. At all.
Curious to find out more? Let's dive deeper!
For some reason the reset did not work however the success message did appear and it was saved in the database. I did copy and past you code in.
By the way hear is the composer json and package json content
PS. Every thing has been working up to this point.
You are using breeze. https://twitter.com/PovilasKorop/status/1696879703187984583?t=U_1RCFwDpuFymFTwPDLL_w&s=19
that did not fix a thing It still will not work.
Did you run
npm run devorprodafter removing alpine. Any console errors?I am using vite. however I restarted it and I am still getting the same thing and I am getting No errors.
Please did your find a solution for the issue of
$this->reset()not working ? Having the same errorThe reason is in your setup. If you are using breeze then you need to remove alpine and compile assets using
npm run produse Livewire\Attributes\Validate; Phpstorm show error: Undefined class Validate.
I changed to this and now works: protected $rules = [ 'title' => 'required|min:6', 'body' => 'required|min:10', ];
The import should be correct. Check the docs https://livewire.laravel.com/docs/validation#validate-attributes
I have to upgrade livewire to v3.4.10 new version, then the validate attributes can work. When I use v3.0.0, the phpstorm always show error undefined class validate.
Don't know the reason why wouldn't you use the latest version. In one of the v3 version attribute nanespace was changed. You can check release notes to see hen
I've got the same issue as Richard A. Hoyle. Everithing works but the reset. I've notice that even the input text content is there, if you try to save again you'll have a message as if the text was empty!
Read Povilas tweet that was mentioned here already
Thank you but I'm not using Alpine / Breeze. Have any other sugestion?
{ "private": true, "type": "module", "scripts": { "dev": "vite", "build": "vite build" }, "devDependencies": { "axios": "^1.1.2", "laravel-vite-plugin": "^0.8.0", "vite": "^4.0.0" } }
Still it's gonna something about your setup. Maybe you are adding alpine some other way. Hard to tell. Check console errors.
I start to use Jetstream and all is working now.
Thanks
Thats one way. But it would be better to find problem which will help in the long
Thought I would try this out in Jetstream and guess what it is working perfectly the inputs are reset and the info is saved to the database Grate! This is the new Jetstream 4 with livewire 3
Ots bec it uses the v3 livewire. It means earlier it was problem with how you set up your project. This course isn't about using anything besides livewire
Following this tutorial, I am stucked at loading the first component. Teacher says "Now, visit the page where your Livewire component should be rendered, and you will see that static text from the Component." We havn't created any route yet so what url should I use in my browser? I am on localhost:8000/....
OK, I created this route:
and a view/components/layout.blade.php: https://laravel.com/docs/10.x/blade#layouts-using-components then changed in the livewire config: 'layout' => 'components.layout', finaly I changed posts/create.blade.php
Thanks for the comment. I didn't think I needed to explain the route, as it could be any route that leads to the Blade file, but maybe you're right as it's not perfectly clear.
I added a few lines of explanation with a simple route:
Hey Povilas,
Great course as usual!
Would you consider committing each lesson to the Git repository as you complete it, so that we can follow along more easily lesson-by-lesson? Maybe even add each lesson in several commits, if there are significant stages during the lesson where things change?
Also great "lesson zero" would be setting up the project with commits showing the initial commit of the empty Laravel framework, then subsequent commits showing each package being added, such as TailwindCSS, TailwindCSS/Forms, Livewire 3, etc. Much can be learned quickly on how to create a new project from such a concise first set of commits. And it would mean that we all start out with something which actually looks like your screenshots ;o))
Thanks again.
I tried to do that, but during the creation of the lesson there are so many little changes that it's extra hard to keep it all in one commit.
The purpose of my lesson is exactly that you would practice on something that does NOT look like my screenshots, as the course is NOT about Laravel/Tailwind, so my goal is that it would fit anyone using Livewire 3, even if they use Bootstrap or other design.
But maybe for the future I would reconsider it, maybe showing one path in full from the beginning, repeating all the fundamentals, is a better way to teach. Will think about it, thanks for the opinion!
@livewireStyles @livewireScripts didint work form me, the create post from appears without css
I don't understand why adding these form should be styled. It's livewire styles and v3 doesn't even need it. In this course we are using tailwind for styling.
Did you used the Tailwind CLI tool or did you include tailwind by using CDN in the header?
Used breeze to be quicker. But in this course it doesn't matter what you will use
If you are following along with the tutorial, when you get to the step of creating resources/views/posts/create.blade.php
If you notice that it does not have any styles, it is because some of the required styles/scripts are not included.
Note: the @vite line is there to include the tailwind styles, assuming you are using vite
If it is important to you that your app, looks like the screenshots provided. I would recommend using the LaravelDaily Skeleton - which is linked at the start of this tutorial.
Hi, there is no Post model and no migration in the skeleton, it's easy enough to create it but it's missing and the tutorial won't work without it.
No, it's not missing. Skeleton isn't for this course. It's just a "tool" we use to make demos quickly
Ha ok, but the Post model is still missing from what I'm understanding.
I am a noob though, it's totally possible I missed something...
I hope you don't mind me asking but where does the Post model suddenly come from? It's never been created in any of the steps so it's causing errors simply because it doesn't exist. Sorry, I'm totally new to this. Some guidance on how to fix this would be greatly appreciated! :)
You have to create it yourself. Before starting this course you must know how Laravel works.
Fair enough. However, it's still confusing nonetheless as it requires a Model and database table with specific columns that were never mentioned. Perhaps make a short mention of it being required so that newbies like myself won't get stuck?
Thanks for your feedback. We are on a fine balance between giving too much information versus too little.
We have found that creating Models is usually the simpliest and the most repetitive part, so often we tend to skip it from our tutorial. Especially if the table in our database is very simple like in this case - title, body.
Hi @modestas, If I can give some constructive feedback. I've stopped using the tutorials and cancelled my membership. When I pay for tutorials, I expect to be given all of the information needed to progress. I don't expect to have to search around and work out what I need to do. Sure, creating a model is simple and as you say there are only two fields. However, as Lucmeister has said, nowhere does it mention that the model needs to be created and what fields are needed. So as soon as I encounter this model, I now need to scan the whole page to see if there are any other fields anywhere else that need to be added. It is not just this tutorial either, I tried three and they were all the same. Sometimes there are whole blocks of code that are missing, or there is an assumption that the IDE that you are using will prepopulate references at the top of the file. Again, all fairly simple stuff to solve, but not what I expect to do when I have paid for the content.
Hi everyone, thanks for the feedback, and sorry @Lucmeister that missing Model became a blocker for you. I agree we DID need to at least mention it in the course, I will fix the text after finishing writing this comment.
To @gpalmer711, I agree to an extent, we have a "problem" of growing out of the base of total junior developers, so I guess sometimes we assume too much that developers will understand some things by themselves "from the context". That said, if we explain everything deeper, we may disturb the flow of more experienced developers, as @Modestas mentioned. So it's a thin line. But we will try harder to proof-read in the future to avoid skipping the important things.
Update: after a few more comments, I ended up rewriting the full lesson with adding more details where necessary.
Many thanks, I am sure this will be helpful to a bunch of people.
Hey. I'm a bit lost at the very beginning. Several options are presented to get started with this tutorial: breeze, jetstream, skeleton. I do everything step by step but whatever I do I can't see the config/livewire.php file, styles, routing don't work. I see in the comments that others have had similar problems. Is everything up to date here?
try
php artisan livewire:publish --configWich starter kit do you use?For the config file you need to publish it first, this is for every package. For styles and everything else can't help without the errors or something. Maybe you have two alpine instances which then conflict. It is mentioned at the start of the lesson, this is the post: https://laraveldaily.com/post/livewire-3-laravel-breeze-error-alpine-js-conflict Also, you don't need to use any of the starter kits. This course isn't about them. But if you use any of them, then you must know how they work. Like styles needs to recompiled using
npm run devornpm run buildNow I use Jetstream, fresh install. Published config, changed layout line, changed routing to correct file but still no styles. OK, I will experiment some more with these styles. Thank you for the tips. Sorry, this is all probably simple and obvious but these are my first steps with LW :)
If you would come to discord it would be easier to help
I have now finished lessons 1 and 2 of this course. This has been a disappointing experience for the following reasons:
The start of the course would have been so much better with clear starting instructions like install standard Laravel 10 with Livewire and Tailwind enabled, run this migration, add this Model, configure Full Page Components, add @vite, and you are good to go.
First of all, I want to thank you for taking so much time to write it in detail. Wow.
After reading your comment, along with a few others, I realized that indeed we made a few fundamentally wrong decisions with the starter kit for this course: made our own skeleton based on Breeze, and meanwhile it changed the configuration with Vite, Livewire layouts, etc. So, for many people, the beginning of the course, indeed, didn't come together.
Most of your points are valid, I will take some time this weekend to re-read the first lessons and fix the missing parts, and update it.
The Validate syntax meanwhile is already updated, it was changed in Livewire 3.2, recently.
Again, thanks a lot for your valuable time.
Update: I ended up rewriting the full first lesson with rewording some stuff and adding more details where necessary. Thanks again for your comment.
For people looking for the migrations file: database/migrations/2024_01_11_194849_create_posts_table.php
Kudos for giving us the complete file!
You're welcome! Professional reaction, and the rewrite looks like it solved the getting started issues. Although I think the issues with lesson 2 still exist, but maybe that is in the works.
For that Lesson 2, I clearly see this command mentioned in the lesson: "php artisan make:livewire EditPost"
So, that file
edit-post.blade.phpshould exist and should work well, maybe you missed launching that command during your testing.Yes, the component is created. But I was talking about the implicit usage of a Full Page Compoment which was accomplished with:
But to my regret, my dissapointments have continued through the course. I have made it to chapter 12 trying to follow allong with the examples, but the inconsistencies keep piling. I have to adjust so many small things, it distracts from the actual course, and it makes the process very unproductive.
Starting lessen 12 I decided to stop following the course in a "hands on" way, I may read through the additional chapters, but I won't try to make the code work anymore, simply too unproductive.
In chapter 12 suddenly a Todo list was introduced to show a new concept. This todo list depends on Tables/Models that were not introduced at all. In chapter 9 a new Comments model was introduced with the migration and Model, but chapter 12 just starts using structures that are not present at all.
But what is worse, there was (from an educational perspective) no reason at all to suddenly introduce a Todo application. The Post/Comment structure was perfectly fit to expand into this subject. Or just start with the Todo application from the start and expand from there. But to introduce totally new Projects during the course is just very unfriendly to the students that want to replicate the examples exactly as they are shown.
As said, I will quit following the course, but may use it as a reference.
Sigh. Ok I guess it's time to re-read the full course.
In general, this course was never planned as a single project, because it's more convenient and appropriate to show different features with different projects, but I guess if it's confusing, need to re-read and change some parts, in upcoming week or so.
TLDR: On Windows, make sure that after running
composer require livewire/livewire:^3.0, the composer.json does indeed contain"livewire/livewire": "^3.0", and not"livewire/livewire": "3.0".I could not get the annotation-style validations to function in
app/Livewire/CreatePost.php. On submit of the form the following error was returned:Missing [$rules/rules()] property/method on Livewire component. Could not find a cause and eventually noticed that livewire was version locked to 3.0, despite mycomposer require livewire/livewire:^3.0command.Turns out Windows shells can have problems with the caret symbol.
All is well and good but once we reset the title and body how can we reset the success message say 1 minit later?
For that you would use js
can't that be done by axios?
Axios does only http request. Totally different thing
This is totally clear, but I have a question might be out of the scope. In the validation of livewire, would not it be better if we used laravel form request validation. I mean that the native form request validation should be re-usable for both livewire components in addition to its usability in API for example. Does that re-usability principle violates separation of concerns principle? What is the best practice in this area?
Ahiet answer is no, with livewire you don't use form