
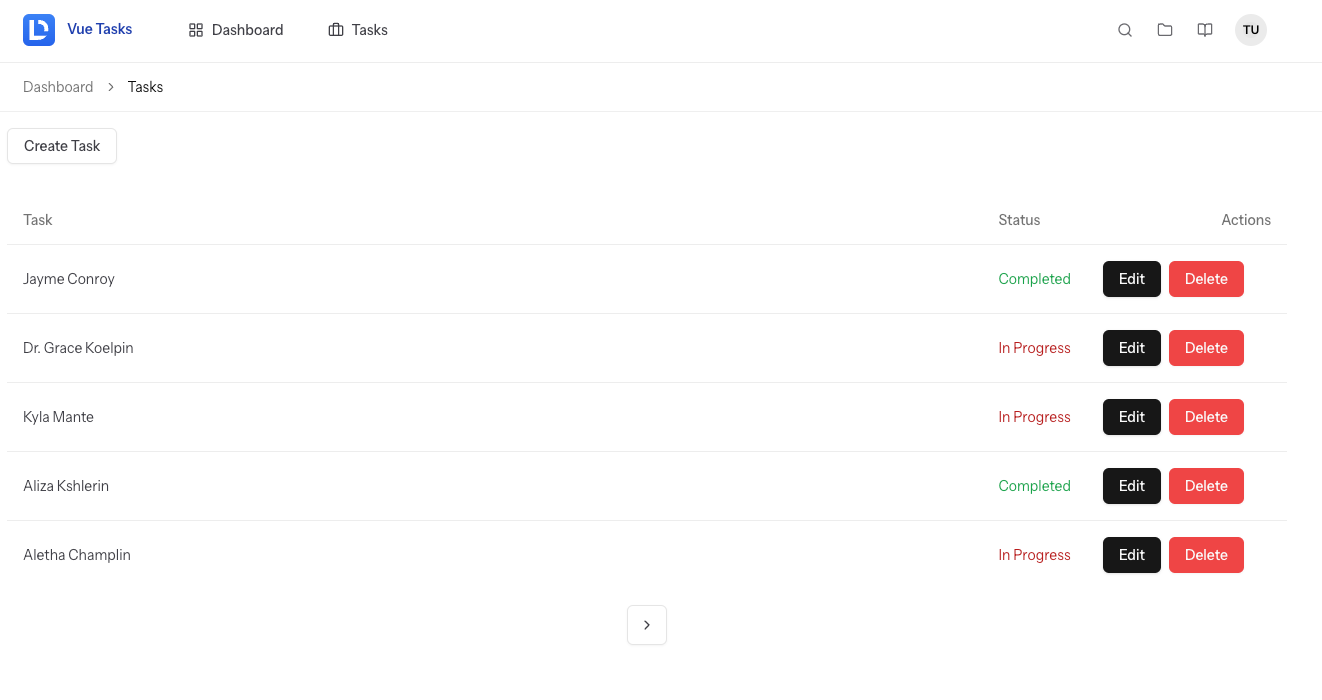
The goal of our first course section is to create a full CRUD like this:
In this first lesson, we will install Laravel with the Vue starter kit and familiarize ourselves with its general structure and code.
Installation
We install a new Laravel project and will choose the Vue starter kit:
laravel new laravel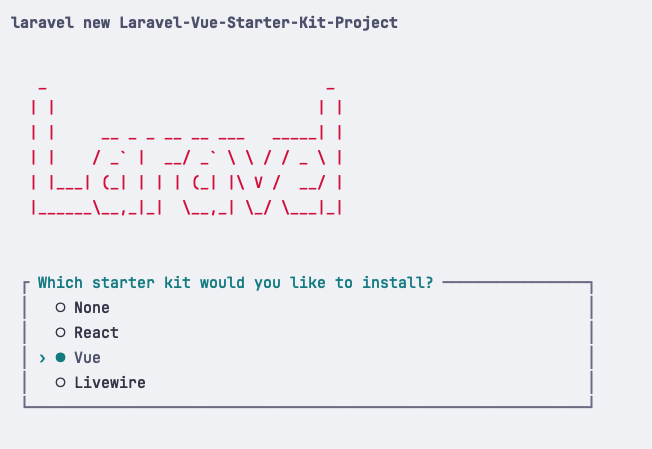
We stay with the default values for all the other choices in the wizard.
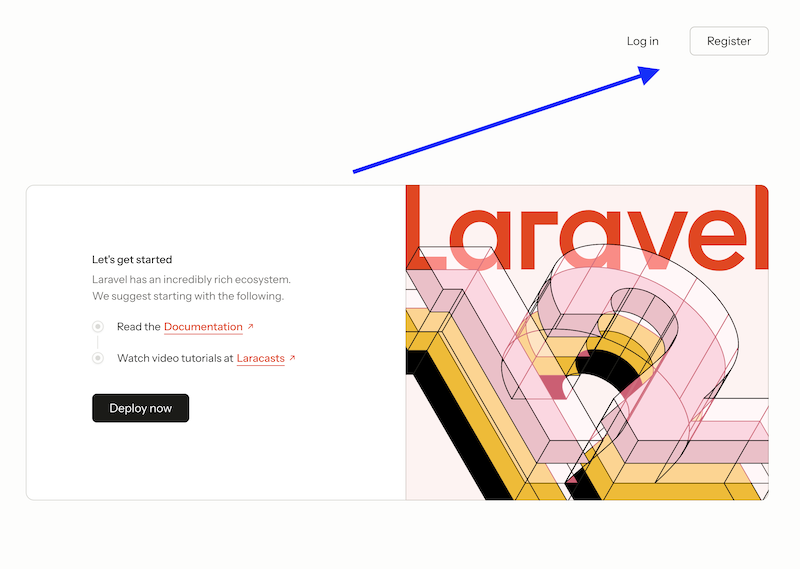
As a result, we have a regular Laravel homepage with "Log in" and "Register" links at the top.
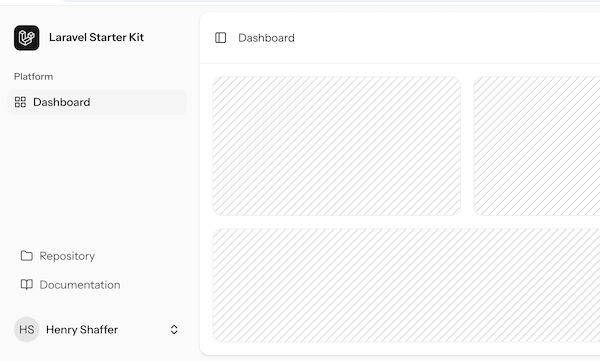
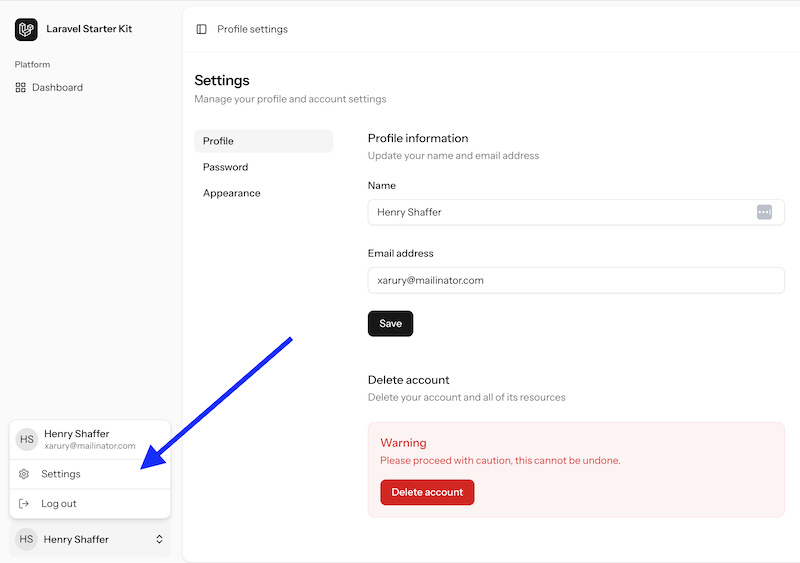
When we register as a new user, we land on an empty dashboard with a sidebar.
In addition to the layout, we have the "Settings" menu item that allows user profile data:
So yeah, that's all about installation! Simple, huh? Now, let's see what's inside the code.
Project Code Structure: Back-End
I typically start analyzing any Laravel project with Routes.
routes/web.php:
Route::get('/', function () { return Inertia::render('welcome');})->name('home'); Route::middleware(['auth', 'verified'])->group(function () { Route::get('dashboard', function () { return Inertia::render('dashboard'); })->name('dashboard');}); require __DIR__.'/settings.php';require __DIR__.'/auth.php';Nothing special here, right? Regular routes, Inertia, and a few includes of other route files.
In the Settings route, we can find a few Controllers:
routes/settings.php:
use App\Http\Controllers\Settings\PasswordController;use App\Http\Controllers\Settings\ProfileController; Route::middleware('auth')->group(function () { Route::redirect('settings', 'settings/profile'); Route::get('settings/profile', [ProfileController::class, 'edit'])->name('profile.edit'); Route::patch('settings/profile', [ProfileController::class, 'update'])->name('profile.update'); Route::delete('settings/profile', [ProfileController::class, 'destroy'])->name('profile.destroy'); Route::get('settings/password', [PasswordController::class, 'edit'])->name('password.edit'); Route::put('settings/password', [PasswordController::class, 'update'])->name('password.update'); Route::get('settings/appearance', function () { return Inertia::render('settings/appearance'); })->name('appearance');});If we look at the ProfileController, it returns Inertia with Vue components:
app/Http/Controllers/Settings/ProfileController.php:
use App\Http\Controllers\Controller;use App\Http\Requests\Settings\ProfileUpdateRequest;use Illuminate\Contracts\Auth\MustVerifyEmail;use Illuminate\Http\RedirectResponse;use Illuminate\Http\Request;use Illuminate\Support\Facades\Auth;use Inertia\Inertia;use Inertia\Response; class ProfileController extends Controller{ /** * Show the user's profile settings page. */ public function edit(Request $request): Response { return Inertia::render('settings/Profile', [ 'mustVerifyEmail' => $request->user() instanceof MustVerifyEmail, 'status' => $request->session()->get('status'), ]); } /** * Update the user's profile information. */ public function update(ProfileUpdateRequest $request): RedirectResponse { $request->user()->fill($request->validated()); if ($request->user()->isDirty('email')) { $request->user()->email_verified_at = null; } $request->user()->save(); return to_route('profile.edit'); } /** * Delete the user's profile. */ public function destroy(Request $request): RedirectResponse { $request->validate([ 'password' => ['required', 'current_password'], ]); $user = $request->user(); Auth::logout(); $user->delete(); $request->session()->invalidate(); $request->session()->regenerateToken(); return redirect('/'); }}The main "meat" of the pages is inside the Vue components in the resources/js folder.
Project Code Structure: Front-End
Let's look at what's inside that Inertia::render('settings/profile') file in Vue.
It's pretty big! But don't get scared if you're not that familiar with Vue. In the course, we will create our own Vue components where I will explain everything step-by-step.
resources/js/pages/settings/Profile.vue:
<script setup lang="ts">import { Head, Link, useForm, usePage } from '@inertiajs/vue3'; import DeleteUser from '@/components/DeleteUser.vue';import HeadingSmall from '@/components/HeadingSmall.vue';import InputError from '@/components/InputError.vue';import { Button } from '@/components/ui/button';import { Input } from '@/components/ui/input';import { Label } from '@/components/ui/label';import AppLayout from '@/layouts/AppLayout.vue';import SettingsLayout from '@/layouts/settings/Layout.vue';import { type BreadcrumbItem, type SharedData, type User } from '@/types'; interface Props { mustVerifyEmail: boolean; status?: string;} defineProps<Props>(); const breadcrumbs: BreadcrumbItem[] = [ { title: 'Profile settings', href: '/settings/profile', },]; const page = usePage<SharedData>();const user = page.props.auth.user as User; const form = useForm({ name: user.name, email: user.email,}); const submit = () => { form.patch(route('profile.update'), { preserveScroll: true, });};</script> <template> <AppLayout :breadcrumbs="breadcrumbs"> <Head title="Profile settings" /> <SettingsLayout> <div class="flex flex-col space-y-6"> <HeadingSmall title="Profile information" description="Update your name and email address" /> <form @submit.prevent="submit" class="space-y-6"> <div class="grid gap-2"> <Label for="name">Name</Label> <Input id="name" class="mt-1 block w-full" v-model="form.name" required autocomplete="name" placeholder="Full name" /> <InputError class="mt-2" :message="form.errors.name" /> </div> <div class="grid gap-2"> <Label for="email">Email address</Label> <Input id="email" type="email" class="mt-1 block w-full" v-model="form.email" required autocomplete="username" placeholder="Email address" /> <InputError class="mt-2" :message="form.errors.email" /> </div> <div v-if="mustVerifyEmail && !user.email_verified_at"> <p class="-mt-4 text-sm text-muted-foreground"> Your email address is unverified. <Link :href="route('verification.send')" method="post" as="button" class="text-foreground underline decoration-neutral-300 underline-offset-4 transition-colors duration-300 ease-out hover:!decoration-current dark:decoration-neutral-500" > Click here to resend the verification email. </Link> </p> <div v-if="status === 'verification-link-sent'" class="mt-2 text-sm font-medium text-green-600"> A new verification link has been sent to your email address. </div> </div> <div class="flex items-center gap-4"> <Button :disabled="form.processing">Save</Button> <Transition enter-active-class="transition ease-in-out" enter-from-class="opacity-0" leave-active-class="transition ease-in-out" leave-to-class="opacity-0" > <p v-show="form.recentlySuccessful" class="text-sm text-neutral-600">Saved.</p> </Transition> </div> </form> </div> <DeleteUser /> </SettingsLayout> </AppLayout></template>It's not the most straightforward file to start with, but it's here for common understanding. For now, notice the main things:
- Laravel starter kits use TypeScript, with the file extension
.vue. It's not a strict requirement, you can proceed writing your custom code with regular JavaScript, but it may be a good tool to adopt. Here's our free article about TypeScript in Laravel. - The design elements are taken from
@/components/ui/powered by Shadcn Vue library - a port of React library. - VueJS component consists mainly of two sections:
scriptlibraries on top, and thentemplatethe HTML, enhanced by JS components and internal variables/functions - The main page structure is in
<AppLayout>, with<Head>and then content inside.
And this is exactly our next step for the next lesson: customizing the layout.
hello when use laravel new laravel not ask about starter kit, install laravel 12 direct
You might need to update your installer. Dependig on how you set it up - you might need:
composer global update