
Text Version of the Lesson
Filament 3 also comes with the ability to create more than one Panel with it:
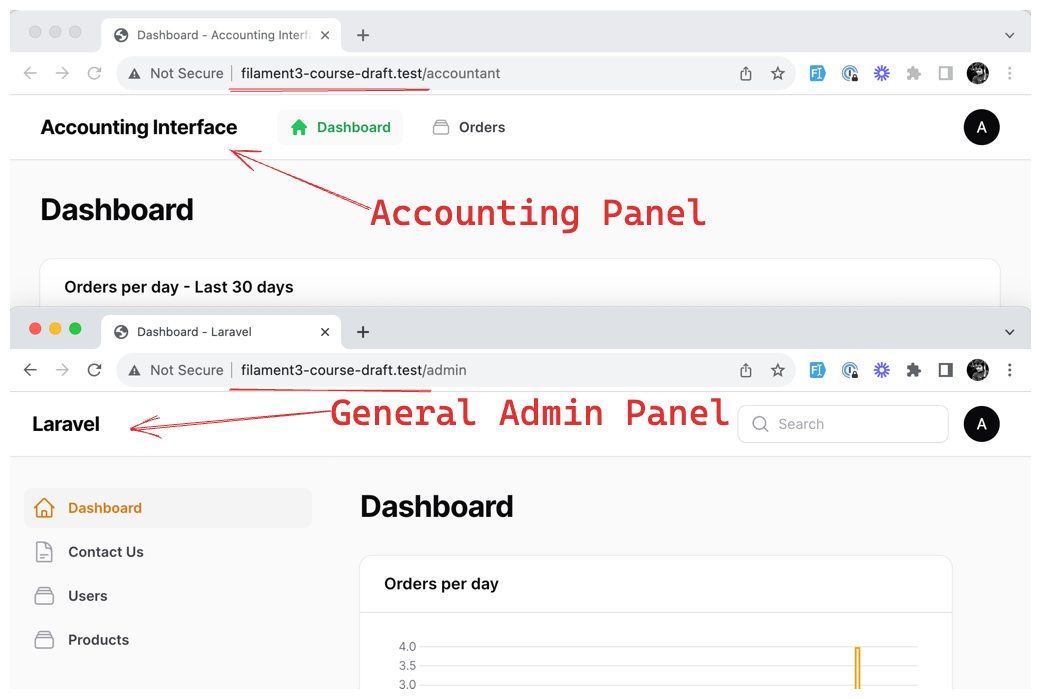
These panels are running on the same Filament project, using the same database. But they are completely independent of each other. This means that we can control the content of each Panel separately, and we can also control the layout of each Panel separately.
Why Panels?
Before we go into the details of how to create a multi-panel Filament project, let's first understand what a panel is and why we need it.
You can treat panels as independent projects inside your application. This means you can create and deploy a single Laravel and Filament application but have multiple "projects" inside it. Each project can have its own access level, configuration, design, and logic. This is very useful if you don't want to mess around with disabling and enabling specific actions. Your actions between panels might differ so much that it would be a pain to manage them in a single project.
Creating a New Panel
Creating a new panel is very simple. All you need to do is run the following command:
php artisan make:filament-panel {name}In our case, we create a new panel named Accountant:
php artisan make:filament-panel AccountantThis will create a new file in app/Providers/Filament called AccountantPanelProvider. This file is responsible for registering...
based on the quote in the title "Why Panel?". Can you please give an example of a case? I think in this article, admin & accountant are 2 entities that are on the same project, just in different roles
That would be the most typical case I've seen actually: different panels for different user roles. Admin and accountant sound similar, but it's more different, for example, if it's Admin and Customer of the shop.
Sorry I still don't understand
are 2 panels used for different projects, for example: panel 1 for performance management projects and the second panel for online shop projects? (assuming the example is in 1 project / composer create laravel command)
or are these 2 panels used for the same project but different for the actors? or how ?
and I still don't understand your sentence "This means you can create and deploy a single Laravel and Filament application but have multiple "projects" inside it". could you please explain to me?
sorry for my misunderstanding
I am using the different Panels currently in my project one for Admin, so admin can see certain resources and pages and Client, so client will see other pages and resources. I am doing this cause its another way around if you dont want to deal up with roles and permissions and give each role a different design. For example, the Admin Loans resources and the client Loans resources are both different in terms of the information i want to display. You can use roles and permissions to achieve the same thing but I prefer to use Panels as it keeps my work clean and clearer to understand that a set of code with roles and permissions.
If we have many accountants, how do we show only specific information related to that accountant in the list, create, edit and view resources?
I would use Eloquent global scopes for this. Here's my video about Tenancy in general, part of that video answers your question.
Got it to work.
public static function getEloquentQuery(): Builder { return parent::getEloquentQuery()->whereBelongsTo(auth()->user()); }
https://filamentphp.com/docs/2.x/admin/resources/getting-started#customising-the-eloquent-query
I see when you create a resource that it is associated with only one panel. What if you want to have multiple panels that are accessing the same models and database tables and doing basically the same things, but just for different users or in different contexts? Are these multiple panels and resources using the same models and tables?
Yes. Model is often just a database connector, so you can use it in as many different resources as you need.
Looking at this lesson and the example of two login pages, the question arises, if a person logs in on one panel, is that effective for all panels in the application? If I login as an accountant, I won't then have to login again in the admin panel, will I? My access or lack of will be determined by authorization at that point? We still only have one cookie for the overall web site?
Thanks.
Yes!
Login is shared between ALL panels, but authorization gates prevent access as needed