
Now that we have created Migrations and have a table in the DB, let's show real categories on the sidebar.
In this lesson, we will learn about MVC (Model View Controller): the three layers responsible for viewing data, getting data, and routing the inputs.
Getting Categories From DB
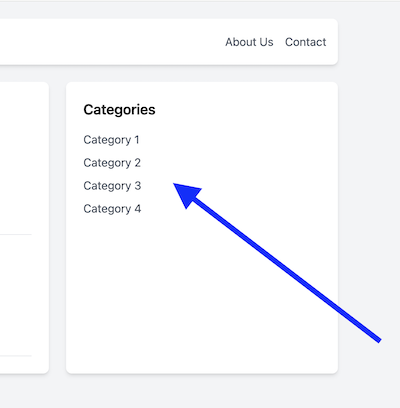
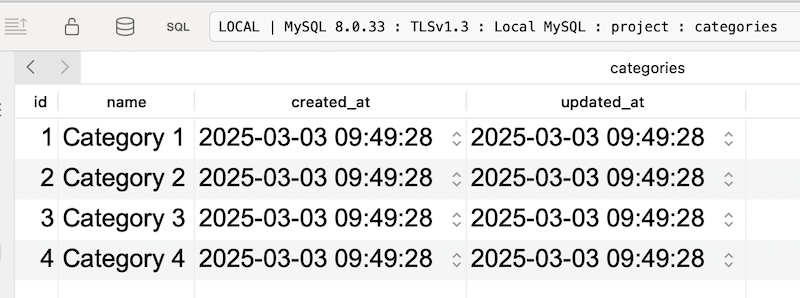
I manually created these four categories in the categories DB table. Later in this course, we will create a panel to manage them.
To get them from the DB, you have two options:
- Use
DBfacade class with methodDB::table()and construct custom query with so-called Query Builder - Or, create a so-called Eloquent Model that would work with specific DB table
Both options are viable, depending on your situation.
I will show you the Query Builder for now, and later, we'll get to Eloquent.
To get all categories from the DB, you need to run this:
// Include this in the "use" section on topuse Illuminate\Support\Facades\DB; // ... $categories = DB::table('categories')->get();Now, the question is, where do we run this code, and how do we pass that $categories variable to be available in the home.blade.php Blade View?
Logic in Route Callback Functions
For now, in the Routes, we used only Route::get() with a callback function or Route::view() to show a static Blade page:
routes/web.php:
Route::view('/', 'home')->name('home');It's time to introduce more logic to get the categories from the database.
The first option is to do it as a part of the callback function:
routes/web.php:
use Illuminate\Support\Facades\Route;use Illuminate\Support\Facades\DB; // Route::view('/', 'home')->name('home');Route::get('/', function () { $categories = DB::table('categories')->get(); return view('home', ['categories' => $categories]);})->name('home');As you can see, the function view() accepts the second parameter: the array of key-value pairs that would be available in that Blade view.
Here's the GitHub commit for this change.
However, the logic is typically more complicated in real projects. So, if we add it all to the Routes file, it would become huge.
That's why the logic is placed in separate files called Controllers.
Introducing Controllers
If you want dynamic data, you need to introduce a Controller, which would get that dynamic data and pass it to the View.
Here, we have another example of Artisan command. Get used to them in Laravel. The Controller also can be created using an Artisan command:
php artisan make:controller HomeController
Controllers are created in the app/Http/Controllers folder.
Here's the default empty Controller with no methods:
app/Http/Controllers/HomeController.php:
namespace App\Http\Controllers; use Illuminate\Http\Request; class HomeController extends Controller{ //}Now, for every Route you want to process, you will create one public method in the Controller.
Let's create the index() method in the Controller, which will get the DB data and return the View with it.
app/Http/Controllers/HomeController.php:
namespace App\Http\Controllers; use Illuminate\Support\Facades\DB; class HomeController extends Controller{ public function index() { $categories = DB::table('categories')->get(); return view('home', ['categories' => $categories]); }}In this case, data will be accessible as a $categories variable in the home.blade.php View file.
We can have a @foreach loop in the View file to show these categories. In the View files, many Blade directives start with an @ sign, which we saw previously in the welcome.blade.php.
resources/views/home.blade.php - BEFORE:
<!-- Sidebar Section --><aside class="w-1/4 bg-white p-6 shadow-md rounded-lg"> <h2 class="text-xl font-semibold mb-4">Categories</h2> <ul class="space-y-2"> <li><a href="#" class="text-gray-600 hover:text-gray-800">Technology</a></li> <li><a href="#" class="text-gray-600 hover:text-gray-800">Design</a></li> <li><a href="#" class="text-gray-600 hover:text-gray-800">Development</a></li> <li><a href="#" class="text-gray-600 hover:text-gray-800">Marketing</a></li> </ul></aside>resources/views/home.blade.php - AFTER:
<!-- Sidebar Section --><aside class="w-1/4 bg-white p-6 shadow-md rounded-lg"> <h2 class="text-xl font-semibold mb-4">Categories</h2> <ul class="space-y-2"> @foreach($categories as $category) <li> <a href="/?category_id={{ $category->id }}" class="text-gray-600 hover:text-gray-800"> {{ $category->name }} </a> </li> @endforeach </ul></aside>The @foreach() Blade directive is identical to the PHP foreach syntax. We have already seen the syntax with curly brackets to show variables: {{ $variable }}.
So, we have a View file to show data and a Controller to pass the data. The final piece to the puzzle is the Route.
Route To Controller
Instead of a closure function, we will use an array parameter.
The first key will be the path to the Controller, and the second will be the method in that Controller.
routes/web.php:
use Illuminate\Support\Facades\DB; Route::get('/', function () { $categories = DB::table('categories')->get(); return view('home', ['categories' => $categories]); })->name('home'); Route::get('/', [\App\Http\Controllers\HomeController::class, 'index'])->name('home'); After refreshing the home page, we see our new four categories from the DB.
It works!
One more thing to polish. See that long path name to the HomeController? We can avoid having such long paths in each Route if we load them on top in the use section.
routes/web.php:
// Usually, all Controllers go on top in the `use`use App\Http\Controllers\HomeController; // ... // And then the Routes contain only the Class nameRoute::get('/', [HomeController::class, 'index']) ->name('home');So, this is how the MVC works with Routing, Controller, and the View.
Here's the GitHub commit for this section of the lesson.
Eloquent Models to Work with DB Tables
Earlier, I mentioned the DB::table() alternative, called Eloquent Model.
Eloquent is a Laravel ORM engine to work with DB tables. It's a more appropriate and common way to deal with DB data.
It has many features and methods, so using Eloquent instead of a Query Builder is more convenient. To create a Model, run an Artisan command.
php artisan make:model Category
A Model name is typically a database table name in a singular form.
All model classes are created in the app/Models category, and they extend a Model class from Eloquent:
app/Models/Category.php:
namespace App\Models; use Illuminate\Database\Eloquent\Model; class Category extends Model{ //}It looks empty, doesn't it? But it's already a fully functioning Model.
By default, if you use Laravel naming, the Category Model will know to use the categories table as a plural form of the word "category". If you have another name, you can specify the table name in the Model with the protected $table property.
app/Models/Category.php:
class Category extends Model{ protected $table = 'categories'; }In the Controller, we can use the Category Model and call the all() method to fetch all records from the categories table.
app/Http/Controllers/HomeController.php:
use App\Models\Category; class HomeController extends Controller{ public function index() { $categories = DB::table('categories')->get(); $categories = Category::all(); return view('home', ['categories' => $categories]); }}And that's it. We don't need to specify any tables. After refreshing the home page, we should see the same four categories in the sidebar.
We will talk about Eloquent Models more in this course. This was just an introduction with the most simple example.
Here's the GitHub commit for this section.
Summary
This lesson explains one of the most essential concepts to understand in Laravel: the whole workflow and request lifecycle of MVC: Route, Controller, Model, and View.
So, routes have a Controller and a method. In the Controller's method, you get the data and pass it to the View, which then displays it.
In the next lesson, we will work on getting Posts by Category from the URL parameter ?category_id=XXXXX.
you have a typo - $allCategories instead of $categories
Thanks a lot for the comment, well noticed! Fixed now.