
In this first lesson, we will create a new project with Laravel.
But before installing Laravel, we must prepare the tools and environment for PHP/Laravel on your computer.
Installing The Tools: Two "Bundled" Options
Generally, for Laravel 12, you need to install these:
- PHP 8.2+
- Composer to manage PHP package dependencies
- Web-server like Nginx/Apache
- Node.js and NPM
- Laravel Installer v5.x
- DB Engine like MySQL/SQLite/PostgreSQL (optional but probably needed)
Luckily, you don't need to install them manually, one by one. The official Laravel team offers two "bundled" options.
Option 1. Terminal command.
This command below would install PHP, Composer, and the Laravel installer:
# Mac version/bin/bash -c "$(curl -fsSL https://php.new/install/mac/8.4)" # Linux version/bin/bash -c "$(curl -fsSL https://php.new/install/linux/8.4)" # Windows PowerShell versionSet-ExecutionPolicy Bypass -Scope Process -Force; [System.Net.ServicePointManager]::SecurityProtocol = [System.Net.ServicePointManager]::SecurityProtocol -bor 3072; iex ((New-Object System.Net.WebClient).DownloadString('https://php.new/install/windows/8.4'))Option 2. Use Laravel Herd.
Herd is the official first-party all-in-one tool that will automatically install all the necessary tools.
Not only that, but it will help you after the installation to auto-detect local domains like project.test, switch between PHP versions, manage various settings, and more.
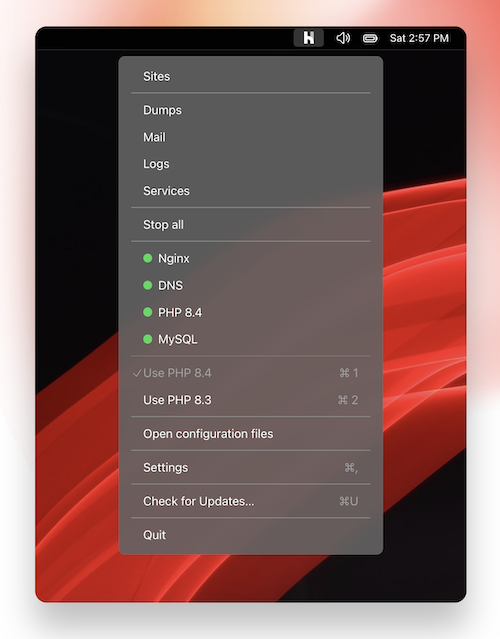
Notice: some Herd features are not free and are included in the Herd Pro version, like MySQL database. If you don't want to buy it, you could install the DB engine separately with something like DBNgin.
Other Options From The Past
In older tutorials and docs, you may find other tools to install Laravel:
- Valet (predecessor of Herd)
- Sail (Docker-based)
- Laragon (Windows)
- etc.
That installation process was pretty fragmented until, in mid-2024, the Laravel core team streamlined it into the recommended tools/process that I mentioned above.
Ok, if you have all the prerequisites installed, we can move on to creating the actual Laravel project.
Install New Laravel Project
Now, let's try creating our first Laravel project.
Run the Terminal command laravel new example-app.
You should run it from your web server folder where you serve sites. For Laravel Herd, you should run this command from your main ~/Herd folder on Mac OS or the alternative main Herd folder on Windows OS.
The folder example-app will be created automatically with the Laravel files inside.
So, let's create a new project.
laravel new projectThis command will create a new Laravel project inside a project folder.
When the installer is executed, the wizard will ask a few questions.
Choosing Starter Kit
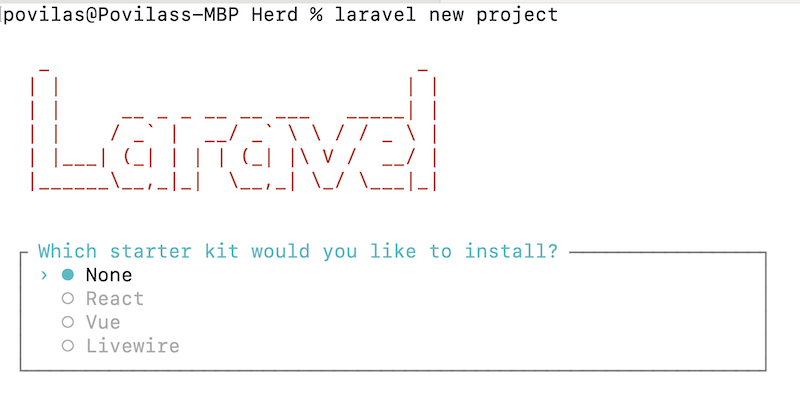
There are a few official starter kits available in Laravel.
For this first lesson, we will choose None to avoid overwhelming you with information about those starter kits, for now.
Notice: if you see other options instead of these above, you may be using an older version of Laravel Installer. Please upgrade it to the latest version. Or, if you use Laravel Herd, please make sure you're using the latest Herd version.
Choosing DB System
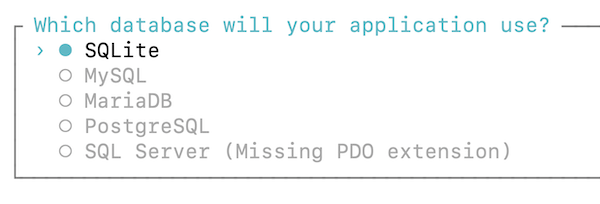
If you proceed with SQLite, the database is created automatically in the database folder, with a few default Laravel DB tables created from the Migration files (we will talk about migrations later in this course).

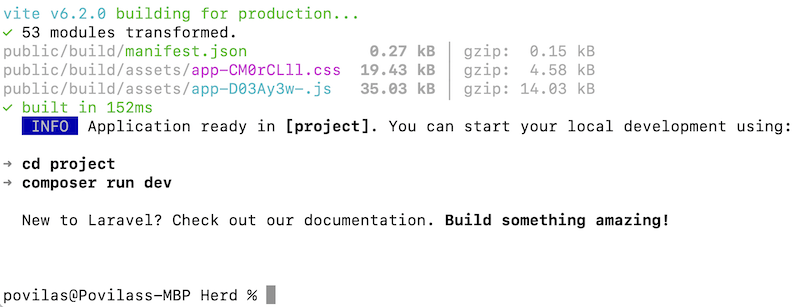
Running NPM Commands
Then, it will ask whether you want to run npm install and npm run build.

The default Laravel homepage has a front-end design prepared with JS/CSS, so to make it work, I do recommend running these front-end compilation commands right away. Choose Yes.
And that's it, success!
Welcome to Laravel Homepage
Since I am using Laravel Herd, it will automatically generate a domain http://project.test from the folder name project, so I can immediately launch it in the browser.
We can see the default Laravel welcome page!

Where does that page come from, in the code?
Let's switch from Terminal to our code editor.
If you open the routes/web.php file, you will see one Route is defined.
routes/web.php:
use Illuminate\Support\Facades\Route; Route::get('/', function () { return view('welcome');});Here, we have a / homepage, which leads to a View called welcome. Views are located in the resources/views folder and have the .blade.php file extension.
Here's the code structure of the default homepage, with a lot of details hidden by ...:
resources/views/welcome.blade.php:
<html lang="{{ str_replace('_', '-', app()->getLocale()) }}"> <head> <meta charset="utf-8"> <meta name="viewport" content="width=device-width, initial-scale=1"> <title>Laravel</title> ... </head> <body class="..."> <header class="..."> @if (Route::has('login')) <nav class="flex items-center justify-end gap-4"> @auth <a href="{{ url('/dashboard') }}" class="..." > Dashboard </a> @else <a href="{{ route('login') }}" class="..." > Log in </a> @if (Route::has('register')) <a href="{{ route('register') }}" class="..."> Register </a> @endif @endauth </nav> @endif </header> <div class="..."> <main class="..."> <div class="..."> <h1 class="...">Let's get started</h1> <p class="...">Laravel has an incredibly rich ecosystem. <br>We suggest starting with the following.</p> ... </div> <div class="..."> {{-- Laravel Logo --}} ... </div> </main> </div> @if (Route::has('login')) <div class="h-14.5 hidden lg:block"></div> @endif </body></html>As you can see, it's a simple HTML, with some {{ }} structures and directives like @if or @auth coming from the Laravel Blade templating engine. We'll talk about those a bit later.
In the next lesson, we will analyze how the Routes and the Views work and will create our own custom pages.
But for now, give yourself a high-five: you've successfully installed Laravel!
If you want to follow this project looking at the code, here's a public repository.
And a here's a commit specifically for this installation lesson.
Muito Bom.
If you do not use Herd, type:
opens at http://localhost:8000/
Hello sir,I just wanted to leave a small suggestion. It would be very helpful to include a section on how to install Laravel using Laradock. It's a tool that many of us use, and it would greatly simplify the startup process.Thank you for your excellent work!
Hello! At the team, we are not using the tool, so it's hard to recommend something we don't use ourselves.
I'm a first-time Laravel user. I appreciate that the course includes both the video and the detailed description, including the code, step by step. Excellent work!
thanks for the simple step to start.
It appears people working with Bootstrap have no oficial options out of the box. We have copied the Laravel UI auth files manually from another project and it works. Just avoid running any blades with layouts.app file created by the other system. This is because of the @vite directive. If you want to run Bootstrap you must remove and replace every line containing @vite with your own .css or .js As far as I know this afects only layout blades. Not a big issue.
There is a big shift from bootstrap to tailwind, so it's normal that this is happening.
But at the same time - this happened when bootstrap was added. People that did custom styling or used other tooling - had the same issues too