
Now let's begin to get the data from the API. In this lesson, we will create the first API endpoint to get Posts and will show them in the table by replacing the dummy hard-coded data.
Laravel Part: Posts DB Structure and API
First, we need to create a Model, Migration, Controller, and API route.
php artisan make:model Post -mdatabase/migrations/xxxx_create_posts_table.php:
public function up(): void{ Schema::create('posts', function (Blueprint $table) { $table->id(); $table->string('title'); $table->longText('content'); $table->timestamps(); });}app/Models/Post.php:
use Illuminate\Database\Eloquent\Factories\HasFactory; class Post extends Model{ use HasFactory; protected $fillable = [ 'title', 'content', ];}Then we can make a Factory:
php artisan make:factory PostFactoryAnd add the following code to the PostFactory:
database/factories/PostFactory.php
use Illuminate\Database\Eloquent\Factories\Factory; class PostFactory extends Factory{ public function definition(): array { return [ 'title' => $this->faker->word(), 'content' => $this->faker->paragraphs(asText: true), ]; }}This allows us to add a seeder:
php artisan make:seeder PostSeederIn the PostSeeder we can add the following code:
database/seeders/PostSeeder.php:
use App\Models\Post;use Illuminate\Database\Seeder; class PostSeeder extends Seeder{ public function run(): void { Post::factory(20)->create(); }}And of course, in our DatabaseSeeder, we can call the PostSeeder:
database/seeders/DatabaseSeeder.php:
// ... $this->call([PostSeeder::class]); // ...Now, we can run the migrations and seed the database. After this, we can create a controller for the API.
php artisan make:controller Api/PostControllerIn the controller for now we will just return a collection of all posts.
app/Http/Controllers/Api/PostController.php:
class PostController extends Controller{ public function index() { return Post::all(); }}And the route. Because all the routes will be for API we will add them to the routes/api.php file. This way Laravel will automatically add an api/ prefix to the routes. Before that, we must run the install:api Artisan command to prepare the Laravel application for API.
php artisan install:apiNow we have API routes:
bootstrap/app.php:
return Application::configure(basePath: dirname(__DIR__)) ->withRouting( web: __DIR__.'/../routes/web.php', api: __DIR__.'/../routes/api.php', commands: __DIR__.'/../routes/console.php', health: '/up', ) ->withMiddleware(function (Middleware $middleware) { $middleware->statefulApi(); }) ->withExceptions(function (Exceptions $exceptions) { // })->create();We can add our route.
routes/api.php:
use App\Http\Controllers\Api\PostController; Route::get('posts', [PostController::class, 'index']);Calling API from Vue
Now we can add the JS code to the PostsIndex Vue component we created earlier. All the JS code needs to go into the <script> tag.
First, we need to add a data variable where all posts will be assigned. Let's call that variable posts and assign a default value of empty array.
resources/js/components/Posts/Index.vue:
<template> // ...</template> <script>export default { data() { return { posts: [] } }}</script>Next, we will create a method fetchPosts which will make a get request to the /api/posts and will fetch all the posts.
When the request is successful, .then method will be executed. It will add all the posts from the API response to the posts data variable.
If something goes wrong, we use .catch to get any errors. For now, we will just console.log them.
And the last thing: when the components get mounted (in other words, initialized), we need to call fetchPosts() This is done in the mounted. We use the syntax of this.fetchPosts() to show that it comes from the same component.
resources/js/components/Posts/Index.vue:
<template> // ...</template> <script>export default { data() { return { posts: [] } }, mounted() { this.fetchPosts() }, methods: { fetchPosts() { axios.get('/api/posts') .then(response => this.posts = response.data) .catch(error => console.log(error)) } } }</script>In other words, three things:
- You initialize the variables in
data() - You add custom functions in
methods: - If those functions need to be called immediately, you call them in
mounted()
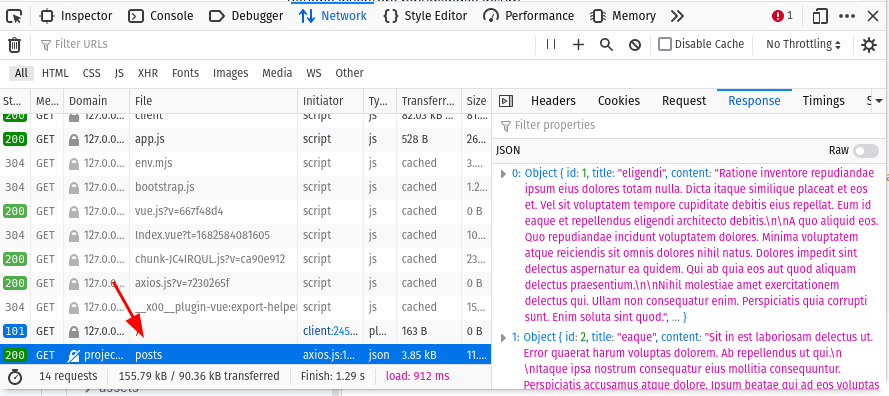
Now, visit the front page and open the Developer tools. In the Network tab you will see that the API request to the /api/posts was made and shows all the posts in the Response part.
Showing API Data in Table
Now, we need to show all these posts in the table. For this we will use v-for Vue directive in the tr table row element.
Instead of hard-coded data in the table, replace it with the v-for="post in posts":
resources/js/components/Posts/Index.vue:
<template> <div class="overflow-hidden overflow-x-auto p-6 bg-white border-gray-200"> <div class="min-w-full align-middle"> <table class="min-w-full divide-y divide-gray-200 border"> <thead> <tr> <th class="px-6 py-3 bg-gray-50 text-left"> <span class="text-xs leading-4 font-medium text-gray-500 uppercase tracking-wider">ID</span> </th> <th class="px-6 py-3 bg-gray-50 text-left"> <span class="text-xs leading-4 font-medium text-gray-500 uppercase tracking-wider">Title</span> </th> <th class="px-6 py-3 bg-gray-50 text-left"> <span class="text-xs leading-4 font-medium text-gray-500 uppercase tracking-wider">Content</span> </th> <th class="px-6 py-3 bg-gray-50 text-left"> <span class="text-xs leading-4 font-medium text-gray-500 uppercase tracking-wider">Created at</span> </th> </tr> </thead> <tbody class="bg-white divide-y divide-gray-200 divide-solid"> <tr v-for="post in posts"> <td class="px-6 py-4 whitespace-no-wrap text-sm leading-5 text-gray-900"> {{ post.id }} </td> <td class="px-6 py-4 whitespace-no-wrap text-sm leading-5 text-gray-900"> {{ post.title }} </td> <td class="px-6 py-4 whitespace-no-wrap text-sm leading-5 text-gray-900"> {{ post.content }} </td> <td class="px-6 py-4 whitespace-no-wrap text-sm leading-5 text-gray-900"> {{ post.created_at }} </td> </tr> </tbody> </table> </div> </div></template> <script>// ...</script>That post in posts means that it takes posts variable from the component's <script> part, and performs a loop, assigning every element to the post variable. It's equivalent of PHP foreach ($posts as $post).
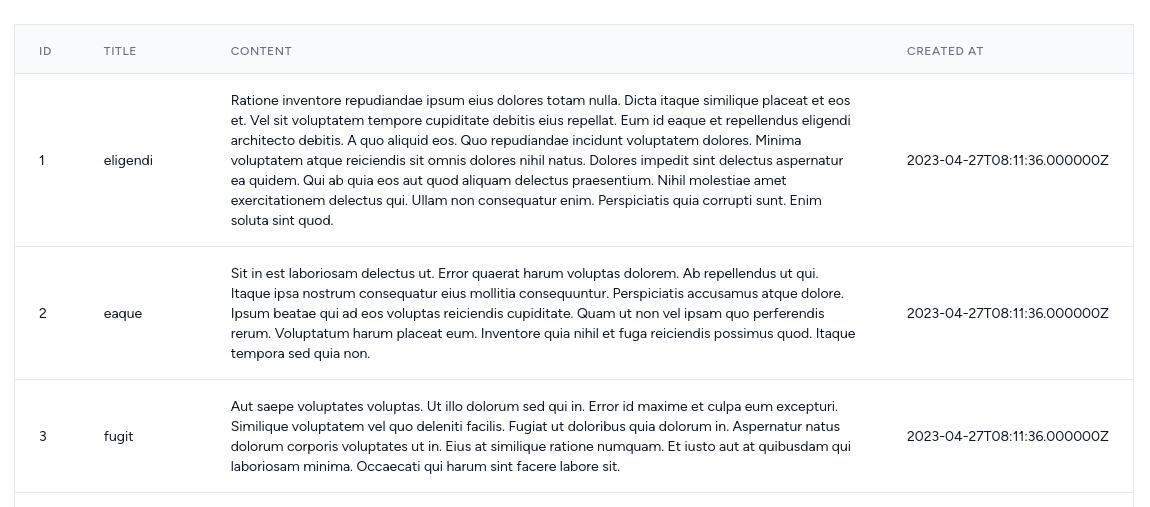
Now, after visiting the page, you should see the table with all the posts that are fetched from the API.
One suggestion: As you are writing a text based tutorials, pages are getting longer. So in that case, please add a scroll to top button, I feel it really necessary
Good suggestion, will add to the to-do list.
"Now, after visiting the page, you should see the table" Did I miss teh part where you made the seeder and factory, and then migrated the tables? If so, ignore my stupidity.
I know it is pretty normal to do but if you follow this word by word you wont see anything in your table as there is no data for the final step.
Good point. In that case, I remember we had seeded the data behind the scenes as we didn't want the seeders/factories to be the part of this tutorial, as it's NOT about factories/seeds.
But maybe you're right, some people follow word by word. Lesson learned for the next tutorials, thanks!
I had same assumption the factories and seeders would have been included in this lesson, but either way im still learning a lot of magic!
That's why we pay good money for this. At least you could've mention about creating a factory/seeder without going into the details if your concern is not about factories/seeds.
Hi, we have updated the lesson to add the seeder information!
I think a couple things were forgotten, but based from reading previous comments, the comments im about to say arent related with this lesson.
but if youre like me and using Xampp, you need to run php artisan migrate, it will create the default DB_NAME from your .env, then you need to make the factory, seeder, then populate the seeder related with the Post Model by using the factory however many times aka rows you want in the table. In Xampp control panel, you can then click admin for mysql to make sure the database in your .env and posts table exists.
If youre on Xampp and got stuck like i did with server side 500s
php artisan make:model Post -m // creates a Model, Migration, Controller, and API route.
php artisan make:controller Api/PostController // creates a controller for the API
php artisan make:factory PostFactory // this uses $faker to generate random fake data
php artisan make:seeder PostSeeder // this uses the factory for however many rows you want included in the table
php artisan db:seed --class=PostSeeder // so it makes however many Post Entires we indicated in the PostSeeder file
In Post model its nessesary to add one more use
use Illuminate\Database\Eloquent\Factories\HasFactory;
Hello, Some steps are missing in this tutorial the creation of factory and seeder are not explained and returns me an error I do not find the error it is impossible to create a migration with the execution of seeder. BadMethodCallException
Call to undefined method App\Models\Post::factory()
at vendor/laravel/framework/src/Illuminate/Support/Traits/ForwardsCalls.php:67 63▕ * @throws \BadMethodCallException 64▕ */ 65▕ protected static function throwBadMethodCallException($method) 66▕ { ➜ 67▕ throw new BadMethodCallException(sprintf( 68▕ 'Call to undefined method %s::%s()', static::class, $method 69▕ )); 70▕ } 71▕ } Dan
To use factories model must have
HasFactorytrait. It is in the model shown in this lesson.Thank you for your answer, the problem is still present even with HasFactory it would be interesting to add a github repo because it is impossible to follow this training in good condition and waste of time.
Maybe tell the error? It should have changed. Repository is on the last lesson.